M9110T Date 11/15/13
Teledyne Electronic Technologies
Copyright 2013 Teledyne Analytical Instruments
Model 9110T NOx Analyzer
Model 9110T- Standard Touch Screen Version
Model 9110TH NOx Analyzer Specific Configuration
Mounting Options
Model 9110T NOx AnalyzerSpecific Configuration
Pump Mounting Options
Rear Panel Gas Fittings
Background Gas
This option includes two concentration alarm relays
Model 9110T NOx Analyzer Specific Configuration
Model 9110TH NOx Analyzer Safety Messages
Safety Messages
Customer Service Department
Or by accessing various service options on our website at
Mise EN Garde
Model 9110T NOx Analyzer Safety Messages
Consignes DE Sécurité
Maintenance of the analyzer or its parts
Instrument and possibly invalidate the warranty
About this Manual
Organization
This page intentionally left blank
Table of Contents
Model 9110T NOx Analyzer Table of Contents
Model 9110TH NOx Analyzer Table of Contents
285
Appendix a Version Specific Software Documentation
Figures
229
Ventilation Clearance
Tables
325
This page intentionally left blank
Model 9110TH NOx Analyzer Part
Part General Information
Model 9110T NOx Analyzer Part
Model 9110TH NOx Analyzer Introduction
Features
Overview
Options
Documentation
Model 9110T NOx Analyzer Introduction
Analyzer Options Description/Notes Reference Number
9110T Analyzer Weighs about 18 KG 40 Pounds
Option Description/Notes Reference Number
Ambient Zero and Ambient Span Valves
Ambient Zero and Pressurized Span Valves
USB Port For remote connection
Specification
Specifications
9110T Basic Unit Specifications Parameter
EPA Equivalency Designation
Parameter Specification
Software Settings for EPA Equivalence Parameter
Other Type Certifications
Approvals and Certifications
Calibration
North American
This page intentionally left blank
Under Customer Support Return Authorization
Instrument warranty. Refer to for more information on
Unpacking the 9110T Analyzer
Model 9110TH NOx Analyzer Getting Started
Ventilation Clearance
Instrument Layout
Model 9110T NOx Analyzer Getting Started
10 cm / 4
Front Panel Layout
Front Panel
Display Screen and Touch Control
Buttons
Field Description/Function
Display Screen and Touch Control Description
Actual display
Provides a description of each component on the rear panel
Rear Panel
Internal Chassis Layout
Internal Layout Top View with IZS Option
Internal Layout Top View Showing Other Options
Connecting Power
Connections and Setup
Connecting Analog Inputs Option
Electrical Connections
PIN Description DAS Parameter
Connecting Analog Outputs
Analog Input Pin Assignments
Test Channel
Current Loop Analog Outputs Option 41 Setup
Current Loop Option Installed on the Motherboard
10 Status Output Connector Status Output Pin Assignments
Connecting the Status Outputs
Diag Mode
Connecting the Control Inputs
Input #
On Condition
Alarm 2 Relay & Alarm 3 Relay
Concentration Alarm Relay Option
Alarm 1 Relay
Alarm 4 Relay
Connecting the Communications Interfaces
Before using
Configuration Section
Communication
Anything other than Multidrop communication
13 Rear Panel Connector Pin-Outs for RS-232 Mode
Using
RS-232 Multidrop Option 62 Connection
RS-485 operation
∙ Parity None
15 Jumper and Cables for Multidrop Mode
Analyzer
Host
Last Analyzer
Time, each by its unique ID see above
RS-485 Connection
Testing it before setting up the rest of the chain
Pneumatic Connections
Procedures defined in Section
Been made check all pneumatic fittings for leaks using
About Zero Air and Calibration Span Gas
Cc3/min x
Available
Cylinders
Calibration Span GAS
NIST-SRM Type Nominal Concentration
Span GAS for Multipoint Calibration
Teledyne Analytical Instruments
Calibration GAS Sources
Connect a sample gas line to the Sample inlet
Sample GAS Source
13.3.13.2 or 13.3.13.3 for detailed check if leak suspected
Pneumatic Layout for Basic Configuration
Venting
Exhaust Outlet
This valve package includes
19 Pneumatics, Basic Configuration
20 Rear Panel Layout with Z/S Valve Options OPT 50A
Attach a sample inlet line to the Sample inlet fitting
13.3.12
Mode Valve Condition Valve Port Status Sample
Teledyne Analytical Instruments
Attach a line to the SPAN2/VENT outlet. It should be
Pneumatic Layout for Ambient ZERO/PRESSURIZED Span OPT 50B
Zero Scrubber and Internal Span Source IZS OPT 50G
10 Valve Operating States OPT 50B installed
Mode Valve Condition Valve Port Status
Nitric Acid and the Chemistry of NO2 Permeation Tubes
Internal Span GAS Generation
Pneumatic Layout for Zero Scrubber and IZS OPT 50G
Zero AIR Scrubber OPT 86C, for Z/S Valves
Gas Conditioner Options
Ammonia Removal Sample Conditioner OPT 86A
Model 9110TH NOx Analyzer Getting Started
Start UP
STARTUP, Functional CHECKS, and Initial Calibration
Model 9110TH NOx Analyzer Getting Started
12 Possible Warning Messages at Start-Up
Initial Calibration
Functional Checks
Calibration on the analyzer
Following procedure assumes that
Interferents for NOX, no and NO2 Measurements
Verifying the Reporting Range Settings
Independently
Verify the Precise Concentration Value of the Span gases
No x Must be identical
Verifying the Expected NOX and no Span GAS Concentration
Model 9110TH NOx Analyzer Getting Started
Initial ZERO/SPAN Calibration Procedure
Improving our service and our products. Thank YOU
This page intentionally left blank
Page
Part Operating Instructions
Model 9110T NOx Analyzer Part
An allowable value, the Entr button will re-appear
Model 9110TH NOx Analyzer Overview of Operating Modes
Test Functions
Sample Mode
Model 9110T NOx Analyzer Overview of Operating Modes
Analyzer Operating Modes
Samp
To view these Test functions, press
Viewing 9110T Test Functions
Absolute atmospheric pressure
Cannot DYN Zero
System Reset
Cannot DYN Span
Setup Mode
Calibration Mode
Primary Setup Menu
Password Security
Secondary Setup Menu Setup MORE
Primary Setup Mode Features and Functions
Entered value had not been accepted
Setup ACAL Automatic Calibration Option
Setup CFG Configuration Information
Setup DAS Internal Data Acquisition System
Model 9110TH NOx Analyzer Setup Menu
Model 9110T NOx Analyzer Setup Menu
Setup RNGE Analog Output Reporting Range Configuration
Physical Ranges
Analog Output Reporting Ranges
For the other modes
When switching between reporting range modes, Always check
Analog OUT
Reset the upper range limits for the new mode selection
Analog Output Reporting Range Default Settings
IND Mode Analog Output Assignments
Teledyne Analytical Instruments 100
Teledyne Analytical Instruments 101
High physical ranges referred to in Section
Teledyne Analytical Instruments 103
Importantimpact on Readings or Data
Setup Rnge DIL Using the Optional Dilution Ratio Feature
Teledyne Analytical Instruments 105
To enable passwords, press
Setup Pass Password Protection
Password Levels
Password Level
Has to press Entr to access the password-protected menus
Setting the Time of DAY
Setup CLK Setting the Internal TIME-OF-DAY Clock
Adjusting the Internal CLOCK’S Speed
ID Machine Identification
Setup Comm Communications Ports
Use the SETUPCOMMCOM1COM2 menus to
Setup Vars Variables Setup and Definition
Inet Ethernet
COM1COM2 MODE, Baude Rate and Test Port
Auto
Allowed Vars Variable Description Default Values
OFF
Teledyne Analytical Instruments 113
Setup Diag Diagnostics Functions
Teledyne Analytical Instruments 115
Stsystemok = on
STSYSTEMOK=ON
Analog Output Diag Aout
Analog I/O Configuration Diag AIO
Accessing the Analog I/O Configuration Submenus
To access the Analog I/O Configuration sub menu, press
Curr
Analog Output Voltage Range Min/Max
Range Name Range Span Minimum Output Maximum Output
Teledyne Analytical Instruments 120
Automatic Individual Calibration of the Analog Outputs
Analog output is enabled. See Section
Teledyne Analytical Instruments 122
Adjusted. See Section
Teledyne Analytical Instruments 124
Teledyne Analytical Instruments 125
Teledyne Analytical Instruments 126
Current Loop Output Check
Turning AN Analog Output OVER-RANGE Feature ON/OFF
Adding a Recorder Offset to AN Analog Output
Model 9110TH NOx Analyzer Setup Menu AIN Calibration
SET Exit
External Analog Inputs XIN1…XIN8 Option Configuration
Teledyne Analytical Instruments 131
Test functions available to be reported are listed in Table
To activate the Test Channel and select a function, press
Optic Test
Ozone GEN Override
Electrical Test
Flow Calibration
Changes with low-level calibration
Data Terminal / Communication Equipment DTE DEC
Communication MODES, Baud Rate and Port Testing
Communication Modes
MODE1
Model 9110T NOx Analyzer Communications Setup and Operation
Teledyne Analytical Instruments 137
COM Port Baud Rate
COM Port Testing
Setup X.X Primary Setup Menu
Sample RANGE=500.0 PPB NOX= TST TST CAL Setup
Secondary Setup Menu Comm Vars
Communications Menu
Ethernet Status Indicators
To configure Ethernet communication manually
Ethernet
LED Function
Teledyne Analytical Instruments 141
Teledyne Analytical Instruments 142
Default Ethernet setting is Dhcp
Access the Communications Menu SETUPMORECOMM, see
Teledyne Analytical Instruments 145
Teledyne Analytical Instruments 146
USB Port for Remote Access
PC match check the PC baud rate and change if needed
Baud Rate COM2 Mode Settings Quiet Mode Computer Mode
1 Mode
Actions
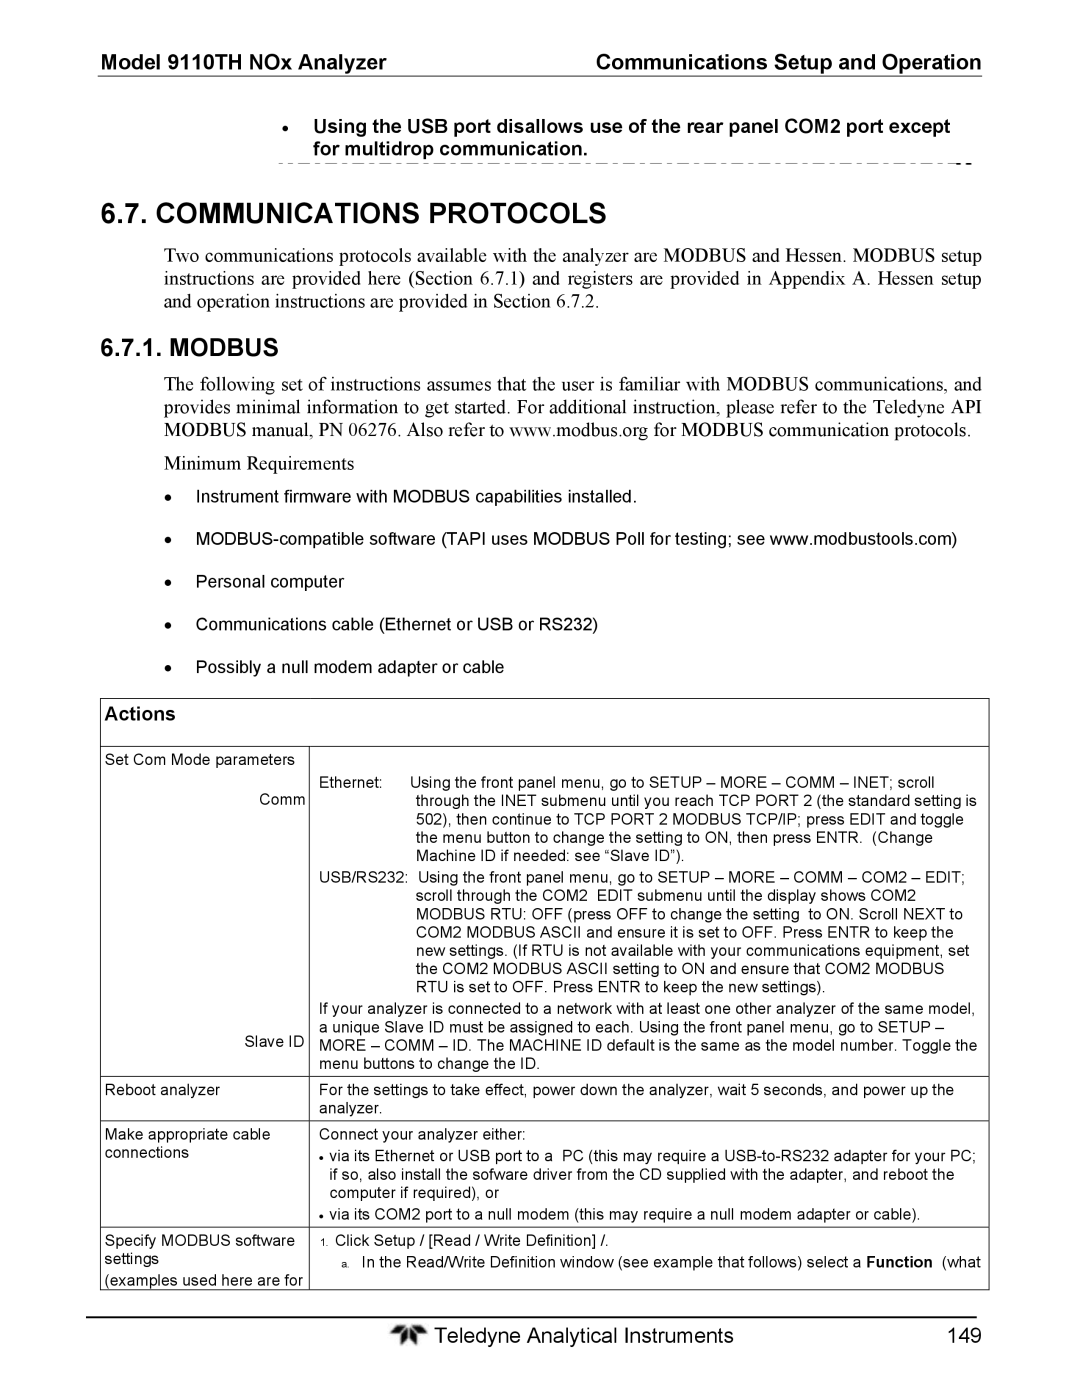
Communications Protocols
Minimum Requirements
Teledyne Analytical Instruments 150
Parameter Standard Hessen
Properly set
RS-232 Communication Parameters for Hessen Protocol
Activating Hessen Protocol
Teledyne Analytical Instruments 153
To select a Hessen Protocol Type press
Mode ID Mode Description CMD
To Select a Hessen response mode, press
BCC
GAS TYPE,RANGE,GAS ID,REPORTED
Hessen Protocol GAS List Entry Format and Definitions
Editing or Adding Hessen GAS List Entries
NO, 0, 212, Reported NO2, 0, 213, Reported
To add or edit an entry to the Hessen Gas List, press
Deleting Hessen GAS List Entries
To delete an entry from the Hessen Gas list, press
Setting Hessen Protocol Status Flags
Status Flag NAME3 Default BIT Assignment
Default Hessen Status Flag Assignments
Operational Flags
Unassigned Flags
Instrument ID
To assign or reset the status flag bit assignments, press
This page intentionally left blank
Page
Front Panel LED Status Indicators for DAS
There is reset
Interface for DAS changes Section
LED State
Channels
DAS Structure
DAS Channels
Property Description Default Setting Range Channel
Default DAS Channels
Enabled
CAL Hold OFF
Settings
Teledyne Analytical Instruments 167
DAS View Touchscreen Functions Button
Viewing DAS Data and Settings
NXCNC1 ATIMER, 5
Translates to the following configuration
Name NXCNC1 Trigger Event Atimer
Editing DAS Data Channels
Teledyne Analytical Instruments 170
Manual
DAS Data Parameter Functions
Changed during data acquisition
Teledyne Analytical Instruments 173
Report period
AVG, SDEV, MIN or MAX sample modes see .1.3.3,
Stored and reported to the Comm ports
Report Periods in Progress when Instrument Is Powered Off
Editing the Number of Records
Teledyne Analytical Instruments 177
ON/OFF
Holdoff Feature
Teledyne Analytical Instruments 179
Disabling/Enabling Data Channels
Starting Date Feature
DAS Configuration VIA Apicom
Remote DAS Configuration
Teledyne Analytical Instruments 182
Advised before attempting any DAS changes
DAS Configuration VIA Terminal Emulation Programs
Whereas the editing, adding and deleting of DAS channels
Teledyne Analytical Instruments 184
Interactive Mode
Computer Mode
Remote Control VIA Apicom
Remote Control VIA a Terminal Emulation Program
Terminal Mode Software Commands
Command Syntax
Command Command Type
Where
General Message Format
Data Types
Status Reporting
AT Y0 D0 H0 I0 S0=0
Remote Access by Modem
Model 9110T NOx Analyzer Remote Operation
To initialize the modem press
Remote Access by Modem
Teledyne Analytical Instruments 190
Where N is any numeral between 0
Password Security for Serial Remote Communications
Teledyne Analytical Instruments 192
Calibration Quality Analysis
Model 9110TH NOx Analyzer Calibration Procedures
Required EQUIPMENT, SUPPLIES, and Expendables
Model 9110T NOx Analyzer Calibration Procedures
Before Calibration
Zero Air
Calibration Gases
Span Gas
Example
Span Gas for Multipoint Calibration
Data Recording Devices
2.4. NO2 Permeation Tubes
Measured medium as closely as possible
ZERO/SPAN Calibration Checks VS. ZERO/SPAN Calibration
4. NO2 Conversion Efficiency CE
Teledyne Analytical Instruments 198
Performing a Basic Manual Calibration Check
See for troubleshooting tips
Performing a Basic Manual Calibration
Outside the allowable range for a reliable calibration
Entered properly in the conversion efficiency setting
Setting the Expected Span Gas Concentration
For troubleshooting tips
As a calibration source
Manual Calibration with the Internal Span GAS Generator
Check is performed
Setup for Calibration with the Internal Span GAS Generator
CAL on NO2 Feature
Teledyne Analytical Instruments 204
Troubleshooting tips
Teledyne Analytical Instruments 206
Teledyne Analytical Instruments 207
Calibration. See for troubleshooting tips
Setup for Calibration Using Valve Options
Sample TST TST CAL Cals Setup
Manual Calibration Checks with Valve Options Installed
Manual Calibration Using Valve Options
Teledyne Analytical Instruments 212
Disabled
Mode Name Action
Automatic ZERO/SPAN CAL/CHECK Autocal
Autocal Modes
For US EPA controlled/related applications
AutoCal Attribute Setup Parameters
Always be set to OFF
Analyzer’s sample port
100 AM
Sept
15.0
0030
To program the example sequence shown in -4, press
Setup Acal Programming and Auto CAL Sequence
Teledyne Analytical Instruments 217
Entr button will disappear from the display
No Offs No Slope NOX Offs NOX Slope
Calibration Quality Analysis
GAS Flow Calibration
Separate flow meter is required for this procedure
Model 9110T NOx Analyzer EPA Protocol Calibration
Calibration General Guidelines
Spare Parts and Expendable Supplies
Calibration EQUIPMENT, SUPPLIES, and Expendables
Calibration GAS and Zero AIR Sources
Calibration Frequency
Data Recording Device
Record Keeping
Definition of Level 1 and Level 2 Zero and Span Checks
Level 1 Calibrations Versus Level 2 Checks
GPT Calibrator Check Procedure
GAS Phase Titration GPT
GPT Principle of Operation
Equation
≤ 2min
Have to be made, and TR and PR will have to be recalculated
Example GPT Calculation
Handbook, Vol. II, Part 1, Appendix
GPT Multipoint Calibration Procedure
Conditions of use against a reliable standard
GPT Calibration System
SET UP for GPT Multipoint Calibration of the 9110T
Span Calibration
Zero Calibration
GPT NO2 Check
See the Troubleshooting if there are problems
Summary of Quality Assurance Checks
Other Quality Assurance Procedures
Short Calibration Checks
ZERO/SPAN Check Procedures
Precision Check
Precision Check Procedure
Certification of Working Standards
References
Certification Procedures of Working Standards
Other Methods of Establishing Traceability
Standard
Teledyne Analytical Instruments 236
Part Maintenance and Service
Teledyne Analytical Instruments 238
Model 9110T NOx Analyzer Instrument Maintenance
Maintenance Schedule
CAL Date Performed Action Freq Check REQ’D
9110T Maintenance Schedule
Maintenance Procedures
Predictive Diagnostics
Predictive Uses for Test Functions
Function Expected Actual Interpretation & Action
Replacing the Particulate Filter
Replacing the Sample Particulate Filter
Changing the O3 Dryer Particulate Filter
Risk of causing a significant leak
Ensure to use proper wrenches
Turn against the Perma Pure dryer
Changing the Ozone Cleanser Chemical
Teledyne Analytical Instruments 245
Offsets, which may take 2-3 weeks to disappear
Changing the Pump DFU Filter
Maintaining the External Sample Pump Pump Pack
Rebuilding the Pump
Replacing the Scrubber
Procedure for Replacing Filters on Internal Pumps
Procedure for Replacing Filters on External Pumps
Changing the External Zero AIR Scrubber OPT 86C
Room temperature and will contaminate the entire instrument
Changing the Internal Span GAS Generator Permeation Tube
Teledyne Analytical Instruments 250
Changing the External Scrubber’s DFU Filter
Zero Air Scrubber Assembly
HOT Surface Hazard
Changing the NO2 Converter
Teledyne Analytical Instruments 253
Cleaning the Reaction Cell
Teledyne Analytical Instruments 255
Replacing Critical Flow Orifices
To clean or replace a critical flow orifice
From the vacuum port to get the parts out of the manifold
Checking for Light Leaks
Simple Vacuum Leak and Pump Check
Assembly
Checking for Pneumatic Leaks
Surfaces
Detailed Pressure Leak Check
This value is only calculated, not measured
Performing a Sample Flow Check
Instrument
Model 9110T NOx Analyzer Troubleshooting & Service
General Troubleshooting
Fault Diagnosis with Warning Messages
Teledyne Analytical Instruments 263
Ozone Flow
Front Panel Warning Messages
XXX.X MV
Teledyne Analytical Instruments 265
OUT of Range reading
Fault Diagnosis with Test Functions
Pressure
Can also cause changes in the absolute atmospheric pressure
Indicated Failures
Diag Signal I/O Using the Diagnostic Signal I/O Function
Under this menu
These signals upon exit
Test Channel Outputs as Diagnostic Tools
Using the Analog Output Test Channel
CPU Status Indicator
Using the Internal Electronic Status Leds
Relay PCA Status Leds
12.3.2.1. I2C Bus Watchdog Status LEDs
D10 Green NO/NOx Valve D9 Green AutoZero Valve
LED Color Function Fault Indicated Failures Status LED ROW
D1 RED
Relay PCA Status LED Failure Indications
Zero or LOW Flow Problems
GAS Flow Problems
Sample Flow is Zero or Low
About 1 in-Hg per 300 m / 1000 ft
Ozone Flow is Zero or Low
Check pressures
High Flow
Check if the particle filter is clogged
Sample Flow is Zero or Low but Analyzer Reports Correct Flow
Negative Concentrations
Calibration Problems
Unstable Zero and Span
No Response
Inability to Zero no Zero Button Calz
Inability to Span no Span Button Cals
NON-LINEAR Response
Discrepancy Between no and NOX Slopes
Discrepancy Between Analog Output and Display
Slow Response
Other Performance Problems
Excessive Noise
Dirty reaction cell can cause high Auto Zero values
Auto Zero Warnings
Subsystem Checkout
AC Main Power
DC Power Supply
From
DC Power Test Point and Wiring Color Codes
DC Power Supply Acceptable Levels
Motherboard
LCD/DISPLAY Module
Test Channel / Analog Outputs Voltage
Touchscreen Interface
Analog Output Test Function Nominal Values Voltage Outputs
12.7.6.2. A/D Functions
Full Scale Output of Voltage Range
Step Nominal Output Voltage
Ozoneflow
Status Outputs
To test the status output electronics
10 Status Outputs Check
Control Inputs
Sample Pressure Sensor Check
Pressure / Flow Sensor Assembly
Basic PCA Operation Check
RS-232 Communications
General RS-232 Troubleshooting
Vacuum Pressure Sensor Check
12.7.7.4. O3 Flow Sensor Check
RS-232 Programming Notes TAI P/N
Troubleshooting Analyzer/Modem or Terminal Operation
Doubt, consult the factory
12.7.10.1. NO2 no Converter Electrical System
Calculating / Checking Converter Efficiency
Teledyne Analytical Instruments 294
Step
Evaluating NO2 no Converter Performance
Simplified GPT Calibration
Concentration must be used must be 440 ppb or more
There must be a minimum of 10% more no than O3 produced
Teledyne Analytical Instruments 298
NOx Loss
OUT-GASSING no NOX
To activate the optics test, press
Photomultiplier Tube PMT Sensor Module
Optic Test
To activate the electrical test, press
PMT Preamplifier Board
High Voltage Power Supply
PMT Temperature Control PCA
12.7.15.1. O3 Generator Override
12.7.15. O3 Generator
Exit the menu
Internal Span GAS Generator and Valve Options
PMT Temperature Sensor Control
Temperature Sensor
Box Temperature Sensor
Teledyne Analytical Instruments 307
DISK-ON-MODULE Replacement Procedure
Service Procedures
Procedures. Contact Teledyne Customer Service Department
Expendables are discussed in Instrument Maintenance
Analyzer has warmed up for about 60 minutes
12.8.2. O3 Generator Replacement
Sample and Ozone Perma Pure Dryer Replacement
To calibrate the PMT preamplifier PCA
PMT Sensor Hardware Calibration
Teledyne Analytical Instruments 311
Qualified Personnel
Replacing the PMT, Hvps or TEC
Between measure and Auto Zero modes
9110T Sensor Assembly
Ensure to replace the 5 desiccant bags inside the housing
Teledyne Analytical Instruments 314
10 Relay PCA with AC Relay Retainer In Place
Removing / Replacing the Relay PCA from the Instrument
Answer
Frequently Asked Questions
Question
Teledyne Analytical Instruments 317
Analytical Instruments
Technical Assistance
Model 9110T NOx Analyzer Principles of Operation
Measurement Principle
Chemiluminescence Creation in the 9110T Reaction Cell
Photo Multiplier Tube PMT
Chemiluminescence Detection in the 9110T Reaction Cell
Optical Filter
NO2* →NO2 + hν1200nm
Tensit
NOX and NO2 Determination
XNO2 + yMo→ xNO + MyOz at 315C
Direct Interference
Measurement Interferences
Light Leaks
Gas Interference Type Rejection Method
Reaction Cell Temperature Control
List of Interferents
Sample GAS Flow
Pneumatic Operation
Both leak tight and not pressurized over ambient pressure
Zero a perfect vacuum
Teledyne Analytical Instruments 327
Basic Internal Gas Flow for Basic 9110T with Internal Pump
Vacuum Manifold
NO/ no
9110T Valve Cycle Phases
Sample Gas Flow Valves and Routing
Critical Flow Orifice
Flow Rate Control Critical Flow Orifices
Teledyne Analytical Instruments 331
O3 Generator
Maintained at a constant temperature
Ozone GAS Generation and AIR Flow
10 Ozone Generator Principle
Ozone Generator Dry Air Supply
Teledyne Analytical Instruments 334
Ozone Supply Air Filter
Pneumatic Sensors
Ozone Destruct
Down, the generator is turned on immediately
Vacuum Pressure Sensor
Sample Pressure Sensor
Sample Gas Flow Calculation
Samplepressure
13.2.4.4. O3 Supply Air Flow Sensor
Electronic Operation
13 9110T Electronic Block Diagram
Teledyne Analytical Instruments 339
Flash Chip
Disk-On-Module
Sensor Inputs
Thermistor Interface
External Digital I/O
Analog Outputs
Motherboard see Section
Reported nor stored
To their normal value/setting
Only until signal I/O menu is exited
Internal Digital I/O
13.3.3.7. I2C Data Bus
Electrical Shock Hazard
15 Relay PCA Layout P/N
16 Relay PCA P/N 045230100 with AC Relay Retainer in Place
Status LED’s
Relay PCA Status LED’s
Color Function Status When Lit Status When Unlit
Yellow no 2 no Converter Heater
Watchdog Circuitry
Valve Control
Teledyne Analytical Instruments 349
TC1
TC2
Sensor MODULE, Reaction Cell
Not Used
TC1
Photo Multiplier Tube PMT
20 9110T Sensor Module Assembly
PMT preamplifier board provides a variety of functions
PMT Preamplifier
Principles of Operation
22 PMT Preamp Block Diagram
23 Typical Thermo-Electric Cooler
PMT Cooling System
TEC Control Board
Pneumatic Sensor Board
PMT
Preamp
All AC and DC Voltages are distributed via the relay PCA
Power SUPPLY/CIRCUIT Breaker
Sensor Module
AC Power Configuration
Hvps PMT
Logic Devices
Configuration Jumpers For AC Heaters
Configuration Jumpers for Optional AC Heaters
Pump Configuration
AC Power Configuration for Internal Pumps JP7
Power Configuration for Standard AC Heaters JP2
AC Configuration Heaters for Option Packages JP6
VAC /115 VAC VAC / 240 VAC
White
Jumper Heaters Between Function Color Pins
Power Configuration for Optional Heaters JP6
RED
IZS
Front Panel TOUCHSCREEN/DISPLAY Interface
30 Front Panel and Display Interface Block Diagram
Front Panel TOUCHSCREEN/DISPLAY Interface PCA
Software Operation
Lvds Transmitter Board
Calibration Slope and Offset
TEMPERATURE/PRESSURE Compensation TPC
Adaptive Filter
Teledyne Analytical Instruments 366
Model 9110T NOx Analyzer Primer on ESD
HOW Static Charges are Created
Static Generation Voltages for Typical Activities
Means of Generation
Potentially damaging electro-static discharges can occur
HOW ELECTRO-STATIC Charges Cause Damage
Sensitivity of Electronic Devices to Damage by ESD
Damage Susceptibility Voltage
General Rules
Common Myths about ESD Damage
Basic Principles of Static Control
Teledyne Analytical Instruments 370
Working AT AN ANTI-ESD Work Bench
Working AT the Instrument Rack
Transferring Components Between Rack and Bench
Opening Shipments from TAI Customer Service
ESD Hazard
Packing Components for Return to TAI Customer Service
Teledyne Analytical Instruments 374
Term Description/Definition
Glossary
Model 9110T NOx Analyzer Glossary
Teledyne Analytical Instruments 376
Teledyne Analytical Instruments 377
Teledyne Analytical Instruments 378