After read this manual Keep it handy for future reference
Hazardous High Voltage
Safety Messages
General Precautions Read These First
Iii
Index to Warnings and Cautions in This Manual
Page
Wiring Cautions for Electrical Practice
Vii
Powerup Test Caution Messages
Viii
Page
General Warnings and Cautions
Inverter
Remote
Xii
Xiii
Wire Connectors
Terminal Tightening Torque and Wire Size
Xiv
Motor Overload Protection
Circuit Breaker and Fuse Sizes
Table of Contents
Xvii
Revisions
Xviii
Revision History Table
Contact Information
Xix
Getting Started
Introduction
Main Features
Operator Interface Options
040
Inverter Specification Label
Model-specific tables for 200V and 400V class inverters
X200 Inverter Specifications
Derating Curve
X200 Inverter Specifications, …
004HFEF 007HFEF 015HFEF 022HFEF
030HFEF 040HFEF
−10
General Specifications
−11
Signal Ratings
−12
What is an Inverter
Introduction to Variable-Frequency Drives
Purpose of Motor Speed Control for Industry
−13
Inverter Input and Three-phase Power
Torque and Constant Volts/Hertz Operation
Inverter Output to the Motor
−14
Intelligent Functions and Parameters
−15
Braking
Velocity Profiles
−16
−17
Frequently Asked Questions
−18
−19
This Chapter… Orientation to Inverter Features
Inverter Mounting Installation
Main Physical Features
Orientation to Inverter Features
Unpacking and Inspection
Front Housing Cover
Logic Connector Introduction
DIP Switch Introduction
Power Wiring Access First, ensure no power
Inverter
Basic System Description
Step Activity
Step-by-Step Basic Installation
Choosing a Mounting Location
Keep Debris Out of Inverter Vents
Ensure Adequate Ventilation
Check Inverter Dimensions
X200-005SFEF,007SFEF, -007NFU
X200-011SFEF~022SFEF, -015NFU~022NFU, -037LFU
X200-004HFEF, -004HFU
X200-007HFEF, -007HFU
X200-015HFEF~040HFEF, -015HFU~040HFU
This page is left intentionally blank…
Prepare for Wiring
Signal Lines
Determining Wire and Fuse Sizes
Applicable
Inverter Model
Wire the Inverter Input to a Supply
Terminal Dimensions and Torque Specs
−20
−21
−22
Logic Control Wiring
Wire the Inverter Output to Motor
−23
Goals for the Powerup Test
Powerup Test
−24
Uncover the Inverter Vents
Powering the Inverter
Pre-test and Operational Precautions
−25
Key and Indicator Legend
Using the Front Panel Keypad
−26
Keys, Modes, and Parameters
−27
Keypad Navigation Map
−28
Selecting Functions and Editing Parameters
−29
−30
−31
−32
−33
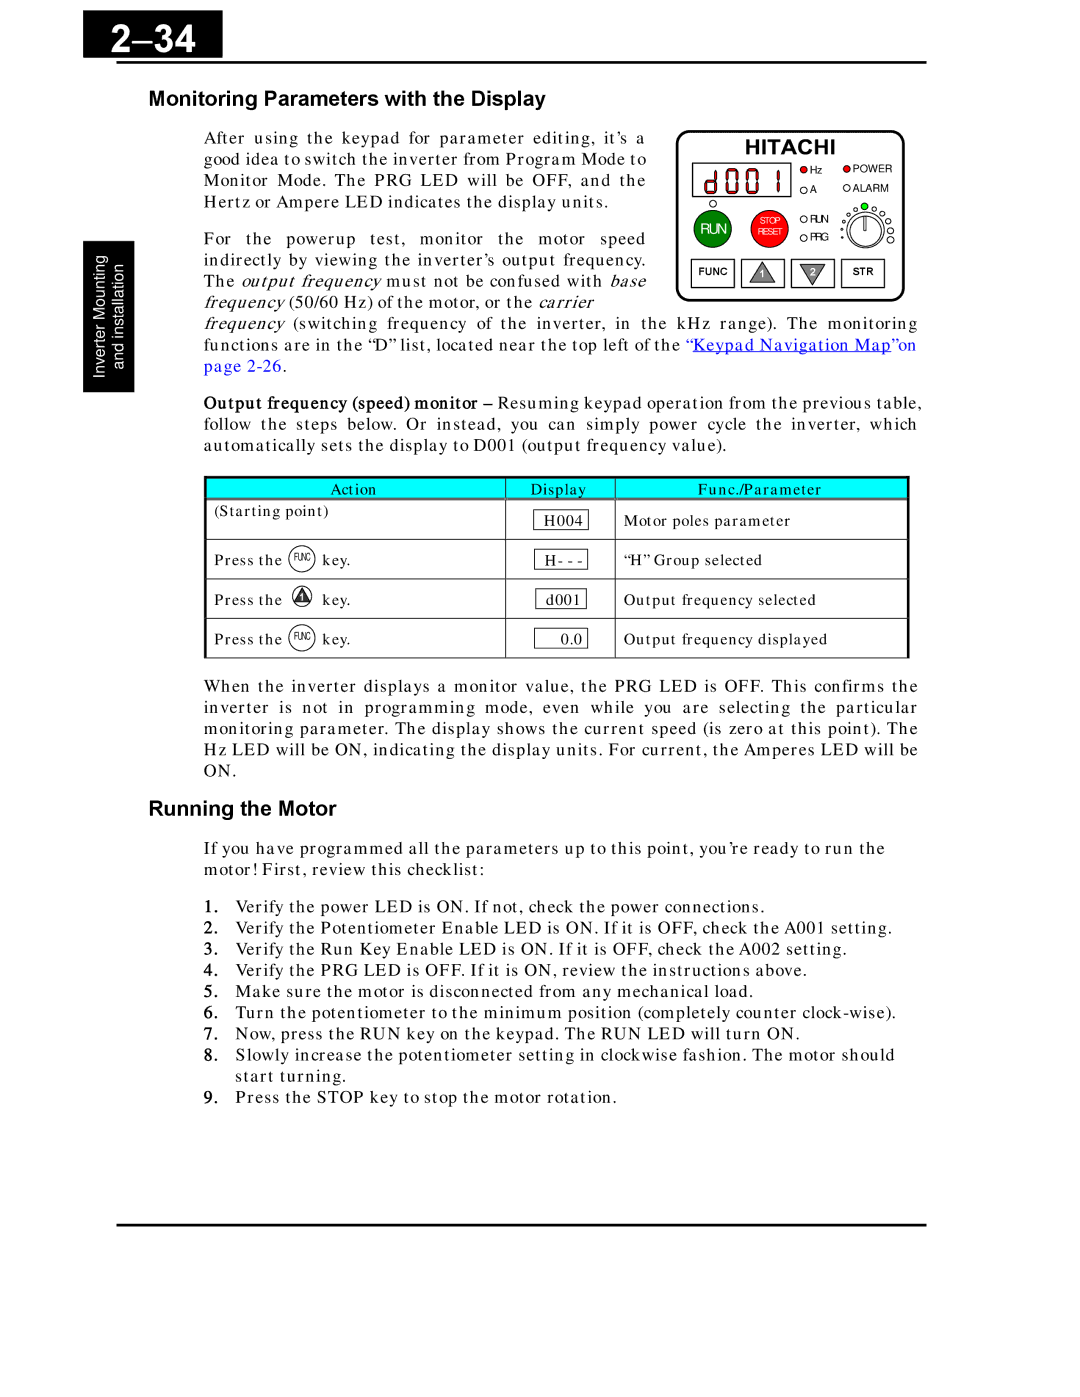
Monitoring Parameters with the Display
−34
Running the Motor
−35
Powerup Test Observations and Summary
Configuring 3 Drive Parameters
Introduction of Inverter Programming
Choosing a Programming Device
Using the Keypad Devices
Monitor Mode Programming Mode
Operational Modes
Run Mode Edit
Control Algorithms
Stop
Group Monitoring Functions
IN-TM Lhlhl
OUT-TM
Trip Event and History Monitoring
Local Monitoring During Network Operation
ACC
Group Main Profile Parameters
DEC
DIG-RUN FWD
COM
Group Standard Functions
2F-COM
OPE-Mode
A001 Frequency Source Setting Method Refer to page…
Code Run Command Source
A002 Run Command Setting Method Refer to page…
Base
Basic Parameter Settings
2F-BASE
MAX
Analog Input Settings
EXE
EXS
EX%S
EX%E
FRS
Multi-speed and Jog Frequency Setting
Manual Torque Boost The Constant
Torque Control Algorithms
2CTRL TRQ
Ctrl TRQ
Normal DC braking performance⎯ The DC
DC Braking DB Settings
DCB F
OFF
DCB
DCB T
Lim H 0000.0Hz
Frequency-related Functions
2Lim H 0000.0Hz
Lim L 0000.0Hz
Jump F2
Jump F1
Jump F3
Jump W1
PID Control
Automatic Voltage Regulation AVR Function
AVR Mode
AVR AC
00230V
RUN Mode NOR
Energy Savings Mode / Optional Accel/Decel
ECO Adj 0050.0%
2ACC2
Second Acceleration and Deceleration Functions
2DEC2
ACC CHG
2ACCCHfr 0000.0Hz
ACC CHfr 0000.0Hz
DEC CHfr 0000.0Hz
2DECCHfr 0000.0Hz
ACC Line
Accel/Decel
DEC Line
Additional Analog Input Settings
POT
Calc Slct1
Calc Slct2
Calc Smbl
ADD DIR Plus
ST-PNT
Potentiometer Settings
Automatic Restart Mode
Group Fine Tuning Functions
IPS Trip OFF
IPS Powr ALM
IPS Retry
Cutoff
THM LVL
Electronic Thermal Overload Alarm Setting
2ETHM LVL
THM Char CRT
Frequency Pull-in Restart
Overload Restriction
Mode Input
Software Lock Mode
−36
Lock
LockMD1
−37
−38
Non Stop Operation at Power OFF
−39
−40
Miscellaneous Settings
TRP
−41
FRS
−42
RUN FRS ZST
−43
Stop DEC
Panel
−44
D001
FAN-CTRL OFF
−45
B130, B131 Over-voltage LAD Stop Enable
Ovladstop OFF
Ladst LVL
−46
DC Bus AVR for deceleration Settings
−47
Miscellaneous Settings ~continuation~
−48
SUP Mode
Cr-DEC
RDY-FUNC OFF
−49
Input Terminal Configuration
Group Intelligent Terminal Functions
Intelligent Input Terminal Overview
−50
Input Function Summary Table Option
−51
Function Name Description
Anlg
−52
RDY
−53
−54
Output Terminal Configuration
FA1
OUT-TM RY
Output Function Summary Table Option
−55
−56
−57
LOC Mode CRT
Low Load Detection Parameters
LOC LVL
−58
Output Function Adjustment Parameters
−59
−60
Network Communications Settings
−61
Analog Signal Calibration Settings
ADJ
OI-ADJ
Miscellaneous Functions
−62
DBG Slct
UP/DWN NO-STR
Output Logic and Timing
−63
LogicOut1
LogicOut2
Dlay
−64
Hold
Dlay RY
Group Motor Constants Functions
−65
This Chapter…
Operations Monitoring
Operations and Monitoring
Operations and Monitoring
Connecting to PLCs and Other Devices
Optional
Example Wiring Diagram
AL2 AL1 AL0
Control Logic Signal Specifications
Intelligent Terminal Listing
Input Function Summary Table Symbol Code Function Name
Intelligent Inputs
Intelligent Outputs
Using Intelligent Input Terminals
Sinking Inputs, Internal Supply
Sinking Inputs, External Supply
Terminal Function Name State Description
Forward Run/Stop and Reverse Run/Stop Commands
Valid for inputs C001~C005
A002 =
Function Name State Description
Multi-Speed Select
Valid for inputs
−13
Option Terminal Function Name State Description
Jogging Command
Option Code Terminal Symbol Function Name State Description
External Signal for DC Braking
A053, A054
Option Terminal Function Name State
Set Second Motor, Special Set
None
Option Terminal Function Name
Two Stage Acceleration and Deceleration
A092, A093, A094=00
Terminal Function Name
Free-run Stop
B003, B088, C011 to C015
External Trip
Unattended Start Protection
B031 excluded from lock
Software Lock
A001 =
Analog Input Current/Voltage Select
Terminal Function Name State Description Code
Reset Inverter
Valid for inputs C005 only
Thermistor Thermal Protection
Three-wire Interface Operation
PID ON/OFF and PID Clear
Remote Control Up and Down Functions
Remote Control Data Clears the Up/Down frequency memory
Force Operation from Digital Operator
A001, A145, A146
Add Frequency Enable
Inverter Ready
Force Terminal Mode
Safe Stop
Required settings
Sinking Outputs, Open Collector
Using Intelligent Output Terminals
Relay shown with inverter power ON, Run Signal OFF
Output Signals
Output Signal ON/OFF Delay Function
Option Terminal Function Name State Description Code
Run Signal
Frequency Arrival Signals
FA2
FM terminal see Analog Output Operation
Overload Advance Notice Signal
Output Deviation for PID Control
Or the relay outputs
Alarm Signal
Power Run Mode AL0-AL1 AL0-AL2
Analog Input Disconnect Detect
PID Second Stage Output
Terminal FBV configuration table is on the following
Transitions to OFF when the PID Feedback
Watchdog time-out period with C077
Network Detection Signal Integrated ModBus
Logic Output Function
Logical 0 result
Set P044=00.00 sec
Network Detection Signal FieldBus Option
C038, C039
Low Load Detection Signal
Analog Input Operation
Other Analog Input-related topics
Analog Output Operation
AM output offset adjustment AM output gain adjustment
GND
PID Loop Operation
Other PID-related topics
PID Loop Configuration
Inverter Configuration for Two Motor Types
Configuring the Inverter for Multiple Motors
Simultaneous Connections
Manual torque boost frequency adjustment
Inverter System Accessories
USA
AC Reactors, Input Side
Component Descriptions
AC Reactors, Output Side
Example calculation
EMI Filter
Zero-phase Reactor RF Noise Filter
RF Noise Filter Capacitive
DC Link Choke
Dynamic Braking
Dynamic Braking Usage
Troubleshooting Maintenance
Safety Messages
Troubleshooting
General Precautions and Notes
Inspection Items
Symptom/condition Probable Cause Solution
Troubleshooting Tips
Reduces output as needed
Error Codes
Fault Detection and Clearing
Error Name Causes Code
Monitoring Trip Events, History, & Conditions
Error Name Causes
Trip Conditions
Trip History and Inverter Status
Action Display Func./Parameter
Restoring Factory Default Settings
Monthly and Yearly Inspection Chart
Maintenance and Inspection
X200
Megger test
Capacitor Life Curves
Spare parts
Pf1 =
General Inverter Electrical Measurements
−13
Inverter Output Voltage Measurement Techniques
Igbt Test Method
Warranty Terms
Warranty
This Appendix…
Glossary Bibliography
Glossary
Temperature
EMI
Insulated Gate Bipolar TransistorIGBT a semiconductor
Free-run Stop
NEC
PWM
Squirrel Cage
Torque
Bibliography
ModBus Network Communications
Specifications
Connecting the Inverter to ModBus
SP SN
Func Name
Settings
03…ModBus network input
03… ModBus network input
Message Configuration Query
Transmission procedure
Network Protocol Reference
Slave address
Data
Error check
Function code
Header and trailer silent interval
Response when an error occurs
Message Configuration Response
Transmission time required
Normal response
No response occurs
Read Coil Status 01h
Explanation of function codes
Data
Field Name
X200 D081
Read Holding Register 03h
Frequency
10-11
Write in Coil 05h
Data Coil Status
Write in Holding Register 06h
Loopback Test 08h
Write in Coils 0Fh
Write in Holding Registers 10h
Function Code
Exception Response
Exception Code
Code Description
Submitting an Enter Command
Store New Register Data Enter command
ModBus Coil List
ModBus Data Listing
List of Coil Numbers Name Description
…OFF
Res
ModBus Holding Registers
Output frequency Real-time display of output
Description Network Data Code Reg
List of Holding Registers Func
Acceleration 1 time Standard default acceleration
Frequency source Five options select codes
4000 A024 Multi-speed 4 setting
Code Reg
List of Holding Registers Func Name Description
PID enable Enables PID function
Acceleration 2 time Duration of 2nd segment
OI-L input active Ending point offset for
Selection of automatic Select inverter restart method
Overload restriction Select the operation mode during
Deceleration time Range is 0.01 to
Restart mode after Selects how the inverter resumes 10D7h
B133 DC bus AVR Two option codes
See Input Terminal Configuration
Communication Settings on
See Output Logic and Timing on
Motor capacity …0.20kW
Drive Parameter Setting Tables
Group Parameters Default Setting
Parameter Settings for Keypad Entry
Main Profile Parameters
Name
Func Name
Standard Functions
Code
Name =10
Appendix
Group Parameters
Fine Tuning Functions
Func Name =10
Group Parameters Default Setting
Intelligent Terminal Functions
Expansion Card Functions
Motor Constants Functions
CE-EMC
CE-EMC Installation Guidelines
Integrated EMC Filter
Installation for X200 series example of Sfef models
Hitachi EMC Recommendations
Index
EMI A-3
Index−2
LEDs 2-26,2-27,2-39,3-3 Line reactor A-5
Index−3
Index−4
Non stop operation at power OFF 3-38 AC reactor
Safe stop 2-5
Index−5
Index−6