FVS318N
Statement of Conditions
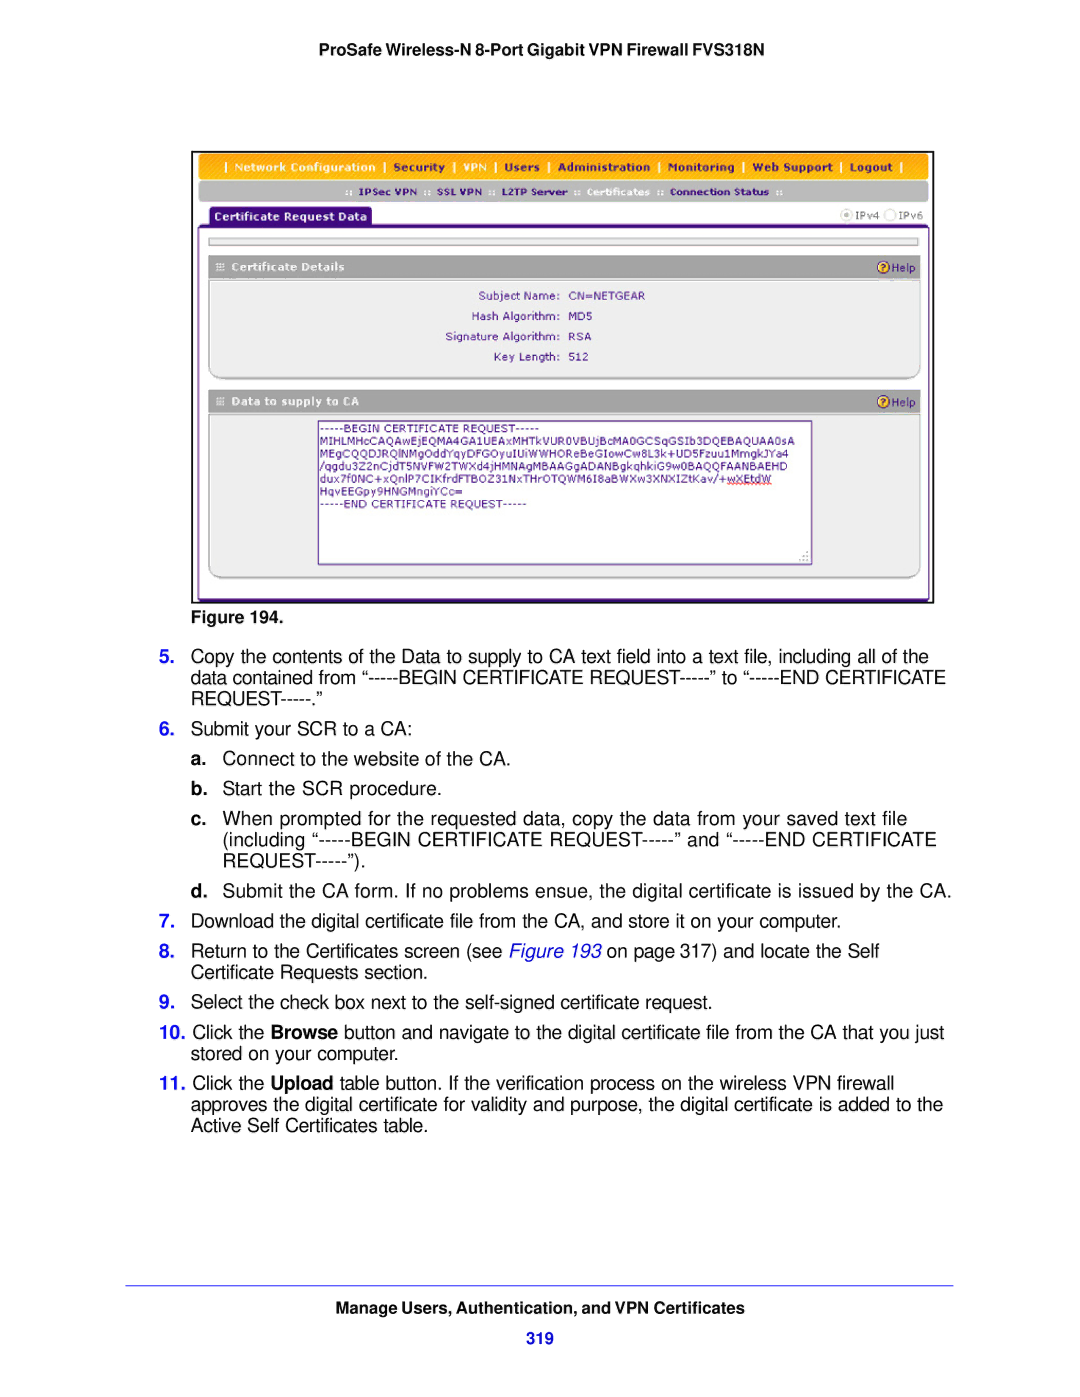
ProSafe Wireless-N 8-Port Gigabit VPN Firewall FVS318N
Technical Support
Trademarks
ProSafe Wireless-N 8-Port Gigabit VPN Firewall FVS318N
Contents
LAN Configuration
Firewall Protection
Virtual Private Networking Using SSL Connections
Network and System Management
Appendix a Default Settings and Technical Specifications
Introduction
Wireless Features
Key Features and Capabilities
Introduction
Advanced VPN Support for Both IPSec and SSL
Powerful, True Firewall
Autosensing Ethernet Connections with Auto Uplink
Security Features
Extensive Protocol Support
Easy Installation and Management
Hardware Features
Package Contents
Active WAN LED
Power Left LAN LEDs
Wireless LED Right LAN LEDs Right WAN LED
Green, one for each port
DMZ LED
Activity Description LAN Ports
WAN Port
Rear Panel
Bottom Panel with Product Label
Choose a Location for the Wireless VPN Firewall
To log in to the wireless VPN firewall
Log In to the Wireless VPN Firewall
ProSafe Wireless-N 8-Port Gigabit VPN Firewall FVS318N
Web Management Interface Menu Layout
ProSafe Wireless-N 8-Port Gigabit VPN Firewall FVS318N
IPv4
Requirements for Entering IP Addresses
IPv6
Tasks to Set Up an IPv4 Internet Connection to Your ISP
Internet and WAN Configuration Tasks
Complete these four tasks
Tasks to Set Up an IPv6 Internet Connection to Your ISP
Configure the IPv4 Internet Connection and WAN Settings
IPv4 and IPv6 Internet and Broadband Settings
Network Address Translation
Configure the IPv4 WAN Mode
Configure the IPv4 Routing Mode
To configure the IPv4 routing mode
Click Apply to save your settings
ProSafe Wireless-N 8-Port Gigabit VPN Firewall FVS318N
Pptp
Connection Method Manual Data Input Required
To manually configure the IPv4 broadband ISP settings
Manually Configure an IPv4 Internet Connection
Setting Description
Pptp and PPPoE settings
Step
Has assigned one. You can leave this field blank
Identifier check box
DNS server settings
Get Automatically from ISP radio button
Configure Dynamic DNS
To configure Ddns
Ddns service settings
Configure the IPv6 Internet Connection and WAN Settings
To configure the IPv6 routing mode
Configure the IPv6 Routing Mode
Use a DHCPv6 Server to Configure an IPv6 Internet Connection
ProSafe Wireless-N 8-Port Gigabit VPN Firewall FVS318N
Configure a Static IPv6 Internet Connection
Setting Description
Configure a PPPoE IPv6 Internet Connection
ProSafe Wireless-N 8-Port Gigabit VPN Firewall FVS318N
Stateless DHCPv6 Server With Prefix Delegation on
WAN Port Status on Options and Other Tasks on
Configure 6to4 Automatic Tunneling
Select the Enable Automatic Tunneling check box
Configure Isatap Automatic Tunneling
To configure an Isatap tunnel
To edit an Isatap tunnel
Add Isatap Tunnel screen settings
To view the status of the tunnels and IPv6 addresses
Configure Stateless IP/ICMP Translation
View the Tunnel Status and IPv6 Addresses
To delete one or more tunnels
To configure Siit
Configure Advanced WAN Options and Other Tasks
To configure advanced WAN options
Setting Description MTU Size
Broadband Advanced Options screen settings
Default Address radio button
Setting Speed Description
Router’s MAC Address
What to Do Next
Additional WAN-Related Configuration Tasks
Verify the Connection
Manage IPv4 Virtual LANs and Dhcp Options
LAN Configuration
Port-Based VLANs
LAN Configuration
Assign and Manage Vlan Profiles
Explained in Configure the IPv4 Internet Connection and WAN
Vlan Dhcp Options
Dhcp Relay
Dhcp Server
DNS Proxy
Ldap Server
Configure a Vlan Profile
To add a Vlan profile
ProSafe Wireless-N 8-Port Gigabit VPN Firewall FVS318N
Port Membership
Add Vlan Profile screen settings
Setting Description Vlan Profile
IP Setup
VLAN, the default start IP address is
Inter Vlan Routing
DNS Proxy
To edit a Vlan profile
Configure Vlan MAC Addresses and LAN Advanced Settings
To enable, disable, or delete one or more Vlan profiles
To configure a Vlan to have a unique MAC address
ProSafe Wireless-N 8-Port Gigabit VPN Firewall FVS318N
To edit a secondary LAN IP address
To add a secondary LAN IPv4 address
To delete one or more secondary LAN IP addresses
Manage IPv4 Groups and Hosts IPv4 LAN Groups
Manage the Network Database
Also Set Up Dhcp Address Reservation on
Add Known PCs and Devices section settings
Add Computers or Devices to the Network Database
Edit Computers or Devices in the Network Database
Deleting Computers or Devices from the Network Database
Change Group Names in the Network Database
To edit the names of any of the eight available groups
Set Up Dhcp Address Reservation
DHCPv6 Server Options
Manage the IPv6 LAN
Stateless DHCPv6 Server
Stateful DHCPv6 Server
Stateless DHCPv6 Server With Prefix Delegation
Configure the IPv6 LAN
Prefix delegation check box is selected. The stateless
LAN Setup screen settings for IPv6
Setting Description IPv6 LAN Setup
DHCPv6
To add an IPv6 LAN address pool
IPv6 screen see Configure a Static IPv6 Internet Connection
Settings IPv6 screen see Configure a Static IPv6 Internet
IPv6 LAN Address Pools
To edit an IPv6 LAN address pool
LAN IPv6 Config screen settings
To delete one or more IPv6 LAN address pools
To delete one or more prefixes
IPv6 LAN Prefixes for Prefix Delegation
To add an IPv6 prefix
To edit a prefix
Flags in the Radvd DHCPv6 Server Provides Radvd Provides
DHCPv6 and Radvd interaction in the LAN
Radvd screen settings for the LAN
To add an advertisement prefix for the LAN
Advertisement Prefixes for the LAN
MTU
To edit an advertisement prefix
Add Advertisement Prefix screen settings for the LAN
SLA ID
To delete one or more advertisement prefixes
DMZ
Enable and Configure the DMZ Port for IPv4 and IPv6 Traffic
DMZ Port for IPv4 Traffic
To enable and configure the DMZ port for IPv4 traffic
Setting Description DMZ Port Setup
DMZ Setup screen settings for IPv4
Dhcp for DMZ Connected Computers
DMZ Port for IPv6 Traffic
ProSafe Wireless-N 8-Port Gigabit VPN Firewall FVS318N
Advertisement Prefixes for the DMZ on
DMZ Setup screen settings for IPv6
Configure the IPv6 Router Advertisement Daemon
DHCPv6 for DMZ Connected Computers
IPv6 DMZ Address Pools
IPv6 screen see Configure a Static IPv6 Internet
To add an IPv6 DMZ address pool
To edit an IPv6 DMZ address pool
DMZ IPv6 Config screen settings
To delete one or more IPv6 DMZ address pools
DHCPv6 and Radvd interaction in the DMZ
Radvd screen settings for the DMZ
To add an advertisement prefix for the DMZ
Advertisement Prefixes for the DMZ
Add Advertisement Prefix screen settings for the DMZ
Manage Static IPv4 Routing
Configure Static IPv4 Routes
To add an IPv4 static route to the Static Route table
Add Static Route screen settings for IPv4
To delete one or more routes
Configure the Routing Information Protocol
To enable and configure RIP
To edit an IPv4 static route
101
RIP Configuration screen settings
102
Authentication for RIP-2B/2M
IPv4 Static Route Example
Manage Static IPv6 Routing
103
104
Add IPv6 Static Routing screen settings
105
To edit an IPv6 static route
106
Overview of the Wireless Features
Wireless Configuration and Security
Wireless Equipment Placement and Range Guidelines
107
Setting Descriptions
Configure the Basic Radio Settings
To configure the basic radio settings
Radio Settings screen settings
109
Physical and Technical Specifications on
Channel Guidelines following this table
110
Operating Frequency Channel Guidelines
111
Wireless Data Security Options
112
Wireless Security Profiles
Data encryption
Network authentication
113
114
Before You Change the SSID, WEP, and WPA Settings
WPA Radius settings
WPA2 Radius settings
115
Configure and Enable Wireless Profiles
To add a wireless profile
Wireless Profiles screen settings
Setting Description Wireless Profile Configuration
Add Wireless Profiles screen settings
116
Security Options on
117
Vlan Profile on
118
119
Setting Description WEP Index and Keys
To enable or disable one or more wireless profiles
Restrict Wireless Access by MAC Address
To edit a wireless profile
To delete one or more wireless profiles
121
To allow or restrict access based on MAC addresses
To view the status of a specific wireless profile
View the Status of a Wireless Profile
122
Connected Clients
Configure Wi-Fi Protected Setup
Wireless Profile Statistics
123
124
To configure advanced radio settings
Configure Advanced Radio Settings
125
126
Advanced Wireless screen settings
To test for wireless connectivity
Test Basic Wireless Connectivity
127
128
About Firewall Protection
Firewall Protection
Administrator Tips
129
Number of supported firewall rule configurations
Outbound Rules Service Blocking
130
Set a Schedule to Block or Allow Specific Traffic on
Setting Description Outbound Rules
Outbound rules overview
131
132
133
Inbound Rules Port Forwarding
NAT IP
134
135
Setting Description Inbound Rules
Manage the Network Database on page 68. Groups are
136
137
Order of Precedence for Rules
138
Configure LAN WAN Rules
139
140
Create LAN WAN Outbound Service Rules
IPv4 LAN WAN Outbound Rules
To create a new IPv4 LAN WAN outbound rule
141
To create a new IPv6 LAN WAN outbound rule
IPv6 LAN WAN Outbound Rules
142
143
Create LAN WAN Inbound Service Rules
IPv4 LAN WAN Inbound Service Rules
To create a new IPv4 LAN WAN inbound rule
To create a new IPv6 LAN WAN inbound rule
IPv6 LAN WAN Inbound Rules
144
145
Configure DMZ WAN Rules
146
147
148
Create DMZ WAN Outbound Service Rules
IPv4 DMZ WAN Outbound Service Rules
To create a new IPv4 DMZ WAN outbound rule
To create a new IPv6 DMZ WAN outbound rule
IPv6 DMZ WAN Outbound Service Rules
149
150
Create DMZ WAN Inbound Service Rules
IPv4 DMZ WAN Inbound Service Rules
To create a new IPv4 DMZ WAN inbound rule
151
To create a new IPv6 DMZ WAN inbound rule
IPv6 DMZ WAN Inbound Service Rules
152
153
Configure LAN DMZ Rules
154
155
Create LAN DMZ Outbound Service Rules
IPv4 LAN DMZ Outbound Service Rules
To create a new IPv4 LAN DMZ outbound rule
To create a new IPv6 LAN DMZ outbound rule
IPv6 LAN DMZ Outbound Service Rules
156
157
Create LAN DMZ Inbound Service Rules
IPv4 LAN DMZ Inbound Service Rules
To create a new IPv4 LAN DMZ inbound rule
To create a new IPv6 LAN DMZ inbound rule
IPv6 LAN DMZ Inbound Service Rules
158
159
Examples of Firewall Rules
Examples of Inbound Firewall Rules
IPv4 LAN WAN Inbound Rule Host a Local Public Web Server
160
161
162
163
IPv4 LAN WAN Outbound Rule Block Instant Messenger
Examples of Outbound Firewall Rules
164
165
Attack Checks
Configure Other Firewall Features
166
IPv4 Attack Checks
To enable IPv4 attack checks for your network environment
Attack Checks screen settings for IPv4
Setting Description WAN Security Checks
Pptp L2TP
Setting Description LAN Security Checks
168
VPN Pass through
IPv6 Attack Checks
Setting Description Jumbo Frames
169
Set Limits for IPv4 Sessions
To enable and configure session limits
Session Limit screen settings
Setting Description Session Limit
171
To enable ALG for SIP
Session Timeout
Manage the Application Level Gateway for SIP Sessions
Add Customized Services
Services, Bandwidth Profiles, and QoS Profiles
172
ICMPv6
To add a customized service
Services screen settings
173
174
To edit a service
To delete one or more services
Service Profiles on
Create Bandwidth Profiles
To add and enable a bandwidth profile
175
176
Add Bandwidth Profile screen settings
177
Preconfigured Quality of Service Profiles
To edit a bandwidth profile
To delete one or more bandwidth profiles
178
Configure Content Filtering
179
To enable and configure content filtering
180
To build your list of trusted domains
To apply keyword blocking to LAN groups
181
To set a schedule
Set a Schedule to Block or Allow Specific Traffic
182
183
Enable Source MAC Filtering
184
Set Up IP/MAC Bindings
185
IPv4/MAC Bindings
186
IP/MAC Binding screen settings for IPv4
187
IPv6/MAC Bindings
To edit an IP/MAC binding
To remove one or more IP/MAC bindings from the table
188
IP/MAC Binding screen settings for IPv6
189
To add a port triggering rule
Configure Port Triggering
190
To edit a port triggering rule
Port Triggering screen settings
191
192
Configure Universal Plug and Play
To configure UPnP
To display the status of the port triggering rules
193
194
Virtual Private Networking Using IPSec and L2TP Connections
195
Virtual Private Networking Using IPSec and L2TP Connections
196
End Point Information a
Setting Description About VPN Wizard
197
Connection Name and Remote IP Type
198
Setting Description Secure Connection Remote Accessibility
199
Create an IPv6 Gateway-to-Gateway VPN Tunnel with the Wizard
200
201
202
203
Create an IPv4 Client-to-Gateway VPN Tunnel with the Wizard
204
205
IPSec VPN Wizard settings for a client-to-gateway tunnel
206
Information required to configure the VPN client
Component Enter the information that you collected Example
207
208
209
NAT-T
VPN client advanced authentication settings
Setting Description Advanced features
210
211
Type vpnclient
To create new authentication settings
212
IKE
VPN client authentication settings
213
Enter
214
Type netgearplatform
To create an IPSec configuration
215
216
VPN client IPSec configuration settings
ESP
217
To specify the global parameters
218
Test the Netgear VPN Client Connection
219
Click Gateway-Tunnel, and press Ctrl+O
Netgear VPN Client Status and Log Information
View the Wireless VPN Firewall IPSec VPN Connection Status
220
221
View the Wireless VPN Firewall IPSec VPN Log
To display the IPSec VPN log
IPSec VPN Connection Status screen information
Manage IKE Policies
Manage IPSec VPN Policies
222
223
To access the IKE Policies screen
IKE Policies Screen
IKE Policies screen information for IPv4 and IPv6
224
Manually Add or Edit an IKE Policy
To delete one or more IKE polices
To manually add an IKE policy for IPv4 or IPv6
225
General
Add IKE Policy screen settings
Setting Description Mode Config Record
226
IKE SA Parameters
Setting Description Local
227
Remote
Dead Peer
228
Group 1 768 bit
Group 5 1536 bit
To edit an IKE policy
Setting Description Extended Authentication
229
VPN Policies Screen
Manage VPN Policies
230
231
VPN Policies screen information for IPv4 and IPv6
To manually add a VPN policy
To enable or disable one or more VPN policies
Manually Add or Edit a VPN Policy
To delete one or more VPN polices
233
234
235
Add New VPN Policy screen settings for IPv4 and IPv6
Setting Description General
Configure Keep-Alives
236
Setting Description Traffic Selection
Manual Policy Parameters
Auto Policy Parameters
237
To edit a VPN policy
Configure Extended Authentication Xauth
238
To enable and configure Xauth
Configure Xauth for VPN Clients
239
240
User Database Configuration
Radius Client and Server Configuration
Extended authentication settings for IPv4 and IPv6
241
To configure primary and backup Radius servers
Radius Client screen settings
Setting Description Primary Radius Server
Connection Configuration
Backup Radius Server
242
Mode Config Operation
Assign IPv4 Addresses to Remote Users Mode Config
243
244
To configure Mode Config on the wireless VPN firewall
Setting Description Client Pool
Add Mode Config Record screen settings
245
Traffic Tunnel Security Level
246
247
248
249
250
Setting Description IKE SA Parameters
Select Group 2 1024 bit
Radius Chap
Configure the ProSafe VPN Client for Mode Config Operation
Screen see User Database Configuration on
251
252
253
Type GWModeConfig
254
VPN client authentication settings Mode Config
VPN client advanced authentication settings Mode Config
Type TunnelModeConfig
255
256
VPN client IPSec configuration settings Mode Config
192.168.1.1
257
Configure the Mode Config Global Parameters
258
Test the Mode Config Connection
To delete one or more Mode Config records
Configure Keep-Alives and Dead Peer Detection
Modify or Delete a Mode Config Record
To edit a Mode Config record
260
Configure Keep-Alives
261
Configure Dead Peer Detection
To configure DPD on a configured IKE policy
Keep-alive settings
Dead Peer Detection settings
Configure NetBIOS Bridging with IPSec VPN
262
To enable NetBIOS bridging on a configured VPN tunnel
Configure the L2TP Server
263
264
L2TP Server screen settings
L2TP IP
View the Active L2TP Users
L2TP Active Users screen information
265
266
SSL VPN Portal Options
Virtual Private Networking Using SSL Connections
Overview of the SSL Configuration Process
267
268
Create the Portal Layout
269
To create a new SSL VPN portal layout
270
Portal URL
Setting Description Portal Layout and Theme Name
Add Portal Layout screen settings
271
272
Configure Domains, Groups, and Users
To edit a portal layout
To delete one or more portal layouts
273
Configure Applications for Port Forwarding
Add Servers and Port Numbers
To add a server and a port number
TCP Application Port Number
Add a New Host Name
Port forwarding applications/TCP port numbers
274
275
Configure the SSL VPN Client
To add servers and host names for client name resolution
Fully Qualified Domain Name. The full server name
To define the client IP address range
Configure the Client IP Address Range
276
Routes for VPN Tunnel Clients on
SSL VPN Client screen settings for IPv4 and IPv6
Setting Description Client IP Address Range
277
To add an SSL VPN tunnel client route
Add Routes for VPN Tunnel Clients
278
279
Use Network Resource Objects to Simplify Policies
Add New Network Resources
To define a network resource
280
Edit Network Resources to Specify Addresses
To delete one or more network resources
To edit network resources
Setting Description Add Resource Addresses
Resources screen settings to edit a resource
281
282
Configure User, Group, and Global Policies
To view the existing SSL VPN policies
View Policies
283
To add an SSL VPN policy
Add an IPv4 or IPv6 SSL VPN Policy
284
285
Add SSL VPN Policy screen for IPv4
Add SSL VPN Policies
Add SSL VPN Policy screen settings
Setting Description Policy For
286
287
288
Access the New SSL Portal Login Screen
To edit an SSL VPN policy
To delete one or more SSL VPN policies
289
Portal Layouts screen for IPv6
290
291
292
View the SSL VPN Connection Status and SSL VPN Log
To view the status of current SSL VPN tunnels
To display the SSL VPN log
293
294
Wireless VPN Firewall’s Authentication Process and Options
295
External authentication protocols and methods
Manage Users, Authentication, and VPN Certificates
Authentication Description Protocol or Method
To create a domain
Configure Authentication Domains, Groups, and Users
Configure Domains
Create Domains
297
Add Domain screen settings
298
Server Configuration
Radius Client
Display name in the DN format . For example
Windows login account name in email format . For example
To delete one or more domains
299
300
Configure Groups
Edit Domains
To edit a domain
To create a VPN group
Create Groups
301
To delete one or more groups
Add Group screen settings
302
303
Configure User Accounts
Edit Groups
To edit a VPN group
304
To create a user account
Configure Extended Authentication Xauth on
Add Users screen settings
305
To delete one or more user accounts
Set User Login Policies
Configure Login Policies
To configure user login policies
To restrict logging in based on IPv4 addresses
Configure Login Restrictions Based on IPv4 Addresses
307
To restrict logging in based on IPv6 addresses
Configure Login Restrictions Based on IPv6 Addresses
Defined addresses settings for IPv4
To delete one or more IPv4 addresses
309
Defined addresses settings for IPv6
310
Configure Login Restrictions Based on Web Browser
To delete one or more IPv6 addresses
To restrict logging in based on the user’s browser
311
Change Passwords and Other User Settings
Internet Explorer Opera Netscape Navigator
To delete one or more browsers
Edit User screen settings
To modify user settings, including passwords
312
313
Manage Digital Certificates for VPN Connections
314
VPN Certificates Screen
To view and upload trusted certificates
Manage VPN CA Certificates
315
To delete one or more digital certificates
Manage VPN Self-Signed Certificates
316
317
318
Generate self-signed certificate request settings
512 1024 2048
319
To delete one or more self-signed certificates
Manage the VPN Certificate Revocation List
View and Manage Self-Signed Certificates
To delete one or more SCRs
321
To delete one or more CRLs
Bandwidth Capacity
Performance Management
322
Network and System Management
Features That Reduce Traffic
323
324
Content Filtering
Source MAC Filtering
Features That Increase Traffic
325
326
VPN and L2TP Tunnels
Port Triggering
DMZ Port
Exposed Hosts
Assign Bandwidth Profiles
Use QoS and Bandwidth Assignment to Shift the Traffic Mix
Monitoring Tools for Traffic Management
Set QoS Priorities
System Management
Change Passwords and Administrator and Guest Settings
329
330
331
Configure Remote Management Access
332
Remote Management screen for IPv4
Setting Description Secure Http Management
Remote Management screen settings for IPv4 and IPv6
333
334
About Remote Access
Telnet Management
335
Use the Command-Line Interface
To access the CLI
Use a Simple Network Management Protocol Manager
336
To configure the Snmp settings
Snmp screen settings
To edit an Snmp configuration
337
338
To delete one or more Snmp configurations
To edit the SNMPv3 default users
Edit User screen settings for SNMPv3 users
Snmp SysConfiguration screen settings
To configure the Snmp system information
339
340
Manage the Configuration File
Setting Description SysName
Default name is FVS318N
341
Back Up Settings
Restore Settings
To back up settings
342
Revert to Factory Default Settings
To download a firmware version and upgrade the firmware
Update the Firmware
343
344
Configure Date and Time Service
Time Zone screen settings
To set time, date, and NTP servers
Http//support.ntp.org/bin/view/Servers/WebHome
345
To configure and monitor traffic limits on the WAN port
Enable the WAN Traffic Meter
346
347
Monitor System Access and Performance
Alerts, and Event Notifications on
Setting Description Enable Traffic Meter
348
Traffic Counter
349
Configure Logging, Alerts, and Event Notifications
To configure and activate logs
Setting Description When Limit is reached
350
Routing Logs
Firewall Logs & E-mail screen settings
Setting Description Log Options
351
352
Setting Description Enable E-mail Logs
Send e-mail logs by Schedule
Setting Description Enable SysLogs
How to Send Syslogs over a VPN Tunnel between Sites
353
Type of Address Gateway 1 at Site Gateway 2 at Site
Configure Gateway 1 at Site
To change the remote IP address in the VPN policy
354
355
Configure Gateway 2 at Site
To change the local IP address in the VPN policy
To specify the syslog server that is connected to Gateway
To view the Router Status screen
View Status Screens
View the System Status
Router Status Screen
357
Router Status screen information
To view the Router Statistics screen
Router Statistics Screen
358
Router Statistics
Detailed Status Screen
Router Statistics screen information
359
360
Detailed Status screen information
LAN Port Configuration
WAN Configuration
WAN Settings on
362
Wireless Configuration
363
Description Wireless Profile Information
Enable Wireless Profiles on
Tunnel Status Screen
364
View the VPN Connection Status and L2TP Users
To view the active IPSec VPN connections
To view the active SSL VPN connections
To view the active L2TP tunnel users
View the VPN Logs
365
View the Port Triggering Status
To view the status of the port triggering feature
366
Port Triggering Status screen information
View the WAN Port Status
IPv4 WAN Port Status
To view the IPv4 status of the WAN port
368
Connection Status screen information for an IPv4 connection
IPv4 Internet Connection on
369
IPv6 WAN Port Status
To view the IPv6 status of the WAN port
Connection Status screen information for an IPv6 connection
370
View the Attached Devices and the Dhcp Log
View the Attached Devices
To view the attached devices on the LAN Groups screen
To review the most recent entries in the Dhcp log
View the Dhcp Log
371
372
To display the Diagnostics screen
Diagnostics Utilities
373
374
Trace a Route
Send a Ping Packet
Look Up a DNS Address
To capture packets in real time
Display the Routing Tables
Capture Packets in Real Time
To display the routing table
To reboot the wireless VPN firewall
Reboot the Wireless VPN Firewall Remotely
377
378
Troubleshooting
Test LED Never Turns Off
Power LED Not On
Troubleshooting
Basic Functioning
LAN or WAN Port LEDs Not On
Troubleshoot the Web Management Interface
380
381
When You Enter a URL or IP Address, a Time-Out Error Occurs
To check the WAN IP address
Troubleshoot the ISP Connection
382
383
Troubleshooting the IPv6 Connection
384
MAC OS
385
386
Troubleshoot a TCP/IP Network Using a Ping Utility
Test the LAN Path to Your Wireless VPN Firewall
Ping
Ping -n 10 IP address
Test the Path from Your Computer to a Remote Device
387
388
Restore the Default Configuration and Password
Access the Knowledge Base and Documentation
Address Problems with Date and Time
389
390
Factory Default Settings
Feature Login settings Default Behavior
WAN settings
IPv6 LAN and DMZ settings
Default Settings and Technical Specifications
Feature Default Behavior
IPv4 LAN, DMZ, and routing settings
392
Firewall and security settings
SIP ALG
393
Wireless radio and access point settings
3DES
394
SHA-1
395
Radius settings
SSL VPN settings
User, group, and domain settings
396
Physical and Technical Specifications
Wireless VPN firewall physical and technical specifications
Administrative and monitoring settings
397
398
Wireless VPN firewall IPSec VPN specifications
Wireless VPN firewall SSL VPN specifications
Setting Specification
399
Wireless VPN firewall wireless specifications
What Are the Benefits of Two-Factor Authentication?
Why Do I Need Two-Factor Authentication?
400
To use WiKID for end users
Netgear Two-Factor Authentication Solutions
What Is Two-Factor Authentication?
Two-Factor Authentication
402
403
FCC Requirements for Operation in the United States
Regulatory Compliance Information
404
European Union
Notification of Compliance Wired
405
Terms
Additional Copyrights
406
AES
MD5
407
408
Edoc in Languages of the European Community
Language Statement
409
Notification of Compliance Wireless
410
FCC Caution
411
Industry Canada
Important Note Radiation Exposure Statement
Interference Reduction Table
412
Index
295
413
DMZ Radvd
414
DMZ Dhcp
227
415
416
SSL VPN
417
418
419
420
421
422
164
423
IKE policies
424
425