4085-001
Carrier with Card Removal
1.Remove all covers.
2.Remove all ink cartridges from carrier.
3.Remove engine board cover. Refer to “Tray 2 Covers Removal” on page
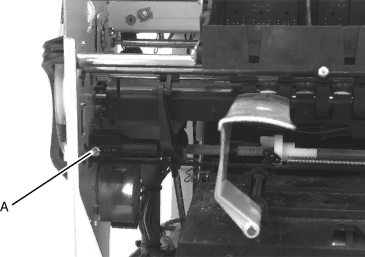
4.Loosen the set screw {A} on the belt tensioner.
5.Remove the tension from the belt and retighten the set screw.
6.Remove the belt keepers from the ends of the belt {B}. The open end of the keepers should face the rear of the carrier.
7.Remove the belt.
8.Disconnect the spring {C} and remove two screws {D} from the support shaft bracket located on the right side.
9.Slide the carrier guide rod out the right side.
10.Remove the encoder strip. Note the routing of the encoder strip through a sensor at the rear of the carrier. Be careful not to touch the encoder strip in any areas that the sensor uses. Handle the encoder strip no further in than 4 cm from each side.
11.Disconnect the carrier clip and cables from the engine board.
12.Remove the carrier.
Note: When reinstalling, insure correct orientation of the support shaft bracket and linkage.
Repair Information
