Manuale di istruzioni
VP-D371i/D371Wi D372WHi/D374
Manual de Instruções do Utilizador
Indice
Índice
Definir o som do obturador Shutter Sound Som Obturador
Procurar rapidamente uma cena Definir a Memória Zero
Registrazione avanzata
PictBridgeTM apenas para a VP-D375Wi/D975Wi
102
107
108
Notas sobre a rotação do ecrã LCD
Notas sobre a limpeza das cabeças de vídeo
Avvertenze riguardanti la rotazione del display LCD
Avvertenze riguardanti la pulizia delle testine video
Avvertenze relative al copyright
Assistenza e parti di ricambio
Notas sobre a câmara de vídeo
Avisos relativamente aos direitos de autor
Funzioni
Conoscere la videocamera Apresentação da câmara de vídeo
Características
Accessori base
Acessórios básicos
Notas
Only
Vista frontale e sinistra
Vista frontal e esquerda
VP-D375Wi/D975Wi only
Tasto Q.MENU pagina Tasto …/ † W / T
Vista laterale sinistra Vista lateral esquerda
Botão Q.MENU página Botão …/ † W / T
Vista destra e superiore
Vista superior e direita
Jack
Tomadas
Vista posteriore e inferiore Vista posterior e inferior
Scheda di memoria utilizzabile
Cartões de memória que pode utilizar
# VP-D375Wi/D975Wi only
Telecomando solo VP-D375Wi/D975Wi
Telecomando apenas para as VP-D375Wi/D975Wi
Uso della maniglia e del copriobiettivo
PreparazionePreparativos
Utilizar a pega e a tampa da objectiva
Installazione della batteria al litio
Colocar a pilha de lítio
Uso della batteria agli ioni di litio
Utilizar a bateria de iões de lítio
Indicador de carga da bateria
Gestione del gruppo batterie
Gestão da bateria
Visualizzazione del livello di carica della batteria
Avvertenze riguardanti le batterie
Notas sobre a bateria
Collegamento di una fonte di alimentazione
Ligar a câmara de vídeo a uma fonte de alimentação
Informazioni sulle modalità operative
Modos de funcionamento
Uso di Quick Menu Menu Rapido
Utilizar o Quick Menu Menu Rápido
OSD in Camera Mode
OSD in Player Mode
Activar/desactivar OSDs opções de menu no ecrã
Attivazione e disattivazione dellOSD On Screen Display
Impostazione iniziale Definição inicial
Impostazioni del menu di sistema Definição do menu Sistema
Acertar o relógio Clock Set Conf. Relógio
Impostazione dell’orologio Clock Set Imp. Orologio
Italiano Impostazione iniziale Definição inicial
Remote Contr. Remoto depois, carregue no
Ligado ou Off Desligado depois, carregue
Se si imposta Remote Telecomando su Off
Definir o sinal sonoro Beep Sound Som Beep
Impostazione del suono bip Beep Sound Suono Bip
System Sistema , quindi premere
Premere il tasto … / † per selezionare On o
Premere il tasto … / † per selezionare Shutter
Seleccionar o idioma para as opções de menu Language
Selezione della lingua dell’OSD Language
Camera ou Player
Ver a demonstração Demonstration Demonstração
Demonstration Dimostrazione , quindi
Definição inicial definição do menu Visor
LCD Bright Lumin. LCD LCD Colour Colore LCD
LCD Bright Luminosid LCD LCD Colour Cor LCD
Regolare LCD Bright Luminosità LCD o LCD
Ver a data/hora Date/Time Data/Hora
Visualizzazione della data e dell’ora Date/Time Data/Ora
Date/Time Data/Ora, quindi premere il
Off, Date Data, Time Ora
Display Visualizaçã TV depois, carregue no
Registrazione di base Gravação básica
Uso del mirino
Inserimento / estrazione di una cassetta
Introduzir / Ejectar uma cassete
Varie tecniche di registrazione
Várias técnicas de gravação
Registrazione del primo filmato
Fazer a primeira gravação
Stby SP
Ricerca di una registrazione REC
Rever e procurar durante a gravação REC Search
Pesquisar gravação REC Search
Œœ REW
Ou Player
Contador de fita com indicador de Zero Memory Memória
Il tasto Self Timer
Start/Stop Iniciar/Parar
Zoom avanti e indietro
Aproximação/afastamento gradual da imagem
Button
Zoom lever
Uso di Dissolvenza a comparsa e Dissolvenza a scomparsa
60min Para iniciar a gravação
Arresto della registrazione
Para parar a gravação
Uso di Colour Nite
Utilizar o botão Colour Nite
Attenzione
Perigo
Registrazione avanzata Gravação avançada
√Record
Reduzir o ruído do vento WindCut Plus Anti-Ruído
WindCut Plus Anti-Ruído depois, carregue no
Auto
Ou Auto
Seleccionar o Real Stereo Estéreo Real
Selezione di Real Stereo Stereo reale
Solo in modalità Camera Modo Cam
Velocità di scatto consigliate durante la registrazione
Velocidades do obturador recomendadas durante a
Gravação
Ajustar a exposição quando gravar
Focagem automática / Focagem manual
Messa a fuoco automatica / Messa a fuoco manuale
Modalità Auto a
Modalità Sports Sport
Modo Auto a
Modalità Spotlight Riflettore
Program AE Programa AE depois, carregue
EASY.Q
Impostazione di White Balance Bilan. Bianco
Definir o White Balance Balanço Br
Selezionare Custom WB e premere il tasto
Applicazione di Visual Effects Effetti visivi
Aplicar Visual Effects Efeitos visuais
Selezione di Visual Effects Effetti visivi
Seleccionar Visual Effects Efeitos visuais
Effect Effetti video, quindi premere il tasto OK
Visual Effect Efeito Visual depois, carregue
Definir o 169 Wide
Impostazione di Wide
Desligado
Uso di Tele Macro
Utilizar a Macro teleobjectiva
Definir o estabilizador de imagem digital DIS
Menu DIS para Off Desligado
Registrazione avanzata Gravação avançada
BLC Off BLC On
Zoom digital Digital Zoom Zoom Digital
Aproximação/afastamento gradual da imagem com o
Selezione di Digital Zoom Zoom digitale
Seleccionar o Digital Zoom Zoom digital
Coloque o interruptor Power na posição Player
Registrazione di immagini fisse Gravação de fotografias
Ricerca di un’immagine fissa
Procurar uma fotografia
Regular o volume
Riproduzione Reprodução
Reproduzir uma cassete gravada no ecrã LCD
Riproduzione di una cassetta registrata sul display LCD
RiproduzioneReprodução
Reprodução X2 para a frente/para trás
Doppiaggio audio solo VP-D375Wi/D975Wi
Dobragem do som apenas para as VP-D375Wi/D975Wi
Player Modo Player. página
Riproduzione audio doppiato Reprodução do som dobrado
Sound1Suono 1 Riproduce l’audio
Riproduzione del nastro su schermo TV
Possibile collegare la videocamera a un
Funzione VOCE+ Função Voice + VOZ +
D372WHi/D374/D376 VP-D375Wi/D975Wi
Modo Player. pagina Player Modo Player. página
Start/Stop
Efeito Áudio
Effetti audio
Effect Effetti audio, quindi premere il tasto OK
Impostazione di Ingresso/Uscita AV
D371i/D371Wi/D372WHi/D375Wi/D975Wi
Definir a Entrada/Saída de AV apenas para as VP
Solo VP-D371i/D371Wi/D372WHi/D375Wi/D975Wi
Quando loperazione di copia è terminata
CollegamentoLigação
Quando a cópia estiver concluída
Registrazione copia su un nastro per
Videocamera
Câmara de vídeo
Per registrare da un televisore
Funzioni della scheda di memoria
Funções do cartão de memória
Introduzir um cartão de memória
Inserimento della scheda di memoria
Estrutura de pastas e ficheiros no cartão de memória
Struttura delle cartelle e dei file nella scheda di memoria
Formato dell’immagine
Formato da imagem
Seleccionar a Photo Quality Qualid Foto
Selezione della funzione Photo Quality Qualità Foto
Número de imagens no cartão de memória
Numero di immagini memorizzabili sulla scheda di
Selezione del formato di registrazione foto solo VP-D975Wi
Impostazione di File Number Numero di file
Desiderata Series Serie o Reset
Definir o File Number Número de ficheiro
Apenas para as VP-D375Wi/D975Wi
Tirar uma fotografia Jpeg para o cartão de memória
Ver fotografias Jpeg
Nenhuma imagem
No image! Nessuna immagine
Protect
To delete? Si vuole cancellare?
Eliminazione di immagini fotografiche e filmati
Apagar fotografias e imagens em movimento
Delete? Pretende apagar?
Image ! Nenhuma imagem
Immagine
Erro cartão memória
Delete All Apagar tudo
Atenção
Attenzione
Aparece a mensagem All files will be deleted
Pretende formatar?
Salvataggio di un filmato sulla scheda di memoria
Tempo di registrazione disponibile sulla scheda di memoria
Guardar imagens em movimento num cartão de memória
Tempo de gravação disponível no cartão de memória
Apenas para as VP-D375Wi/D975Wi
√ PLAY/STILL , œœ/ √√ REV/FWD e Stop
Durante la riproduzione di un filmato,i tasti Menu e
OK non sono disponibili. Per utilizzare i tasti
Menu e OK, interrompere la riproduzione. La
Now copying
Modo Player. pagina
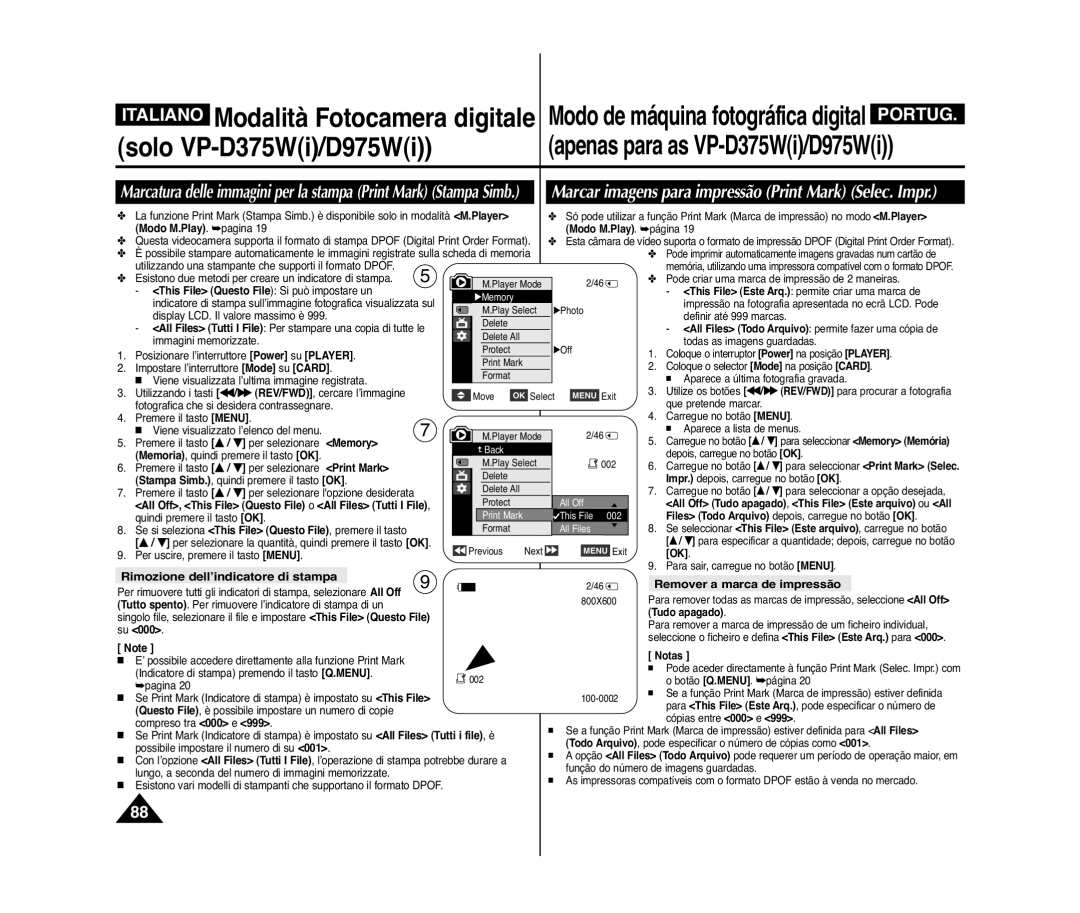
Rimozione dell’indicatore di stampa
Remover a marca de impressão
Stampa delle immagini Utilizzando PictBridgeTM
Imprimir imagens Utilizando a função PictBridgeTM
Collegamento a una stampante
Cancelar a impressão
Selezione delle immagini
Impostazione del numero di stampe
Seleccionar imagens
Trasferimento di dati standard IEEE1394 i.LINK-DV
Trasferimento dati Ieee Transferência de dados Ieee
Transferir ligações de dados standard DV IEEE1394 i.LINK
Stop
√ Notas
Italiano Interfaccia USB
Solo VP-D375Wi/D975Wi As VP-D375Wi/D975Wi
Uso dell’interfaccia USB
Utilizar a interface USB
Seleccionar o dispositivo USB USB Connect Conexão USB
Computer Computador ou Printer
Pode seleccionar Computer Computador
Pode seleccionar Printer Impressão para
Installazione del programma DV Media PRO
Installazione del programma
Instalar o programa DV Media Pro
Instalação do programa
Collegamento a un PC
Ligação a um PC
Scollegamento del cavo USB
Desligar o cabo USB
Uso della funzione PC Camera Fotocamera del PC
Utilizar a função de câmara para PC
Uso della funzione USB Streaming Streaming USB
Utilizar a função de fluxo USB
Uso della funzione Removable Disk Disco rimovibile
Utilizar a função de disco amovível
ManutenzioneManutenção
Al termine della registrazione
Depois de terminar uma gravação
Cassette utilizzabili
Pulizia e manutenzione della videocamera
Limpeza e manutenção da câmara de vídeo
Pulizia delle testine del video
Limpeza das cabeças de vídeo
Uso della videocamera all’estero
Utilizar a câmara de vídeo no estrangeiro
Risoluzione dei problemi Resolução de problemas
Display di auto diagnosi
Visor de diagnóstico automático
Formazione di condensa
Risoluzione dei problemi Resolução de problemas
Indicação Intermitê Informa que Acção Ncia No Memory Card
Sintomo Spiegazione/Soluzione
Sintoma Explicação/Solução
Impostazione delle voci di menu Definir opções do menu
Menu
Sottomenu Funzioni
Secundário Funções
Menu Modo disponível Funções
Secundário
Specifiche Características técnicas
Sistema
Generale Geral
Display LCD/Mirino
Índice remissivo
Italia Italy
Portugal
Contatta Samsung World Wide
Region Country Customer Care Centre Web Site
Contacte Samsung Global
Conformità RoHS