AT&T
Copyright 1994, AT&T All Rights Reserved August
Warranty
Security of Your System Preventing Toll Fraud
Trademarks
Contents
Connecting the Control Unit to the Network Interface
Installing the PC, CAT, or Printer
Installing Applications
Unit Load Calculation Worksheet
Figures
MFM
Connecting the Control Unit to the Network Interface
Installing the PC, CAT, or Printer
Ground-Start Button
Tables
Merlin Mail Ports Required
Important Safety Instructions
Page
Safety
Safety Xviii Installation
Intended Audience
How to Use This Book
Xx Installation
Lines, Trunks and Facilities
Terms and Conventions Used
Example Purpose
Product Safety Labels
Security
System Documents
Related Documents
AT&T
How to Comment on This Document
How to Comment on This Document Xxvi Installation
Order No -630-140 Date August
Merlin Legend Communications System Release
Introduction
Installation Sequence
System Forms
Connecting the Network Interface
Installling the Control Unit
Installing Telephones Required Adjuncts Optional
Upgrading the System
Connecting Data Equipment
Programming the System
Overview
Installing the Control Unit
Environment
Control Unit Requirements
Electrical Noise/Radio-Frequency Interference
Backboard Requirements
Hardware Preassemble Process
Installing the Backboard
AC Power and Grounding
Page
AC Grounding Requirements
Using an Ideal 61-035 Circuit Tester or Equivalent
AC Power Requirements Parameter Value
Measuring the AC Outlet Voltages
Unplug the circuit tester
Grounding Requirements
Central Office and AC Grounds
Approved Grounds
Central Office Trunk Protection
Heavy Lightning Protection
Installing 146A and 147A Protectors
Checking Unit Loads
Unit Loads for Hybrid/PBX Mode
Unit Loads
Auxiliary Power Units
Installing the Basic Carrier
Unit Loads for Key or Behind Switch Mode
Marking the Basic Carrier Screw Holes
Installing the Power Supply
Installing a Copper Shield
Turning Off the Power
Installing the Power Supply
Installing a Copper Shield in the Power Supply
Installing the Ferrite Cores
Installing the Power Supply Module Carrier
Installing the Ferrite Cores
Installing the Auxiliary Power Unit
Installing an Auxiliary Power Unit
Installing Expansion Carriers
Connecting the Carriers
Installing the Processor
Push firmly until the processor snaps into place
Installing the Processor in the Carrier
10. Installing the Processor into the Carrier
Guidelines
Installing the Modules
Installing Modules
Signaling Modes
Tie Trunk Signaling
Signaling Types
Tie Trunks
Mode
400EM Tie Trunk Module DIP Switches
Simplex Mode
Merlin
Signaling Formats for the 400EM Tie Trunk Module
11 EM Module Sample Dip Switch Settings for Signaling Types
Labeling
12. Line/Trunk and Telephone Jack Locations on Each Module
Replacing a Module
Installing the Control Unit
13. Removing Modules from the Carrier
Connecting the Control Unit to An AC Outlet
Turn on the power switch on the basic carrier power supply
Powering Up the System
Unplug the system from the AC outlet
Powering Down the System
Powering Down the System 46Installing the Control Unit
Installing Multi-Function Modules
Installing Telephones Adjuncts
Considerations
Risk of Electrical Shock Follow all warnings and cautions
Removing the User Card Tray and Line Cable
Releasing the Deskstand
Removing the Deskstand
Release and remove the module cover. See -5, -6,and Figure
Releasing the Module Cover Screw
Releasing the Module Cover
Removing the Module Cover
Removing an MFM Module
Install the new MFM. See Figure
Installing an MFM Module
Multi-Function Module
To remove the jack guard, see Figure
11. Removing the Jack Guard
To replace the module cover, see -12, -13,and Figure
12. Placing the Module Cover into the Locating Slot
13. Lowering and Locking the Module Cover
14. Replacing and Tightening the Module Cover Screw
15. Replacing the Deskstand
16. Lowering the DeskStand and Locking into Place
Replace the user card tray and line cable. See Figure
17. Replacing the User Card Tray and Line Cable
Power up the telephone. See Figure
Adjust the deskstand height. See Figure
19. Powering Up the Telephone after Installing the MFM
Test the MFM for T/R operation
Attach the adjunct to the MFM. See Installing Adjuncts
To connect an adjunct to a single-line telephone
20. Routing the Cords Through the Cord Channel
To connect an adjunct to an analog multiline telephone
General Purpose Adapter
Dial Dictation Devices
Credit Card Verification Terminals
Group Calling Delay Announcement Devices
Fax Machines
Headpieces
Headsets
One-Touch Operation All Telephones
Manual Operation Analog Multiline Telephones Only
21. Manual and One-Touch Headset Operation
Loudspeaker Paging Systems
Dual-Tone Multifrequency Dtmf Signaling
22. Single-Zone Paging with PagePac Plus
23. Single-Zone Paging with Customer-Supplied Amplifier
24. Single-Zone Paging with Upam
Modems
Merlin Identifier
Music On Hold and Magic on Hold
36Installing Telephones and Adjuncts
Music Port
Supplemental Alert Adapter
Supplemental Alerts
Unsupported Telephones, Adjuncts Adapters
27. Installing the Supplemental Alert Adapter
Unsupported Telephones and Adjuncts Model
Single-Line Telephones
Single-Line Telephones Description
Single-Line Telephones in Release 3.0 and Later
Installing Direct Station Selectors
Wire the two DSSs. See Figure
Adjust the angle of the DSS
Install the D8AC cord on the DSS
Wire the telephone to the DSS units. See Figure
28. Connecting One or More DSSs
29. Wiring for Auxiliary Power
Label the DSS designation cards
Considerations
Assembling MLX Telephones
Remove or adjust the deskstand. See Figure
30. Adjusting or Removing the Deskstand
Connect the line cords. See Figure
31. Connecting the Line Cords
Label the extension identification card
Connect the handset
33. Labeling the Extension
Prepare the handset holder for wall-mounting
34. Removing the Handset Holder
Wall mounting an MLX-10, MIX-10DP, or MlX-10D telephone
Replace the extension label and plastic cover
37. Mounting the Backplate
Label the button assignment card
38. Routing the Cord Through the Backplate
MDW 9000 Cordless/Wireless Telephones
Installing Cordless or Cordless/Wireless Telephones
Adjust the contrast on the telephone% display
MDC 9000 Cordless Telephone
Connecting Telephones To the Control Unit
Installing Telephones and Adjuncts
Wiring a Telephone for Two Voice Pairs
Even D8W
Remove the wires or the patch cord from the connecting block
Removing Damaged Connecting Blocks
40. Removing the Connecting Block
Page
Connecting the Control Unit to Network Interface
Network Interfaces Description Adapter
Wiring
Did
RJ21X Interface
RJ21X Network Interface Connector
RJ21X Wiring Field Hardware
Building the Wiring Field
RJ21X Wiring Field Tools
Using the D-Impact Tool to Seat the Conductors
See Labeling Trunks, later in this chapter, for instructions
RJ11 and RJ14 Interfaces
RJ11 and RJ14 Interfaces
RJ2GX Interface
RJ48C/X Interface
Testing Trunks
Testing Loop-Start Trunks
Testing Ground-Start Trunks
Labeling Trunks
Installing the Channel Service Unit
Acculink CSUs
Page
3150 Front Panel
Page
Connecting a PC to the Control Unit
Installing the PC, CAT, or Printer
Connect the D8W cord
Connecting a PC Within 50 Feet
Connecting a PC Within 50 ft .2 m
Connecting a PC More Than Feet 15.2 m Away
Page
Connecting a PC More Than 50 ft .2 m Away
Connecting a Printer To the Control Unit
Connecting a CAT To the Control Unit
8Installing the PC, CAT, or Printer
Connecting a CAT and Printer On the Same AC Outlet
Connecting a CAT and Printer on the Same AC Outlet
Connecting a CAT and Printer on a Different AC Outlet
Page
Page
Merlin Smdr
Page
Connecting a Printer Within 50 Feet 15.2 m
Connecting a Printer Within 50 ft .2 m
Connecting a Printer 50 Feet Or More Away
18Installing the PC, CAT, or Printer
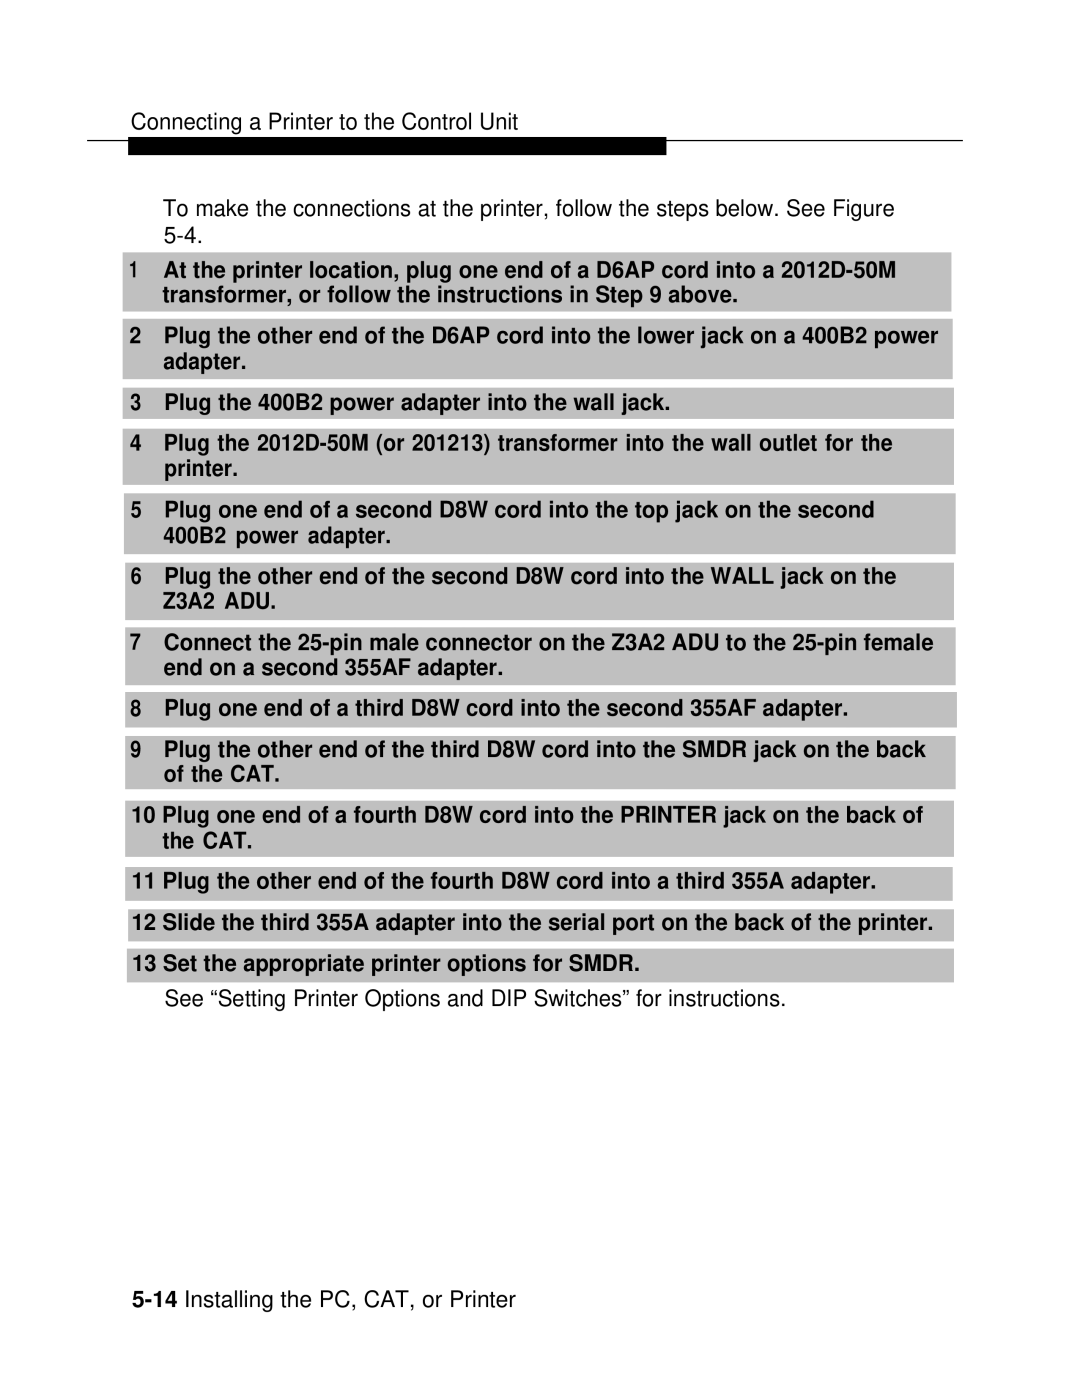
Connecting a Printer More Than 50 ft .2 m Away
Connecting the 24813 Adapter and the 201213 Transformer
Setting Printer Options and DIP Switches
On next
AT&T 572 Printer Options Function Menu Status
BPS
Function Menu Status
Switch
AT&T 475/476 Printer DIP Switch Settings
DIP 2-CM
AT&T CAT Printer DIP Switch Settings Control Switch
Page
Data Stations
Connecting Data Equipment
Station For voice
Data Station Configurations
Telephone GPA or
Modem Data Stations
7500B Data Stations
Analog Voice and Modem Data Stations
GPA Settings
Setting Up
Connect the GPA to the analog multiIine telephone
Connect the modem to the GPA
Analog Voice and Modem Data Equipment Configuration
Connect the modem to the control unit
Modem Data-Only Stations
Modem Data-Only Equipment Configuration
MLX Voice and Modem Data Stations
Modem Data and MLX Voice Equipment Configuration
Connect the MLX telephone to the control unit
Connect the modem to the MFM in the MLX telephone
MLX Voice and 7500B Data Stations
Connect the 7500B data module to the control unit
MLX Voice and 7500B Data Equipment Configuration
7500B Data-Only Stations
B Data-Only Equipment Configuration
Acculink 3150 CSU
Video Conferencing Data Stations
Page
Video Conferencing Configuration
Page
B Data Module Settings Kbps
7500B Data Module and CSU Settings
Initializing the System
Initializing and Testing System
Restoring from the Translation Memory Card
Programming Guides
Restoring from the System Programming Disk
Perform a System Erase frigid start
Testing MLX Telephones
Setting the Time and Date
Testing the System
Page
Testing MLX Telephones with MFMs
Testing MLX Display Telephones
Hang up the handset to leave test mode
Press the unlabeled display buttons
Testing Telephones for Outside Dial Tone
Testing Telephones for Dial Tone
Hang up
Turn off the Message light
Testing Analog Multiline Single-Line Telephones
Dial *03 followed by the trunk ID number 01 through
Testing did Trunks
Testing Incoming Automatic-Start Tie Trunks
Testing Tie Trunks
Testing Two-Way Automatic-Start Tie Trunks
Testing Outgoing Automatic-Start Tie Trunks
Testing Incoming Dial-Repeating Tie Trunks
Testing Two-Way Dial-Repeating Tie Trunks
Testing Outgoing Dial-Repeating Tie Trunks
Verify that you have good two-way communication and hang up
Testing Selected System Features
Group Calling Test
ARS and Smdr Tests
Coverage Test
System Speed Dial Test
Testing Night Service
Testing the DSS
Testing the Paging System
Testing the Dictation System
Hang up Repeat Steps 1 through 3 for all paging zones
Testing Music On Hold
Make an announcement into the handset
Ground-Start Button
Testing the Power Failure Transfer Jacks
If you hear reorder tone, try again
Testing Touch-Tone Receivers
Have that person call the number after you hang up
Repeat the test for each TTR
Installing the Control Unit’s Housing
Installing the Top Cover
Top Cover
Installing the Control Unit Front Cover
Installing the Front Cover
Installing Applications
Voice Messaging Systems Touch-Tone Receivers
Automated Document Delivery System
Hardware Requirements
Call Accounting System
Hardware and Software Requirements
Page
CAS Documentation
Call Accounting Terminal
8Installing Applications
CAT Documentation
Call Management System
Hardware and Software Requirements
CMS Documentation
Consideration
Conversant
Conversant Intro Documentation
Integrated Solution
Hardware Requirements
Installing Applications
AT&T Attendant
Merlin Mail Ports Required Number of Jacks Required
Merlin Mail
Considerations
Hardware Requirements
Merlin PFC
Hybrid/PBX and Key Modes
Behind Switch Mode
PassageWay Direct Connect Solution
Hardware Requirements
System Programming Maintenance SPM
Hardware Requirements
Page
Upgrading the System
Removing the Control Unit Housing
Removing the Control Unit Housing
4Upgrading the System
Powering Down the System
Install or replace any modules
Install any expansion carriers
Upgrading the Control Unit
Replace the processor module. See Figure
Remove the housing clips from the right side of the module
Replacing the Housing Clips
Beware of hazardous voltages
Replacing a Module in the Carrier
Modifying the Processor For Key Mode
Removing the Processor Module Cover
Removing the Processor Module Circuit Board
Changing the Key Mode Switch Position to Closed
Install SPM Backup system programming
Completing the Upgrade
If applicable, program new features
Convert the backup file
Install SPM
Remove the control unit housing
Program the system
Replace the control unit housing
Release 2.0 or Earlier
Installing the Control Unit Housing
Completing the Upgrade 18Upgrading the System
System Numbering Forms
Figure A-1. Form 2a, System Numbering Extension Jacks
Form 2a, System Numbering Extension Jacks
Page
Figure A-2. Form 2b, System Numbering Digital Adjuncts
Form 2b, System Numbering Digital Adjuncts
Figure A-3. Form 2c, System Numbering Line/Trunk Jacks
Form 2c, System Numbering Line/Trunk Jacks
Figure A-4. Form 2d, System Numbering Special Renumbers
Form 2d, System Numbering Special Renumbers
Unit Load Calculation Worksheet
Unit Load Worksheet
Did
Module Qty Unit Load = Total
Qty Equipment
Network Access Lines
Telephones
Unit Load Hybrid/PBX or Modified = Total Square
Optional Equipment
Page
DS1 GS/LS
Qty Unit Load = Total Hybrid/PBX or Modified Square
Page
Unit Load Calculation Worksheet 10Installation
Index
IN-2Installation
Installation IN-3
IN-4Installation
Installation IN-5
IN-6Installation
Installation IN-7
IN-8Installation
Installation IN-9
Index IN-10Installation
Maintenance and Troubleshooting
All Rights Reserved August
Copyright 1994, AT&T
Contents
Error Logs, Access Logs, and System Inventory
Central Office Problems
GL Glossary Index
Figures
Backing Up with a Memory CardChapter Name
Function of PC Keys in SPM
Tables
LMPORTANT Safety lNSTRUCTlONS
Page
Safety
Safety Xiv Maintenance and Troubleshooting
About This Book
Terms and Conventions Used
On next
Typographical Conventions
Product Safety Labels
System Documents
Document No. Title
Telephone User Support
System operator Support
Documentation for Qualified Technicians
Document No Title
Miscellaneous User Support
Feedback Form
Equipment
Maintenance Terminal
Tools
MLX-20L Failure
On-Site Programming Maintenance
Setting Up the MLX-20L Console
Figure l-l. Setting Up the MLX-20L Console
Setting Up the PC
Setting Up the PC
Remote Programming Maintenance
Connect the PC and modem
Setting Up Equipment for Remote Maintenance
Starting SPM
Using SPM
With a Direct Local Connection
Press any key
Enter the password
When you hear the modem tone, hang up
With a Local or Remote Modem Connection
Dialing the System Operator
Dialing the Modem Directly
Select an option
Console Display/Instructions
SPM Display
SPM Display
Conf
Function of PC Keys in SPM Console SPM Function
←Bksp
Exiting SPM
Preparation for Hardware Maintenance
Removing the Control Unit Housing
16Introduction
Disconnecting AC Power
Disconnecting AC Power
Maintenance Strategy
Maintenance Strategy
Automatic Tests
Alarms
Trouble Reports
System Restarts
Clearing Alarms
Cold Start Restart
Warm Start
Frigid Start System Erase
Isolating the Trouble
Check Telephone Problems
Check the Error Logs
Check the power supply LED
Trouble Accessing the Error Logs
Check the Access Log
Check the Processor
Check the Power Supply
Check the Modules
Check the Control Unit Carrier
Check the Central Office
Escalating the Problem
Check the Trunks
Checking Unit Loads
Unit Loads for Hybrid/PBX Mode
Unit Loads for Key or Behind Switch Mode
28Introduction
Error Logs
Error Logs, Access Logs, System Inventory
Transient/Permanent Error Thresholds Code Error Description
Checking the Error Logs
More → More → Error Log
Summary
Select an error log option
From the Maintenance menu, select the System option
Select Error Log
Console Display/Instructions Additional Information PC
Checking Transient Errors
Interpreting Error Codes
Checking the Last 10 Errors
000l
Error Codes Action Description
Start
Error Action Codes Description
8Error Logs, Access Logs, and System Inventory
Full
Error Codes Description Action
10Error Logs, Access Logs, and System Inventory
6COA DS1
PRI B-CH Group Inconsist
7404
Error Codes Descrption Action
Not in Standby Mode
Miscellaneous Error
On Hook Before Ready
840D Incorrect Firmware State
Reviewing the Access Log
Access Log
Scanning the Log
Display the first screen of the Access Log
More
System Inventory
Select the Inventory option
Reviewing the Screen
Xx = slot number entered in Step
Phantom Modules
Telephone Problems
Troubleshooting Telephone Problems Symptom Section
Fixing Telephone Problems
General Telephone and Wiring Problems
Check the LEDs on the module
Voice Transmission Problems
Analog Multiline Telephone Problems
Move the T/P switch to its normal position
If the LEDs do not light, retest the original telephone
Call Forwarding Problems
Single-Line Telephone Problems
MLX Telephone Tests
LEDs should toggle on and off
MLX Telephone Display Buttons
System Requirements For Touch-Tone Receivers
If these tests fail, replace the MFM
System Requirements for Touch-Tone Receivers
Modules with TTRs No. of TTRs
Backing Up System Programming
Control Unit Problems
Checking the LED
Power Supply Problems
Checking the Power Supply
Checking the Interlocking Post
Replacing the Ring Generator
Power Supply Interlocking Post
App. Code
PEC and Apparatus Codes for 012 Modules
6Control Unit Problems
Replacing a Ring Generator
Replacing Auxiliary Power Units
Replacing an Auxiliary Power Supply
Power down the system
Replacing the Power Supply
Insert a new power supply
Peek
Processor Problems
Select the Demand Test
From the Maintenance menu, select the Slot option
Specify Slot
Dial a memory address
Select the Peek option
Continue
Poke
Select Continue
Console Display/Instructions Additional Information
Select Poke two times
System Erase Frigid Start
Select System Erase twice
Select Yes
Forced Installation of System Software
Menu →Maintenance →System →
Inserting a Memory Card
Observe the memory card validation screens
Initiate the software installation
Select Upgrade/install
MemCard Rel Vnn.mm Current
If the release number is the one you want, select Yes
Restore system programming
Error Conditions During Forced Installation
Processor Problems
Memory Card Is Corrupt
Missing Card or Card Not Inserted Correctly
Memory Card Is Wrong Type
Power Cycle During Installation
Other Error Conditions
Removal of Memory Card During Installation
System Busy
Pressing hidden key two times will delete existing program
If possible, save system programming
Install the new processor module Power up the system
Replacing the Processor Module
Replacing the Feature Module
Replacing the Feature Module
Module Tests
Module Problems
Module Test Process
Module Test Process
Power supply
Busy-Out/Reset
System Components
Test Notes
Run the internal Ioopback test
Busy-out or reset the module
Run the board controller test
For 100D modules, continue with the CSU Ioopback test
Busy-Out and Reset
Persistent Module Problems
Specify the slot number n=00 to
Busy-Out Summary
Select Busy-Out
Console DispIay/Instructions
Console Display/Instructions Additional Information P C
Reset Summary
Specify the slot number nn = 00 to
Select Reset
Restore
Specify the slot number n= 00 to
Enter →Restore →Yes
Select the Restore option
Internal Loopback Test
Menu →Maintenance →Slot
Select Internal Loopback Test
Specify the slot number nn = 00 to
Select Demand Test
Screen below smearsI
Interpreting Test Results
Slot empty or not valid
Restoring the Module
Board Controller Test
Select the Board Controller Test
Board aaaaaaaaaaaaaaaaa
Select Test Once or Repetitive
Channel Loopback Test
Summary
Select the B-Channel Loopback test
From the main menu, select the Slot option
Specify the MLX module’s 2-digit slot number nn = 00 to
Screen below appears only if the test fails
Replacing Modules
Channel Loopback Errors Error Messages Corrective Action
To replace a module, follow the steps below
Checking Unlabeled Wiring
Upgrading Circuit Module Firmware
Summary
Inserting the Upgrade Memory Card
Specify the slot number nn =00 to
Select Upgrade
Module Problems Screens below appear during the procedure
Observe the status screen below
Memory Card In Use By Another Feature
Error Conditions During Firmware Upgrade
Module Cannot Be Upgraded
Select Exit and reinitiate the upgrade procedure
Module Error
Xx = slot selected in Step
Memory Card File Error
Flash ROM Fails to Erase
Board Memory Programming Failure
100D Module Problems
Upgrade Attempted on an Empty Slot
CSU Loopback Test
Error Events
Busy-out the 100D module Prepare the CSU
551 T1 CSU Loopback Connection
ESF T1 CSU DTE Loopback Connection
S t P b k L p b k P t r n s
U E S F
A t T e x t C n f i g
LLB PLB DLB
O p b a c k O r t L L B P L B
O p b a c k
Select the CSU Loopback Test
Specify the 2-digit slot number Nn = 00 to
Screen below appears when the test fails
Fmwr not in Standby Node
Automatic Tests for the 100D Module
100D Module Error Events
Select the current hour or a previous hour
Select Error Events
Specify the 2-digit slot number nn= 00 to
Enter →Clock →Exit
100D Module Clock Status
Select Clock
From the Maintenance menu, select. the Slot option
Unplug the control unit from the AC outlet
Carrier Problems
Removing the Faulty Carrier
System Status
Checking System and Slot Status
Replacing the Carrier
Select Status
Red LED
Interpreting the System Status Screen
Yellow LED
Green LED
→Enter →Status
Slot Status
F10
Select the Status option
LED
Checking System and Slot Status 92Control Unit Problems
Troubleshooting Trunk Problems
Trunk Errors
Troubleshooting Trunk Symptoms Section
Manual Correction of Trunk Problems
If the module continues to malfunction, replace it
Outgoing Trunk Problems
Check for outside dial tone at the network interface
Testing Trunks Automatically
Incoming Trunk Problems
Maintenance-Busy Status
Place an incoming call through the troubled trunk
Maintenance-Busy Causes
Permanent Errors
Ground-Start GS Trunk
Maintenance-Busy Programming
Loop-Start LS Trunk
TieTrunk
Checking Ports
Checking Trunk Maintenance-Busy Status Summary
Select the Line/Trunk Option
From the Maintenance menu, select the Port option
Select trunk Status Xxx = line number entered in Step
Checking Extension Maintenance-Busy Status Summary
Select Next to see the status
Next trunk
Select the Station extension option
Busying-Out a Trunk Summary
Specify the dial plan number line for the trunk nnn = 801 to
Busying-Out an Extension Summary
14Central Office Problems
Screen below appears when Busy-Out is completed successfully
Restoring a Trunk Summary
Additional Information
Restoring an Extension Summary
Select Restore
Console Procedure
Resetting an RS-232 Port
PC Procedure
→ F1 → F3
Specify the RS-232 port
Resetting the Processor’s Internal Modem Summary
Select the Modem option
Screen below is shown until Reset fininshes or fails
Auditing Lines Summary
Auditing DS1 PRI B-Channels
Select the B-Channel option
Select Audit Line
Auditing Calls Summary
Select Audit Call
Installing the Control Unit Housing Release 2.1 or Later
Conclusion of Hardware Maintenance
To install the front cover, see -2and follow these steps
Installing the Control Unit Top Cover Release 2.1 and Later
Conclusion of Hardware Maintenance Front cover
Assemble the control unit housing. See Figure
Installing the Control Unit Housing Release 2.0 or Earlier
Assembling the Control Unit Housing Release 2.0 and Earlier
Installing the Control Unit Housing Release 2.0 and Earlier
Support Telephone Number
Customer Support Information
Customer Support Information
FCC Notification and Repair Information
Page
Installation and Operational Procedures
DOC Notification and Repair Information
DOC Certification No 4095A CSA Certification No. LR Load No
Customer Support Information
Maintenance and Troubleshooting A-9
10Maintenance and Troubleshooting
Security of Your System Preventing Toll Fraud
Page
Limited Warranty Limitation of Liability
14Maintenance and Troubleshooting
Limitation of Liability
Voice Mail Systems
Page
Remote Administration Maintenance
Page
Figure B-1
Figure B-1. Form 2a, System Numbering Extension Jacks
Page
Figure B-2. Form 2b, System Numbering Digital Adjuncts
Figure B-3. Form 2c, System Numbering Line/Trunk Jacks
Figure B-4. Form 2d, System Numbering Special Renumbers
Unit Load Calculation Worksheet
Unit Load Worksheet
MLX
Network Access Lines
Optional Equipment
Page
Telephones
Unit Load Calculation Worksheet
Page
Page
Backing Up with a Memory Card
Card Types
Figure D-1. Pcmcia Transition Memory Card
Figure D-2. Inserting the Memory Card
Inserting the Card
Unformatted Card
Memory Card Formatting
Format Warning
Procedure Backup
Backup
Summary Backup
Select the System menu
Select Back/Restore
Select Backup
Save your entry
Select the backup filename
Rename the backup file n = 1 to 11 characters
Respond to the prompt
Observe the backup progress screen
Observe the backup completion screen
Summary Automatic Backup
Automatic Backup
Select Auto Backup
Procedure Automatic Backup
Select Off
Make a selection
Erase the current daily backup time
Daily Backup Procedure
Erase the current weekly backup day and time
Backup Messages
= backup filename
Backup Canceled
Card Removed While Backup Is in Progress
Card Is Write-Protected
Card Missing or Card Not Inserted Correctly
Card Failure
Summary Restore
Select Restore
Procedure Restore
Observe the restore progress screen
Select the restore file
Observe the restore file validation screen
Card Missing or Card Not Inserted Correctly
Restore Messages
Wrong System Programming Port
Card Removed after Confirmation
Card Failure after Confirmation
Release Mismatch
Board Mismatch
Wrong Type of Card
Strap in Place for Key Mode but Mode is Set To Hybrid
Release 2.1 and Earlier
Modifying a Release 2.1 or Earlier Processor for Key Mode
Figure E-1. Modifying the Processor for Key Mode
Installing the Control Unit Housing Release 2.1 and Earlier
Figure E-2. Installing the Control Unit Housing
ALS
Adds
ANI
AMI
ARS
Ascap
Asynchronous data
AT&T Switched Network Audix Voice Power
Transmission
AT&T Attendant
B8ZS
BIS
Board assignment Board renumbering Bus Button Byte
CCS
CAS
CAT
CMS
CSU
COR
CRC
DHG
DCE
DFT
Did
Dnis
DLC
DOS
DS0
EIA
DSS DTE
ESS
ESF
FCC
FRL
Frame Framing format frequency generator
General-Purpose Adap See GPA Glare
GPA
Iclid
Hfai
HFU
II/III
Isdn
Kbps Key mode
Isdn 7500B Data Module
Jack
LED
LAN
LDN
Local loop
Access
Logical ID
Loop-start trunk
MLX-10DP
MFM
MLX-10 or MLX-10D telephone
Glossary
OPX
OPT
PBX
PRI
PFT
RAM
QCC
SAA
ROM
SDN
SID
Single-line telephone
Simplex signaling
Slot
Smdr
Programming Maintenance
System acceptance test System Access buttons
Supplemental Alert See SAA Adapter
System date
TTR
TDM
VAC
UPS
VDC
VMI
Maintenance and Troubleshooting IN-1
IN-2Maintenance and Troubleshooting
Maintenance and Troubleshooting IN-3
IN-4Maintenance and Troubleshooting
Maintenance and Troubleshooting IN-5
Index