Digital Video Camcorder
AD68-01227K
Contents-ÂÒȘ¸ÏÂÌ·
¡Ì··Ò·„˘„fi
Advanced Recording
102
100
101
103
≈ȉÔÔÈfiÛÂÈÚ Í·È Ô‰Á„flÂÚ ·Ûˆ‹ÎÂÈ·Ú
ÁÏÂÈ˛ÛÂÈÚ Û˜ÂÙÈÍ‹ Ï ÙÔÌ Í·Ë·ÒÈÛϸ Ù˘Ì Íˆ·Î˛Ì ‚flÌÙÂÔ
Correct Disposal of This Product
Servicing & Replacement Parts
ÁÏÂÈ˛ÛÂÈÚ Û˜ÂÙÈÍ‹ Ï ٷ ÌÂıÏ·ÙÈÍ‹ ‰ÈÍ·È˛Ï·Ù·
Waste Electrical & Electronic Equipment
Features
·ÒÂÎ͸ÏÂÌ· Ôı ·Ò›˜ÔÌÙ·È Ï ÙÁ ‚ÈÌÙÂÔÍ‹ÏÂÒ·
Accessories Supplied with Camcorder
Basic Accessories
CD ÎÔ„ÈÛÏÈÍÔ˝
TFT LCD Screen Internal Microphone
ÒÔÛÙÈÌfi & ·ÒÈÛÙÂÒfi ÎÂıÒ‹
VP-D375Wi/D975Wi only
ÁÏÂÈ˛ÛÂÈÚ
¡ÒÈÛÙÂÒfi ÎÂıÒ‹
Left Side View
Menu Button T Button
Jacks
ƑÂÓÈ‹ & Â‹Ì˘ ÎÂıÒ‹
’Ô‰Ô˜›Ú
Usable Memory Cards
Rear & Bottom View flÛ˘ Í·È Í‹Ù˘ ÎÂıÒ‹
ÒÁÛÈÏÔÔÈfiÛÈÏÁ Í‹ÒÙ· ÏÌfiÏÁÚ
Remote Control VP-D375Wi/D975Wi only
‘ÁΘÂÈÒÈÛÙfiÒÈÔ Ï¸ÌÔ „È· Ù· ÏÔÌٛη VP-D375Wi/D975Wi
Installing the Lens Cover after Operation
Using the Hand Strap & Lens Cover
Hand Strap Adjusting the Hand
ÒfiÛÁ ÙÔı ÈÏ‹ÌÙ· ˜ÂÒÈÔ˝ Í·È ÙÔı ͷνÏÏ·ÙÔÚ ˆ·ÍÔ˝
Precaution regarding the Lithium Battery
Lithium Battery Installation
Lithium Battery Installation for the Internal Clock
‘ÔÔË›ÙÁÛÁ Ï·Ù·Òfl·Ú ÎÈËflÔı
Charging, Recording Times based on Model and Battery Type
Using the Lithium Ion Battery Pack
Charging the Lithium Ion Battery Pack
ÒfiÛÁ ·̷ˆÔÒÙÈʸÏÂÌÁÚ Ï·Ù·Òfl·Ú ȸÌÙ˘Ì ÎÈËflÔı
≈ψ‹ÌÈÛÁ ÛÙ‹ËÏÁÚ Ï·Ù·Òfl·Ú
Battery Level Display
Battery Pack Management
ƑÈ·˜ÂflÒÈÛÁ Ï·Ù·Òfl·Ú
ÁÏÂÈ˛ÛÂÈÚ Û˜ÂÙÈÍ‹ Ï ÙÁÌ Ï·Ù·Òfl·
˝Ì‰ÂÛÁ Á„fiÚ ÒÂ˝Ï·ÙÔÚ
Connecting a Power Source
Using a Household Power Source
About the Operating Modes
Cam Mode VP-D375Wi/D975Wi only
For example Setting the White Balance
Camera Mode
Player Mode VP-D375Wi/D975Wi only
Battery Level Visual Effects Mode page 52 EASY.Q Wide
OSD in Camera Mode
OSD in Player Mode
Volume Control Message Line DV in DV data transfer mode
OSD On Screen Display in M.Cam/M.Player Modes
OSD in M.Cam Mode
OSD in M.Player Mode
VP-D375Wi/D975Wi only
˝ËÏÈÛÁ ÙÔı ÒÔÎÔ„ÈÔ˝ Clock Set
Setting the Clock Clock Set
Set the Power switch to Camera or Player
Displays in this manual
˝ËÏÈÛÁ ÏÂÌÔ˝ ÛıÛÙfiÏ·ÙÔÚ
Press the / button to select Beep
Setting the Beep Sound Beep Sound
˝ËÏÈÛÁ ÙÔı fi˜Ôı ÏÈ Beep Sound
Sound, then press the OK button
˝ËÏÈÛÁ ÙÔı fi˜Ôı ÙÔı ÍÎÂflÛÙÒÔı Shutter Sound
Setting the Shutter Sound Shutter Sound
›ÛÁ Tape
Selecting the OSD Language Language
Pûòòíëè
Viewing the Demonstration Demonstration
Set the Mode switch to Tape
Press the / button to select System, then press
Adjusting the LCD Screen LCD Bright/LCD Colour
˝ËÏÈÛÁ ÙÁÚ Ô˸ÌÁÚ LCD LCD Bright/LCD Colour
Time, Date&Time
JAN.2007
˝ËÏÈÛÁ ÙÁÚ Ô˸ÌÁÚ TV TV Display
Setting the TV Display TV Display
Set the Power switch to Camera or Player
·È ÙÁÌ ÙÁθҷÛÁ
Inserting / Ejecting a Cassette
Using the Viewfinder ÒfiÛÁ ÙÔı ÛÍÔ½ÙÒÔı
Adjusting the Focus
≈ÈÛ·„˘„fi / ÂÓ·„˘„fi Í·Û›Ù·Ú
Self recording
Various Recording Techniques
ƑÈ‹ˆÔÒÂÚ Ù˜ÌÈÍ›Ú Â„„Ò·ˆfiÚ
Recording with the Viewfinder
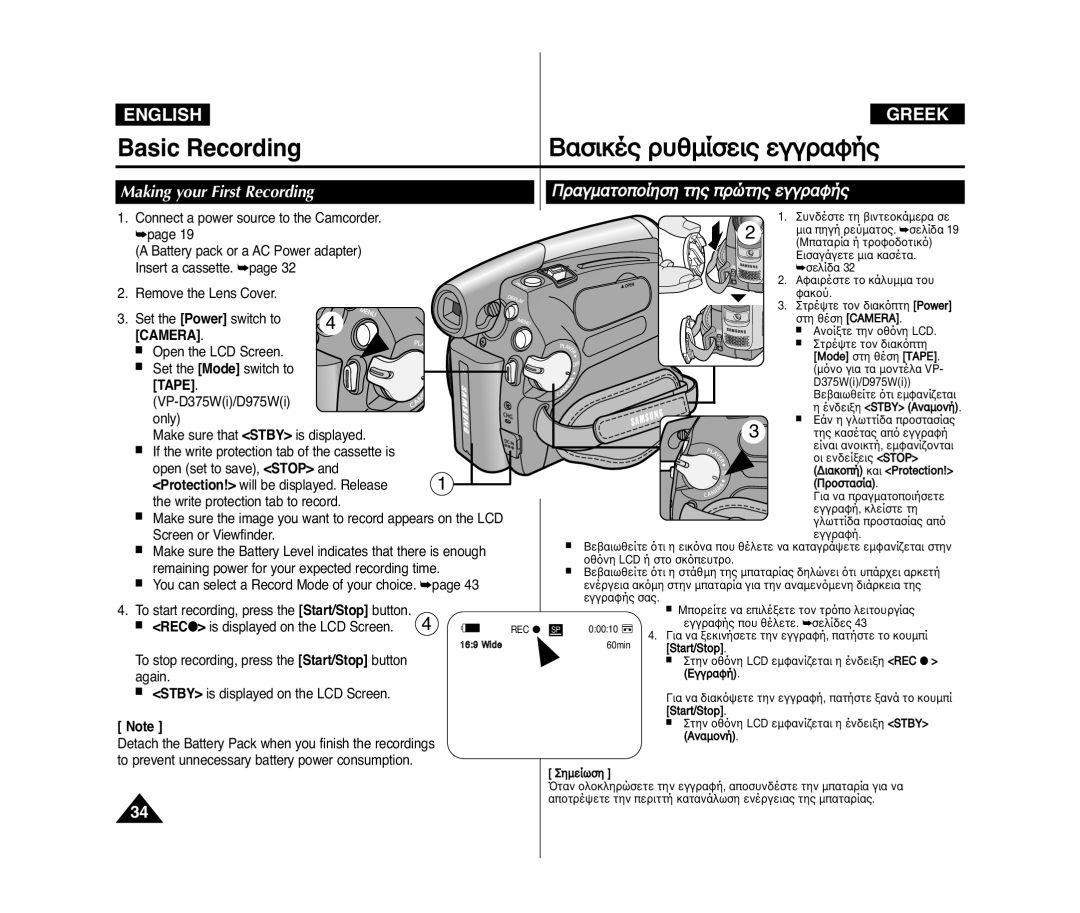
To start recording, press the Start/Stop button
Making your First Recording
·„Ï·ÙÔÔflÁÛÁ ÙÁÚ Ò˛ÙÁÚ Â„„Ò·ˆfiÚ
REC is displayed on the LCD Screen
KÔıÏÈ‹ ÏÁ ‰È·Ë›ÛÈÏ· Í·Ù‹ ÙÁ ÎÂÈÙÔıÒ„fl·
Recording with Ease for Beginners EASY.Q Mode
Unavailable buttons during operation
Words EASY.Q and DIS are displayed at the same time
Record Search REC Search
Reviewing and Searching a Recording REC Search
¡Ì·ÊfiÙÁÛÁ „„Ò·ˆfiÚ REC Search
00000
Camera
Self Timer
ÙÁΘÂÈÒÈÛÏÔ˝ ÙÁÚ ‚ÈÌÙÂÔÍ‹ÏÂÒ·Ú
Ûùáì Ô˸ÌÁ
Zooming In and Out
Ä›ËıÌÛÁ Í·È ÛÏflÍÒıÌÛÁ
ÍÔÌÙ‹
To Stop Recording
ÒfiÛÁ Ù˘Ì ÎÂÈÙÔıÒ„È˛Ì Fade In Í·È Fade Out
To Start Recording
√È· ›Ì·ÒÓÁ ÙÁÚ Â„„Ò·ˆfiÚ
ÒfiÛÁ ÙÁÚ ÎÂÈÙÔıÒ„fl·Ú Colour Nite
Set the Power switch to Camera Set the Mode switch to Tape
Please disable 169 Wide mode to use this function.
Light can become extremely hot
D975Wi only modes.
Selecting the Record Mode & Audio Mode
DV in or AV in VP-D371i/D371Wi/D372WHi/D375Wi
Modes. This Camcorder records sound in two ways Bit, 16Bit
·Ù·ÛÙÔÎfi ËÔÒ˝‚Ôı ·Ì›ÏÔı WindCut Plus
Cutting Off Wind Noise WindCut Plus
Or Auto
˝ÌËÂÙÂÚ ÒıËÏflÛÂÈÚ Â„„Ò·ˆfiÚ
Press the … / † button to select Record, then
Adjusting the Exposure When Recording
Setting the Shutter Speed & Exposure
Recommended Shutter Speeds when Recording
250, 1/500, 1/1000, 1/2000, 1/4000 or
Auto Focus
Auto Focus / Manual Focus
¡ıٸϷÙÁ ÂÛÙfl·ÛÁ / ÃÁ ·ıٸϷÙÁ ÂÛÙfl·ÛÁ AF/MF
Manual Focus
Portrait mode
Auto a mode
Sports Mode
Spotlight mode
Setting the Program AE
EASY.Q
Setting the White Balance
˝ËÏÈÛÁ ÙÁÚ …ÛÔÒÒÔfl·Ú ÎÂıÍÔ˝ White Balance
Indoor, Outdoor or Custom WB, then
Applying Visual Effects
≈ˆ·ÒÏÔ„fi ÔÙÈÍ˛Ì Âˆ› Visual effect
Selecting the Visual Effects
Nite
Setting the 169 Wide mode
Set the Mode switch to Tape or Card
Using the Tele Macro Macro
ÒfiÛÁ ÙÁÚ ÎÂÈÙÔıÒ„fl·Ú Tele Macro
DIS function in 169 Wide mode may produce lower
You can directly access the DIS function using the Q.MENU
Or Pastel2 is not available in the DIS mode
Quality than in normal mode
˘ÙÈÛÏÔ˝ BLC
Using Back Light Compensation Mode BLC
BLC Off BLC On
≈ÈÎÔ„fi ÙÁÚ ÎÂÈÙÔıÒ„fl·Ú Digital Zoom
Selecting the Digital Zoom
Value Off, 100x, 200x, 400x or
Still Image Recording Àfi¯Á ˆ˘ÙÔ„Ò·ˆÈ˛Ì
Please disable 169 Wide mode to use this function
Searching for a still image
Playing Back a Tape on the LCD Screen
Adjusting the LCD Bright/LCD Colour during Playback
Adjusting the Volume
Ô˸ÌÁ LCD
Picture Search Forward/Reverse
Various Functions while in Player Mode
Playback Pause
Slow Playback Forward/Reverse
¡Ì··Ò·„˘„fi Í·Ò›-Í·Ò› ¸ÌÔ „È· Ù· ÏÔÌٛη VP-D375Wi/D975Wi
Reverse Playback VP-D375Wi/D975Wi only
X2 Playback Forward/Reverse VP-D375Wi/D975Wi only
Forward frame advance
Audio Dubbing VP-D375Wi/D975Wi only
ÃflÓÁ fi˜Ôı ϸÌÔ „È· Ù· ÏÔÌٛη VP-D375Wi/D975Wi
Dubbed Audio Playback ¡Ì··Ò·„˘„fi ÏÈÓ·ÒÈÛÏ›ÌÔı fi˜Ôı
Player
¡Ì··Ò·„˘„fi Í·Û›Ù·Ú Ûùáì ÙÁθҷÛÁ
Connecting to a TV which has
Tape Playback on TV Screen
Playing back on a TV Monitor
˝Ì‰ÂÛÁ Ï ÙÁθҷÛÁ ˜˘ÒflÚ ‚˝ÛÏ·Ù· ÂÈÛ¸‰Ôı Audio/Video
Connecting to a TV which has no Audio/Video Input Jacks
Power switch to Player
¡Ì··Ò·„˘„fi
ÀÂÈÙÔıÒ„fl· ÷ŸÕ«+
Voice + Function
Voice+
«˜ÁÙÈÍ‹ ˆ›
Audio Effect
≈ÈÛ·„‹„ÂÙ ÙÁÌ Í·Û›Ù· Ï ÙÔÌ Â„„„ҷÏÏ›ÌÔ
External device Select this when recording the contents
Out Select this when copying or playing
Back the contents of this camcorder onto
When recording images from a VCR, playback
ºÙ·Ì ÔÎÔÍÎÁÒ˘ËÂfl Á ·ÌÙÈ„Ò·ˆfi
When Copying is Complete
VP-D371i/D371Wi/ VP-D375Wi/D975WiD372WHi
Camcorder Tape
When Recording Copying is Complete
Recording Copying onto a
To record from a VCR
Memory Card Functions
‘Ò¸ÔÚ ÎÂÈÙÔıÒ„fl·Ú ¯ÁˆÈ·ÍfiÚ ˆ˘ÙÔ„Ò·ˆÈÍfiÚ
ÏÁ˜·ÌfiÚ Ï¸ÌÔ „È· Ù· ÏÔÌٛη VP-D375Wi/D975Wi
Inserting a Memory Card
Image Format
Structure of Folders and Files on the Memory Card
ƑÈ‹ÒËÒ˘ÛÁ ˆ·Í›Î˘Ì Í·È ·Ò˜Âfl˘Ì Ûùáì Í‹ÒÙ· ÏÌfiÏÁÚ
Photo Image
‘Ò¸ÔÚ ÎÂÈÙÔıÒ„fl·Ú ¯ÁˆÈ·ÍfiÚ ˆ˘ÙÔ„Ò·ˆÈÍfiÚ
Selecting the Photo Quality
Number of Images on the Memory Card
Select the Image Quality
Photo Size function works only in M.Cam mode.
≈ÈÎÔ„fi ÙÔı Ï„›ËÔıÚ Â„„Ò·ˆfiÚ ·Ò˜ÂflÔı Photo
¸ÌÔ „È· Ù· ÏÔÌٛη VP-D975Wi
Press the … / † button to select 1152 x
Setting the File Number
˝ËÏÈÛÁ File Number ¡ÒÈËÏ¸Ú ·Ò˜ÂflÔı
Àfi¯Á ˆ˘ÙÔ„Ò·ˆfl·Ú Jpeg Ûùáì Í‹ÒÙ· ÏÌfiÏÁÚ
Taking a Photo Image Jpeg on the Memory Card
LCD
To view a Single Image
Viewing Photo Images Jpeg
ÒÔ‚ÔÎfi ˆ˘ÙÔ„Ò·ˆÈ˛Ì Jpeg
To view a Slide Show
ÒÔÛٷٽÛÂÙÂ
Protection from accidental Erasure
ÒÔÛÙ·Ûfl· ·¸ ·ÍÔ˝ÛÈ· ‰È·„Ò·ˆfi
ÂÈÍ¸Ì˘Ì
· ·Ì·ÍÙÁËÔ˝Ì
ƑÈ·„Ò·ˆfi ˆ˘ÙÔ„Ò·ˆÈ˛Ì Í·È ÍÈÌÔ˝ÏÂÌ˘Ì ÂÈÍ¸Ì˘Ì
Message Do you want to delete? is
Message Do you want to delete all? is displayed
Deleting All Images at Once
‘·ıÙ¸˜ÒÔÌÁ ‰È·„Ò·ˆfi ¸Î˘Ì Ù˘Ì ÂÈÍ¸Ì˘Ì
Do you want to delete all?
ÒÔÛÔ˜fi
Formatting a Memory Card
Ƒȷϸ҈˘ÛÁ ÙÁÚ Í‹ÒÙ·Ú ÏÌfiÏÁÚ
Message All files will be deleted! Do you
Saving Moving Images onto a Memory Card
Recording Moving Images Mpeg on a Memory Card
≈„„Ò·ˆfi ÍÈÌÔ˝ÏÂÌ˘Ì ÂÈÍ¸Ì˘Ì Mpeg Ûùáì Í‹ÒÙ· ÏÌfiÏÁÚ
Recording time available on the Memory Card
Digital Still Camera Mode
Menu button and OK button are not available during
Moving image playback is not available when a Menu
Œœ/ √√ REV/FWD and Stop buttons
Moving image playback. To use Menu button and OK
≈„„Ò·ˆfi ÍÈÌÔ˝ÏÂÌÁÚ ÂÈÍ¸Ì·Ú ·¸ Í·Û›Ù· ˘Ú ˆ˘ÙÔ„Ò·ˆfl·
Recording Photo Image from a Cassette
Displayed ÂÈ͸̷Ú, Á Ô˸ÌÁ ·Ì··Ò·„˘„fiÚ
Camcorder automatically performs the still
Copy stops when the cassette is finished or
Will be copied onto a Memory Card
Image search to find still images and copy starts
Removing the Print Mark
Marking Images for Printing Print Mark
fiÏ·ÌÛÁ ÂÈÍ¸Ì˘Ì „È· ÂÍÙ˝˘ÛÁ Print Mark
Off , This File or All Files , then press the OK button
≈ÍÙ˝˘ÛÁ ˆ˘ÙÔ„Ò·ˆÈ˛Ì ÒfiÛÁ ÙÔı PictBridgeTM
Connecting To a Printer
˝Ì‰ÂÛÁ Ï ÂÍÙı˘Ùfi
Canceling the Printing
Setting the Number of Prints
Setting the Date/Time Imprint Option
Selecting Images
System Requirements
Connecting to a DV Device DVD Recorder, Camcorder, etc
Connecting to a PC
˝Ì‰ÂÛÁ Ï ıÔÎÔ„ÈÛÙfi
√ÁÏÂÈ˛ÛÂÈÚ
VP-D371i/D371Wi D372WHi
·È Colour Nite ·ÂÌÂÒ„ÔÔÈÔ˝ÌÙ·È
Transferring a Digital Image through a USB Connection
Using USB Interface
ÒfiÛÁ ÙÁÚ ‰È·Û˝Ì‰ÂÛÁÚ USB
USB Connection Speed depending on the System
Selecting the USB Device USB Connect
≈ÈÎÔ„fi ÙÁÚ ÛıÛÍÂıfiÚ USB USB Connect
Program Installation
Installing DV Media PRO Program
≈„Í·Ù‹ÛÙ·ÛÁ ÙÔı DV Media PRO Program
˝Ì‰ÂÛÁ Ï ıÔÎÔ„ÈÛÙfi
Connecting to a PC
Disconnecting the USB Cable
¡ÔÛ˝Ì‰ÂÛÁ ÙÔı ͷ΢‰flÔı USB
Using the PC Camera Function
ÒfiÛÁ ÙÁÚ ÎÂÈÙÔıÒ„fl·Ú Í‹ÏÂÒ·Ú Web PC Camera
ÒfiÛÁ ÙÁÚ ÎÂÈÙÔıÒ„fl·Ú ÒÔfiÚ ‰Â‰ÔÏ›Ì˘Ì USB USB Streaming
Using the USB Streaming Function
Using the removable Disk Function
ÒfiÛÁ ÙÁÚ ÎÂÈÙÔıÒ„fl·Ú ·ˆ·ÈÒÔ˝ÏÂÌÔı ‰flÛÍÔı
Usable Cassette Tapes
After Finishing a Recording
ÃÂÙ‹ ÙÁÌ ÔÎÔÍÎfiÒ˘ÛÁ ÏÈ·Ú Â„„Ò·ˆfiÚ
REC
·Ë·ÒÈÛÏ¸Ú Í·È ÛıÌÙfiÒÁÛÁ ÙÁÚ ‚ÈÌÙÂÔÍ‹ÏÂÒ·Ú
Cleaning and Maintaining the Camcorder
Cleaning the Video Heads
·Ë·ÒÈÛÏ¸Ú Ù˘Ì Íˆ·Î˛Ì ‚flÌÙÂÔ
ÒfiÛÁ ÙÁÚ ‚ÈÌÙÂÔÍ‹ÏÂÒ·Ú ÛÙÔ ÂÓ˘ÙÂÒÈ͸
Using Your Camcorder Abroad
Power sources
Colour system
ŒË¸ÌÁ ·ıÙԉȷ„Ì˘ÛÙÈÍÔ˝ ÂΛ„˜Ôı
Troubleshooting
Self Diagnosis Display
Moisture Condensation
Slow Memory Card needs Format a Memory Card To format See
Slow If inserted Memory Card is Eject and re-insert
You have reached the beginning or end
Symptom Explanation/Solution
Viewfinder lens has not been adjusted
Cassette
˝ËÏÈÛÁ ÛÙÔȘÂfl˘Ì ÏÂÌÔ˝
Setting menu items
Main Available Mode Sub Menu Functions
Menu
106
General
Connectors
Weight
Size/dot number LCD Screen Method Viewfinder
EASY.Q Mode
Audio Dubbing Photo Copy Audio Mode Photo Quality
Battery Pack Photo Search
Protection Cassette
Region Country Customer Care Centre Web Site
Contact Samsung World Wide
This Camcorder is Manufactured by