Océ TDS600
Internet
Safety information
Tademarks
Copyright
Contents
Perform basic copy jobs
Chapter Use the Océ TDS600 to scan
Special copy and scan jobs
Océ Power Logic Remote Logic
Chapter
Océ Print Exec LT Web
Chapter Océ Power Logic Queue Manager
Chapter Océ Power Logic System Control Panel
Job-related settings for printing
Chapter Problem solving
Chapter Océ Power Logic Account logging
Chapter Maintenance
Chapter Media and supplies
Chapter Folder
Appendix a Overview and tables
Appendix B
Appendix C Miscellaneous
Chapter Introduction
Page
Introduction
Océ TDS600
Océ TDS600 key concepts
Page
Introduction
Océ TDS600 users
Océ TDS600 components
Océ TDS600 printer
Océ Power Logic controller
Océ TDS600 scanner
Introduction
Page
Chapter Use the Océ TDS600 to print
Switch the Océ TDS600 printer on
Before you begin
Switch the Océ Power Logic controller on
Switch the Océ TDS600 printer off
Switch the Océ TDS600 printer on
Switch the Océ TDS600 printer off
Printer operator panel
Display
Counter
Buttons
Button types
Printer operator panel actions
Media type and size on the printer
Set media type
Set media type for manual feed
Special media indication
Set media size
Set a special media indication
Select a language
Cancel a print job
Interrupt a print job
Continue a print job
Select a language
Off-line folding settings
Make off-line folding settings
Positioning the reinforcement knives optional
Prepare the reinforcement knives for cleaning
Page
Chapter Use the Océ TDS600 to copy
Switch the Océ TDS600 printer and scanner on
Switch the Océ TDS600 scanner on
Switch the Océ TDS600 printer and scanner off
Switch the Océ TDS600 scanner off
Scanner operator panel
Section, Function and Arrow buttons
Button type
Sections on the operator panel
Image Destination
Settings on the Océ TDS600 Copier operator panel
Change the operator panel language
To select a language
Make settings
Perform basic copy jobs
Make copies
Select the required media
Selecting the required media
Select the input mode
Select the input mode
Specify the zoom factor
Selecting the zoom factor
Selecting the exposure setting
Select the exposure
Background compensation
Deliver originals after scanning
Select original delivery
Define settings for the next original
Define settings for the next copy job
Account logging
Using the manual feed for copying
To select accounting
Copying on pre-cut sheets
Define delivery of copies
Deliver copies on the copy delivery tray
Stop a copy job
Stop a job
Chapter Use the Océ TDS600 to scan
Switch the Océ TDS600 scanner on
Switch the Océ TDS600 scanner off
Scanner operator panel
Buttons
Sections on the operator panel
Print section of the Océ TDS600 Copier
29 ‘File’ section of the Océ TDS600 Copier
Make settings
Océ Scan Logic
Scan clicks
Scan click count in the Océ Scan Manager
Make a scan to file
Scan to file
Feedback during scan to file
Settings for scan to file
File type
File mode
Destination
Select a destination
Tiff subformat
Resolution
Zoom
Optimization
Mirror
Océ Scan Manager
Tree view
Table view
Update the table view
Actions from the Océ Scan Manager
Destinations
Create a destination
Following dialogue box appears see figure
Delete a destination
Lock a destination
Unlock a destination
Define file name
View a scanned file
Scanned files
Set / Change destination properties
Print a scanned file
Delete a scanned file
View properties of a scanned file
Manage the temporary store
Automatically view a file after scanning
How to retrieve scanned files?
Get files via FTP
Get files via FTP
Océ View Station LT
Menu options
File menu
View menu
Function buttons
Help menu
View error
Page
Chapter Special copy and scan jobs
Non-standard size originals
Scan width
Define the scan width
Copy size
Copy non-standard size originals
Scanning originals with filing strip
Copying with removed filing strip along the left hand side
Copying with removed filing strip along the right hand side
Removing strip
Adding strip
Automatic background compensation
Improving the image quality
Brightness
Set the exposure
Set the automatic background compensation
Set the original type of your image
100
Editing functions
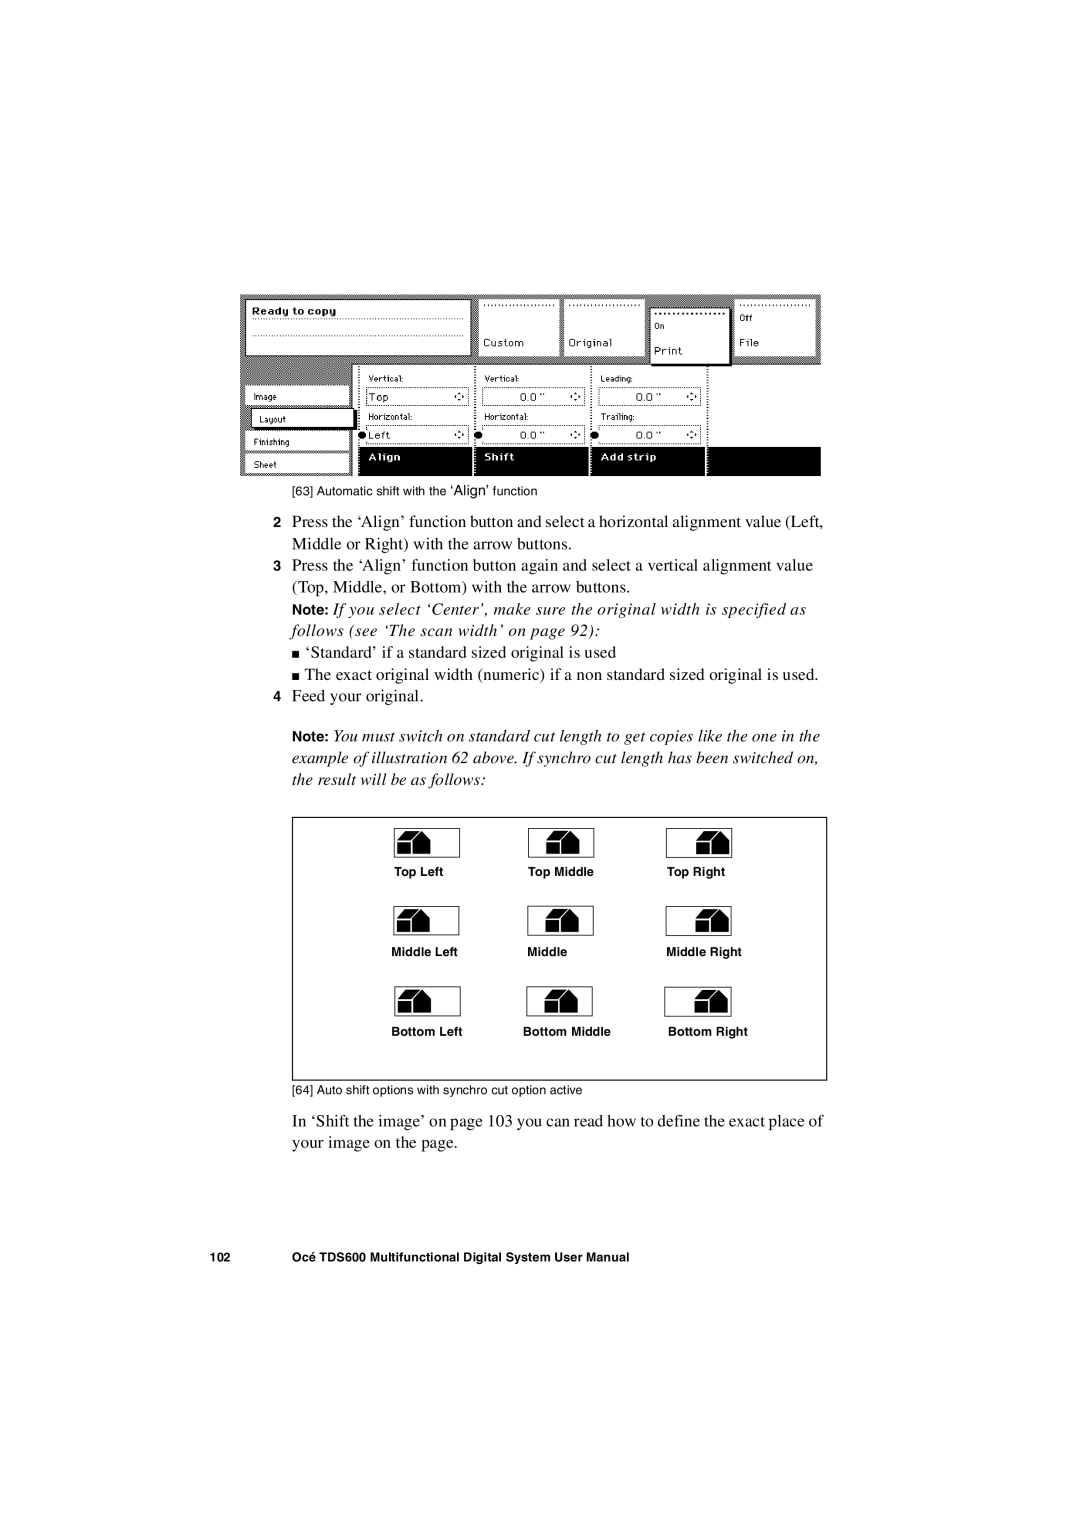
Auto align
102
Shift the image
Shift the image
Mirror-image copies
Make mirror-image copy
Chapter Océ Print Exec LT Web
Basic concepts
How to connect to the Océ Print Exec LT Web
Introduction to Océ Print Exec LT Web
Requirements for the user browser software
Add new jobs
For more information please consult the on-line help
Chapter Océ Power Logic Remote Logic
Introduction
Installation procedure for MS Windows systems
Install Remote Logic
112
Installation procedure for Unix systems
Install Océ Remote Logic’
IBM AIX
Linux
Installation procedure for Other systems
Steps to install Océ Remote Logic in general
Use Océ Remote Logic
Start Océ Remote Logic on a remote workstation
User modes
To change the password
Log
Log out
Automatic login
Language
Help
Command line parameters
Language
How to use the remote system
Add an Océ Power Logic controller
Connect to an Océ Power Logic controller
Chapter Océ Power Logic Queue Manager
Structure
Start Océ Queue Manager on a remote workstation
Océ Power Logic Queue Manager 125
126
Modes
Icons
Océ Power Logic Queue Manager 129
View the print queue
Managing print jobs
Print queue
Delete print jobs
Inbox queue
Restart jobs that are put on hold
Move jobs to top
History queue
Chapter Océ Power Logic System Control Panel
134
Océ Power Logic System Control Panel 135
136
Océ Power Logic System Control Panel 137
Make a demo plot
Print your system configuration
User operations
Clear the system
Chapter Océ Power Logic Settings Editor for the key operator
140
Starting up and shutting down the controller
Start up the Océ controller
Shut down the Océ controller
Settings Editor
General structure
Menu bar
Top toolbar
Save settings to file
Settings area
Left toolbar
Open a saved file
Status bar
Start Océ Settings Editor on the Power Logic Controller
How to access the Settings Editor
Start Océ Settings Editor
Start Océ Settings Editor on a remote workstation
How to perform actions from the Settings Editor
Load a settings file
Specify the custom card
Key operator settings
Make key operator settings in the Settings Editor
Job-related settings for copying
Checkprint
Job-related settings for copying
Output mode
Number of prints/sets
Zoom method
User id
Account id
Custom zoom
Input mode
Original card
Drawing method
Remove leading / trailing strip
Scan length method
Custom scan length
Original type
Background compensation
Exposure
Print card
Align
Unfolded copy delivery
Horizontal shift
Vertical shift
Folding
Folding reinforcement
Folding length
Folding width
Binding strips
Default paper source
Default paper source number
Manual feed
Add leading / trailing strip
Destination
File card
File format
Tiff compression
File resolution
Tiff organization
Optimization
Zoom calibration
Horizontal / vertical zoom calibration
Scan to file
Job-related settings for printing
Print error
Number of prints/sets
Collate
User id
Sheet
Auto format
Default paper source
Fit method
Feed preference
Default roll format
Print cut method
Custom print length
Default material
Finishing
Unfolded print delivery
Folded print delivery
Drawing method
Folding length
Binding strip
Image
Invert
Rotate
178
Layout
Auto shift
Horizontal / Vertical shift
Off line folding
Folding delivery
You can use the ‘Drawing method’ option to determine how
Printer related settings
Automatic roll switch
Reinforce A4
Sheets on belt
Block number with correct light intensity
Scanner related settings
Rewind originals
Single options
Printer family
Automatic feed
Will be printed if the specified media size is not available
Timers
Zoom steps
Panel time out
Set time out
Automatic feed time out
System related settings
Enabling passwords
Scan Logic password
Telephone number
Account logging
Advanced Queue management
Localization
First language
Second language
Measurement unit for your system meters or inches
Job priorities
Copy priorities
Media
Paper series
Media request time-out
Media request action
Manual feed time out
Sleep mode time
Controller panel time out
Disk clean up
Frequency
File age
Print jobs
Job management
Next time
Rights for printing
Enable history queue
Print job lifetime
Max nr of jobs
Logging
File format
202
203
204
System Administrator settings
Make system administrator settings in the Settings Editor
206
Nirs Tiff Cals Ascii
Dithering matrix
Poker max number of vertices in polygons
Poker PDL heap size
Poker min number of vertices in polygons
Scale down algorithm
Printer Descriptive Language settings
Enable Automatic Language Sensing ALS
Hpgl
HPGL-2
Calcomp
Step size
Calcomp
PostScript
Tiff
Specifying printer language settings
Pen settings
Define pen settings
Scan memory reservation
Host name
Controller identification settings
Administrator
Description
Making connectivity settings
Set memory reservation settings
Connectivity settings
Orange zone limit
FTP
SMB
Novell
TCP/IP
NetBeui
Chapter Océ Power Logic Account logging
Enable the Account logging option
Account logging mechanism
Account log file
Make copy/print/scan jobs
To set the accounting for a copy or scan job
To set accounting for a print job
How to retrieve the account files
Get the account log file via FTP in a internet browser
Get the account log file via FTP in a dos box
Use the generated accounting file
Import the account log file into Microsoft Excel
Account information in the log file
Account information for the media format
Account information for the media weights
Structure of the account file
Description of all the parameters in the account log file
All Parameter descriptions
PSERVER, FTP, Centronics
HPGL2, C4, CALCOMP, Ascii
FILM, POLYESTER, VELLUM, Translu
DIN
238
Chapter Media and supplies
Media
Load rolls of copy material
Load paper
Left view
Feed/cut
Use the optional roll loader to load a roll
Media and supplies 245
Cut sheet material
Load cut sheet material
Guide
How to add toner
Add the toner
Media and supplies 249
Move the toner bottle to a vertical position see figure
Chapter Maintenance
Maintenance of the glass platen and the reference roller
Clean the glass platen and reference roller
Switch on the scanner
Maintenance of the reinforcement unit
New tape roll
Open the side door of the reinforcement unit see figure
Insert a new tape roll
Remove the trailing edge of the old tape see figure
Maintenance 257
258
Close the guide plates of the pin roller see figure
260
Close the side door of the reinforcement unit
Waste box
Empty the waste box
Maintenance of the reinforcement knives
Clean the reinforcement knives
Clean the upper and lower knife using Cleaner K see figure
Chapter Problem solving
266
How to clear original jams
Remove a stopped original
268
How to clear paper jams
How to clear a paper jam in the sheet feeder
Paper jam in the cut sheet section
Paper jam in the roll feed section
How to clear a jam in the roll compartments
How to clear a jam in the manual feed
Paper jam in the manual feed
How to clear a jam in the fuser section
Paper jam in the fuser section
How to clear a jam at the integrated receiving tray
Paper jam at the integrated receiving tray
How to clear a jam in the first fold section
Paper jam in the folder
Open the cover of the first fold section see figure
Clear a jam in the folder transport section
Clear a jam in the second fold section
Open the delivery unit see figure
278
Close the vertical transport see figure
Open the door of the belt unit see figure
Clear a jam in the belt unit
Problem solving 281
Problems with the Reinforcement Unit
How to clear a paper jam
Clear paper jams in the Reinforcement Unit
Problem solving 283
Clear tape jams in the reinforcement unit
Hoe to clear a tape jam
Remove all tape between the rollers and knives see figure
Solve this error
Problem solving 287
Other problems call service
Chapter Folder
Océ TDS600 folder
Set the folded package width
Set folding legend
Set the drawing method
Set the folded package length
Fold settings from the Océ TDS600 scanner operating panel
Folder 293
Maximum folding settings for long plots
Folding settings 110 grams
Off line folding settings
Make off line folds
Reinforcement unit
Enable reinforcement
Adjusting the side guides of the belt
Belt unit
298
Appendix a Overview and tables
Overview of the Océ TDS600 system
Printer operating panel
Scanner operating panel
Product specifications Océ TDS600
Printer Technology
Lines, Dark Original, Blueprint, Printed matter
Other operating Concurrent scanning and printing Functions
Length 276 310 mm
Types of media
List of available material types and sizes
Ansi Plus
Reinforcement strips
Appendix B Safety information
Recommended weight limits
Weight of a stack of sheets never exceeds the RWL
Instructions for safe use
Safety information 315
Safety data sheets
Safety data sheet Océ TDS600 printer
Product Safety Data Sheet
Safety data sheet Océ TDS600 scanner
Safety data sheet Océ TDS600 folder
Safety data sheet B5 toner
Material Safety Data Sheet
Safety information 321
Safety data sheet D5 developer
Océ D5 Developer
Safety information 323
Safety data sheet OPC drum
Océ OPC Drum Part No , Océ ES102 OPC Part No
Safety information 325
EPA Energy Star
Safety information 327
328
Appendix C Miscellaneous
Notation conventions
Reader’s comment sheet
Comments Date
Name Occupation Company Phone Address City Country
Addresses of local Océ organisations
Ul. Łopuszańska
Index
336
124
Scan manager