Manuale del proprietario e dinstallazione
Serial #
How to Connect Electricity section
Before You Throw Away Your Old Refrigerator or Freezer
Refrigerants
HOW to Connect Electricity
Mains lead replacement
About the temperature controls
Ambient Room Temperature Limits
Unit will have one of the temperature controls shown below
How to Use
Refrigerator temperature cannot be changed during TurboCool
About TurboCool
How it Works
How to Use
About CustomCool. on some models
ExpressThaw ExpressChill
CustomCool Chart
When to Replace the Filter
Installing the Filter Cartridge
About the water filter
Water Filter Cartridge on some models
About the refrigerator doors
About the shelves and bins
Refrigerator Doors
Refrigerator Door Bins and Freezer Door Tilt-Out Bins
Slide-Out Spillproof Shelf
QuickSpace Shelf
Removable Beverage Rack
Divider Deep Freezer Baskets
Freezer Baskets
Slide-Out Freezer Shelves
Fixed Freezer Shelves
About the freezer compartment
Loading the Freezer Compartment
Freezer Performance
About the crispers and pans
About crisper removal
About the automatic icemaker
Automatic Icemaker
Ice Storage Drawer
About the ice and water dispenser. on some models
To Use the Dispenser
Locking the Dispenser on some models
Dispenser Light on some models
Care and cleaning of the refrigerator
Cleaning the Outside
Cleaning the Inside
Ice Storage Drawer on Dispenser Models
Behind the Refrigerator
Preparing for Vacation
Preparing to Move
Replacing the light bulbs
Freezer Compartment
Dispenser
This light is located above the top drawer
Trim kits and decorator panels
Panels less than 6 mm thick
Mm or Raised Panel
Read these instructions completely and carefully
Dimensions for Custom Wood Panels
Freezer Panel Without Dispenser With Dispenser
Inserting the door panels
Insert the Bottom Freezer Panel on dispenser models
Attach the Top Trim on the Freezer and Refrigerator Doors
Install the Side Trim
These pieces are tucked inside the refrigerator door handle
Removing and replacing the doors
Removing the Doors
Replacing the Doors
Dimensions
Before YOU Begin
Refrigerator Location
Clearances
To adjust the rollers on 25′, 27′ and 29′ models
To adjust the rollers on 21′ and 23′ models
Rollers
Door Alignment
Dimensions and Specifications
For Built-In Style models
Installing the Water Line
Reattach the access cover
Before YOU Begin
Connect the Tubing to the Refrigerator
Turn the Water on and Plug in the Refrigerator
Start the Icemaker
Normal operating sounds
You may hear the fans spinning at high speeds
New high efficiency compressor may run faster
Cycle, you may hear the ice cubes dropping into
Before you call for service…
Problem Possible Causes What To Do
See Care and cleaning
Ice cubes have
Odor/taste
Small or hollow cubes
Temperatures are OK
Actual temperature not
Equal to Set temperature
Select Temp feature is
Special Safety Instructions for Australia and New Zealand
Important Safety Instructions
Before You Begin
Shut Off the Main Water Supply
Connecting the Tubing to the Shutoff Valve
Connecting the Tubing to the Refrigerator
Turn the Water On
Plug In the Refrigerator
Start the Icemaker
Page
Fonctionnement
Avant de jeter votre vieux réfrigérateur ou congélateur
Réfrigérants
Remplacement du cordon d’alimentation
Branchement Électrique
Les commandes de température des
Classe de Symbole Température ambiante Maximale Minimale
Limites de température ambiante dans la pièce
Pas l’alimentation électrique du réfrigérateur
Les commandes de température
Commandes de Température interne Commande cadran Interne
Les commandes de température suite
Au sujet de TurboCool
Fonctionnement
Utilisation
Au sujet de CustomCool. sur certains modèles
Comment il fonctionne
Comment l’utiliser
Tableau CustomCool
Installation de la cartouche du filtre
Le filtre à eau
Cartouche du filtre à eau
Quand remplacer le filtre
Les portes du réfrigérateur
Étagères et bacs
Portes du réfrigérateur
Dispositif de retenue de bouteille
Étagère QuickSpace
Panier mobile à breuvage
Support à bouteilles de vin/boissons sur certains modèles
Étagère coulissante anti-déversement
Paniers du bas du congélateur
Paniers du congélateur
Étagères de congélateur coulissantes
Clayettes de congélateur fixes
Compartiment congélateur
Performance du congélateur
Chargement du compartiment congélation
Les tiroirs et conteneurs à légume
Retrait des conteneurs
Machine à glaçons automatique
Tiroir à glaçons
Pour obtenir de la glace, tirez le tiroir vers
’avant
Le distributeur d’eau et de glaçons. sur certains modèles
Pour utiliser le distributeur
Verrouillage du distributeur
Eclairage du distributeur
Entretien et nettoyage du réfrigérateur
Tiroir à glace
Nettoyage de l’extérieur
Nettoyage de l’intérieur
Derrière le réfrigérateur
Départ en vacances
Déménagement
Remplacement des ampoules
Compartiment réfrigérateur-lampe supérieure
Compartiment réfrigérateur-lampe inférieure
Compartiment congélateur
Kits de moulures et de panneaux décoratifs
Panneaux de moins de 6 mm d’épaisseur
Panneau de 19 mm ou surélevé
Veuillez lire toutes les directives attentivement
Dimensions pour les panneaux de bois sur mesure
Panneau du Panneaux du Congélateur sans
Distributeur
Installation des panneaux de porte
Insérez les panneaux du congélateur et du réfrigérateur
Installez la moulure latérale
Démontage et remontage des portes
Démontage des portes
Remontage des portes
Emplacement DU Réfrigérateur
Avant DE Commencer
Alimentation D’EAU DE LA Machine À Glaçons
Dégagements
Roulettes
Alignement DES Portes
Installation DE LA Conduite D’EAU
Dimensions ET Spécifications
Avertissement
Avant DE Commencer
Installation DE LA Conduite D’EAU Suite
Branchez LE Tuyau À Votre Réfrigérateur
Remettez le couvercle d’accès
Mettez EN Marche LA Machine À Glaçons
Ouvrez LE Robinet D’EAU ET Branchez LE Réfrigérateur
Bruits normaux de fonctionnement
CustomCool
Sur les modèles équipés d’une machine à glaçons
Après un cycle de fabrication de glaçons, vous pouvez
Avant d’appeler un réparateur…
Problème
Problème Causes possibles Correctifs
Consultez Remplacement des ampoules
Signal sonore
En éclaboussant
Fonctionne, mais ne
La commande de
Les aliments ne se
Dégèlent pas/ne se
Refroidissent pas
Instrucciones de seguridad Instrucciones de manejo
Refrigerantes
Freezer
Antes de desechar su antiguo frigorífico o
Cómo Conectar LA Electricidad
Reemplazo del cable
Límites de temperatura ambiente en el entorno
Rango de Símbolo Temperatura Ambiente Máximo Mínimo
Los controles de la temperatura
Controles de Temperatura interna
Controles de ajuste Externos
TurboCool
Cómo funciona
Cómo usar
CustomCool. en algunos modelos
Cómo utilizarlo
El gráfico CustomCool
El filtro de agua
Instalar el cartucho del filtro
Tapón de derivación del filtro
¿Cuando se debe reemplazar el filtro?
Puertas del frigorífico
Los estantes y recipientes del frigorífico
Puertas del frigorífico
Recipiente para botellas
Estante deslizable a prueba de derramamientos
Estante QuickSpace
Colgador de bebidas extraíble
Estante de vino/bebidas en la puerta en algunos modelos
Divisor Cestas hondas del congelador
Cestas del congelador
Estantes deslizantes del congelador
Estantes fijos del congelador
El compartimento del congelador
Cómo llenar el congelador
Rendimiento del congelador
Las bebidas gaseosas no deben guardarse en el congelador
Gavetas y recipientes
Gavetas para frutas y vegetales
Gavetas con humedad ajustable
Recipiente convertible para carnes
El dispositivo automático para hacer hielo
Advertencia Conéctelo
Cajón de almacenamiento de hielo
Dispositivo automático para hacer hielo
El dispensador de agua y de hielo. en algunos modelos
Para usar el dispensador
Para bloquear el dispensador
Luz del dispensador en algunos modelos
Cuidado y limpieza del frigorífico
Limpiar el exterior
Limpiar el interior
Atrás del frigorífico
Preparación para vacaciones
En caso de mudanza
Reemplazo de bombillas
Compartimento del frigorífico-Luz inferior
Compartimento del congelador
Dispensador
Molduras y paneles decorativos
Paneles de menos de 6 mm de espesor
Panel de 19 mm o panel levantado
Lea las instrucciones completamente y debidamente
Dimensiones de los paneles de madera hechos a medida
Panel del congelador Paneles del Sin dispensador Congelador
Las áreas superiores de los paneles necesitan recortarse
Cómo insertar los paneles de la puerta
Inserte el panel del congelador y panel del frigorífico
Lea las instrucciones completa y detenidamente
Instalación de la moldura lateral
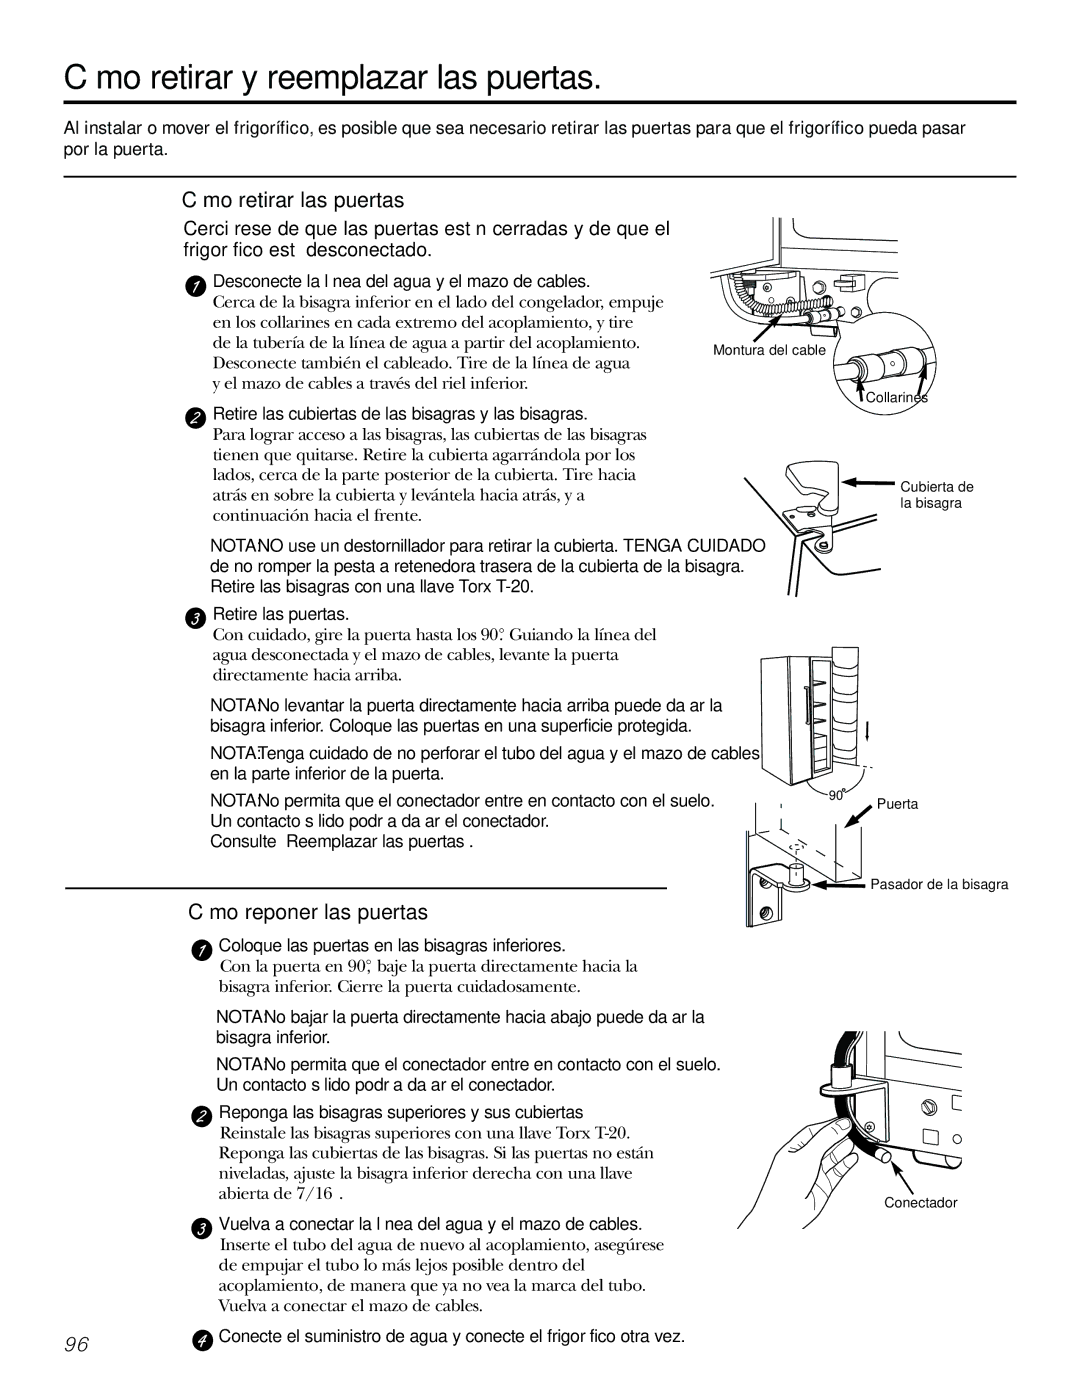
Cómo retirar y reemplazar las puertas
Cómo retirar las puertas
Cómo reponer las puertas
Antes DE Iniciar
Ubicación DEL Frigorífico
Área
Rodillos
Alineación DE LAS Puertas
Dimensiones Y Especificaciones
Instalación DE LA Toma DE Agua
Antes DE Empezar
Sólo a tomas de agua potable
Conecte EL Tubo AL Frigorífico
Vuelva a colocar la cubierta de acceso
Encienda EL Agua Y Conecte EL Frigorífico
Hielo
Sonidos normales de operación
Problema Causas Posibles Qué hacer
Antes de solicitar un servicio…
Dispositivo automático
Para hacer hielo no
Vea Instalar la línea de agua
El dispensador de hielo
Hielo picado No sale agua pero el
Dispositivo para hacer
Hielo funciona
El agua chorrea del
Del frigorífico
No funciona la luz
Interior
Vea Reemplazar las bombillas
Notas
108
Di alcuni problemi -142 Rumorosità normali di funzionamento
Istruzioni per l’uso
Prima di smaltire il vecchio freezer/frigo
Refrigeranti
Collegamento Elettrico
Sostituzione dei cavi principali
Limiti delle temperature ambiente
Classi di Simbolo Temperatura ambiente Massime Minime
Molto Temperata 32C 10C 16C Sub-Tropicale 38C 18C 43C
Regolazione delle temperature
Come funziona
Modo di impiego
Istruzioni per l’uso del CustomCoolsolo in alcuni modelli
Come funziona il CustomCool
Come si usa
Istruzioni per il CustomCoolsolo in alcuni modelli
Tabella per l’uso del CustomCool
Installazione della cartuccia del filtro dell’acqua
Istruzioni per il filtro dell’acqua
Cartuccia del filtro dell’acqua
Quando cambiare il filtro
Istruzioni per le porte del frigorifero
Porte del frigorifero
Ferma bottiglie
Contenitori larghi
Ripiani scorrevoli raccogligocce
Ripiano retrattile di QuickSpace
Rastrelliera rimovibile per le bottiglie
Ripiano per vino e bevande sulla porta su alcuni modelli
Ripiani e cestelli
Divisore Cestelli profondi del freezer
Cestelli del freezer
Ripiani del freezer estraibili
Come utilizzare il freezer
Riempimento del freezer
Prestazioni del freezer
Le bibite frizzanti non devono essere conservate in freezer
Informazioni sui ripiani e cassetti
Cassetti per frutta e verdura
Regolazione dell’umidità
Cassetto a temperatura convertibile per la carne
Fabbricatore automatico di ghiaccio
Fabbricatore di ghiaccio automatico
Cassetto del ghiaccio
Allacciatevi solo ad acqua potabile
Distributore di acqua e ghiaccio solo in alcuni modelli
Come usare il distributore
Blocaggio distributore in alcuni modelli
Produzione rapida di ghiaccio
Manutenzione e pulizia del frigorifero
Pulizia dell’esterno
Pulizia interna
Per estrarlo
Parte posteriore del frigorifero
Prima di un periodo di vacanze
Trasloco del frigorifero
Sostituzione delle lampadine
Comparto frigorifero-luce superiore
Comparto frigorifero-luce inferiore
Comparto freezer
Kit cornici e pannelli di rivestimento
Pannelli con spessore inferiore a 6 mm
Pannelli da 19 mm o con rilievo
Leggere attentamente e completamente e queste istruzioni
Pannello freezer senza Distributore Con distributore
Installazione dei pannelli delle porte
Installazione del pannello del freezer e del frigorifero
Leggere completamente e attentamente queste istruzioni
Installazione della cornice laterale
Le cornici laterali sono attaccate alle maniglie
Smontaggio e rimontaggio delle porte
Rimozione delle porte
Montaggio delle porte
Dimensioni
Prima DI Iniziare
Posizione DEL Frigorifero
Spaziature
Regolazione Delle Ruote
Allineamento Dele Porte
Le ruote hanno tre funzioni
Per regolare le ruote sui modelli 25, 27 e
Dimensioni E Specifiche solo modelli incorporati
Installazione Della Tubazione DELL’ACQUA
Riattaccare il coperchio di accesso
Prima DI Iniziare
Connessione solo a fonti di acqua potabile
Accendete IL Fabbricatore DI Ghiaccio
Rumorosità normali di funzionamento
Whoosh
Problemi Possibili Cause Cosa Fare
Prima di chiamare l’assistenza…
Non funziona
Lenta
Cubetti sono piccoli e
Irregolari
Lacqua fuoriesce dal
Funziona
Nessuna erogazione di
Acqua o ghiaccio
Selezionate
All’interno. Con tempo
Accendono
Vedere sezione Sostituzione lampadine
143
144
Escreva aqui o modelo e o número de série
De série
Antes de jogar fora seu frigorífico ou
Congelador velho
Frigorígenos
Como Conectar a Electricidade
Substituição do condutor principal
Limites de temperatura do ambiente de funcionamento
Classe de Símbolo Temperatura ambiente Máxima Mínima
Na medida do necessário para compensar tais factores
Sobre os controlos de temperatura
Sobre a função TurboCool
Como funciona
Como utilizar
Sobre a função CustomCool. em alguns modelos
Como utilizar
Diagrama da Função CustomCool
Sobre o filtro de água
Cartucho do filtro de água
Quando trocar o filtro
Instalação do cartucho do filtro
Sobre as portas do frigorífico
Sobre as prateleiras e recipientes
As portas do frigorífico
Retentor de garrafas
Prateleira QuickSpace
Porta-bebidas removível
Porta-vinho/bebidas da porta em alguns modelos
Divisor Cestas da arca frigorífica
Cestas do congelador
Prateleiras do congelador que deslizam para fora
Prateleiras fixas do congelador
Sobre o compartimento do congelador
Para carreguar do compartimento do congelador
Desempenho do congelador
Sobre os compartimentos e gavetas
Sobre a remoção dos compartimentos
Compartimentos de frutas e vegetais
Gaveta de carne conversível
Sobre o dispensador automático de gelo
Dispensador automático de gelo
Gaveta de armazenagem de gelo
Para ter acesso ao gelo, puxe a gaveta para a
Sobre o dispensador de gelo e água. em alguns modelos
Para utilizar o dispensador
Para trancar o dispensador
Luz do dispensador em alguns modelos
Manutenção e limpeza do frigorífico
Gaveta de armazenagem de gelo nos modelos de dispensador
Limpeza exterior
Limpeza do interior
Parte traseira do frigorífico
Preparação para as férias
Preparação para uma mudança
Troca das lâmpadas
Compartimento do frigorífico Lâmpada inferior
Compartimento do congelador
Compartimento do frigorífico Lâmpada superior
Remates e painéis decorativos
Painéis com menos de 6 mm de espessura
Painéis de 19 mm ou elevados
Leia estas instruções completa e cuidadosamente
Dimensões para os painéis de madeira feitos sob medida
As áreas no topo dos painéis devem ser cortadas dos painéis
Instalação dos painéis das portas
Insira o painel do congelador e o painel do frigorífico
Instale o remate lateral
Remover e recolocar das portas
Remoção das portas
Recolocação das portas
168
Antes DE Começar
Localização do Frigorífico
Vãos Livres
Dimensões
Rodas
Alinhamento DAS Portas
As rodas servem a três propósitos
Para ajustar as rodas nos modelos 25′, 27′ e 29′
Dimensões E Especificações
Para os modelos Built-in Style
Instalação do Sistema DE Fornecimento DE Água
Antes DE Começar
Conecte a Tubulação AO Frigorífico
ATENÇÃO! Conecte apenas a um fornecimento de água potável
Ligue a Água E Insira a Ficha do Frigorífico NA Tomada
Ligue O Dispensador DE Gelo
Sons normais de operação
Problema Causas possíveis Que fazer
Antes de chamar o serviço de atendimento…
Os cubos de gelo
Têm odor e/ou sabor
Veja Manutenção e limpeza
Congelação dos cubos
Há um odor a emanar
Do frigorífico
Porta não fecha bem
Forma-se humidade no
178
Serie
Modell- und Seriennr. hier eintragen Modell
Kühlmittel
Auch Abschnitt Elektrischer Anschluss
Den Kühlschrank oder Tiefkühltruhe entsorgen
Elektrischer Anschluss
Ersatz desHauptleitungsanschlusses
Temperaturklasse Symbol Maximum Minimum
Temperaturregler an
Raumtemperaturgrenzen
Raumtemperatur
Temperaturregler
Temperaturregler Forts
Wirkungsweise
Bedienungsweise
CustomCool. an bestimmten Modellen
Bedienungsweise
CustomCool Tabellen
Wasserfilter
Wasserfilter Patrone
Ersetzen des Filters
Einbau der Filterpatrone
Kühlschranktüren
Regale und Behälter
Kühlschranktüren
Kühlschrank Türbehälter und Gefrierfach Aufkippbehälter
Herausziehbares, rutschfestes Regal
QuickSpace Regal
Entfernbares Getränkegestell
Wein-/Getränkegestell in Tür bei manchen Modellen
Trennwand Gefrierfach-Körbe
Gefrierfach-Körbe
Herasuschiebbare Gefrierfach-Regale
Feste Gefrierfachregale
Das Gefrierfach
Beladung des Gefrierfachs
GefrierfachNutzleistung
Kühlhaltefächer und Schubladen
Kühlhaltefach
Automatischer Eismacher
WARNUNG! Nur an
Automatischer Eismacher
Eisschublade
Eis- und Wasserverteiler. an bestimmten Modellen
Benutzung des Verteilers
Wichtiges über den Verteiler
Pflege und Reinigung des Kühlschrankes
Eisschublade an Verteilermodellen
Reinigung des Abtropfregals
Reinigung der Innenseite
Hinter dem Kühlschrank
Ferienvorbereitungen
Umzug
Kühlschrank muss immer aufrecht stehen
Ersetzen der Glühbirne
Kühlschrankfach oberes Licht
Kühlschrankfach unteres Licht
Gefrierfach
Zierleisten und dekorative Verkleidungen
Verkleidung unter 6 mm Dicke
Mm oder überhöhte Verkleidung
Diese Anleitungen sorgfältig und vollständig lesen
Dimensionen für die sonderangefertigte Holzverkleidungen
Einsetzen der Türverkleidung
Einsetzen der Verkleidung in die Gefrierfachtür
Einsetzen der unteren Gefrierfachtürverkleidung
Anleitungen sorgfältig und vollständig lesen
Anbringen der seitlichen Leiste
Diese Teile befinden sich auf der Innenseite am Türgriff
Abnehmen und Einsetzen der Türen
Abnehmen der Tür
Einsetzen der Tür
Dimensionen
VOR Beginn
Wasserleitung ZUM Eismacher
Standort DES Kühlschrankes
Installationsanleitungen
Rollen
Türenabgleich
Dimensionen UND Spezifikationen
Für eingebaute Modelle
Installationsanleitungen Installation DER Wasserleitung
VOR Beginn
Anschluss DER Leitung AN DEN Kühlschrank
Trinkwasserleitung anschliessen
Eismacher Anstellen
Wasser Anstellen UND Kühlschrank Einstecken
Normale Betriebsgeräusche
Problem Mögliche Ursachen Was kann man tun?
Ehe Sie den Kundendienst anrufen
Häufiges Brummen
Eiswürfel haben einen
Geruch oder Geschmack
Siehe Pflege und Reinigung
Gespendet Gefrierfach erscheint
Orange Kühlschrank hat einen
Geruch
Tür lässt sich nicht
Anmerkungen
Veiligheidsinformatie . . . . .214 Gebruiksaanwijzingen
Serienr
Waarschuwing
Koelmiddelen
Aansluiting OP HET Stroomnet
Vervanging van de hoofdkabel
Temperatuurregeling CustomCool-modellen
Grenzen omgevingstemperatuur
Omgevingstemperatuur
Temperatuurklasse Symbool Maximum Minimum
Temperatuurregeling
Interne draaiknop Externe setpoint Bedieningselementen
Temperatuurregeling Vervolgd
Werking
Gebruiksaanwijzing
CustomCool. sommige modellen
Gebruiksaanwijzing
CustomCool-tabel
Installatie van de filtercartridge
Waterfilter
Cartridge van de waterfilter sommige
Vervanging van de filter
Deuren van de koelkast
Rekken en bakken
Deuren van de koelkast
Fleshouder
Uitschuifbaar morsvrij rek
QuickSpace-rek
Verwijderbaar drankrek
Deur Wijnrek/Drankrek met sommige modellen
Verdeling Manden in diepvriesgedeelte
Manden in vriesvak
Uitschuifbare rekken in vriesvak
Vaste rekken in vriesvak
Diepvriesgedeelte
Vullen van diepvriesgedeelte
Rendement van de diepvriezer
Groentevakken en laden
Verwijderen van het groentevak
Automatische ijsmachine
Automatische ijsmachine
IJslade
Trek de lade uit om bij het ijs te kunnen
IJs- en waterverdeler. sommige modellen
Gebruiksaanwijzing voor de verdeler
Vergrendelen van de verdeler
Belangrijke informatie in verband met de verdeler
Onderhoud en schoonmaak van de koelkast
Berglade voor ijs modellen met verdeler
Schoonmaken van de buitenkant
Schoonmaken van de binnenkant
Achter de koelkast
Vakantieregeling
Verhuizen
Vervangen van lampjes
Koelgedeelte licht bovenaan
Koelgedeelte licht onderaan
Diepvriesgedeelte
Sierkits en decoratieve panelen
Minder dan 6 mm dikke panelen
Paneel van 19 mm of verhoogd paneel
Lees alle instructies heel aandachtig
Afmetingen van op maat gemaakte houten panelen
Paneel van vriesvak
Zonder verdeler
Verdeler
Plaatsen van deurpanelen
Plaatsen van panelen van vriesvak en van koelgedeelte
Installeren van sierpaneel op zijkant
Verwijderen en terugplaatsen van de deuren
Verwijderen van de deuren
Terugplaatsen van de deuren
Voordat U Begint
Plaats VAN DE Koelkast
Vrije Ruimten
Afmetingen
Wieltjes
Uitlijnen VAN DE Deuren
239
Installatie VAN DE Waterleiding
Waarschuwing
Voordat U Begint
Buis OP Koelkast Aansluiten Vervolg
Ijsmachine Starten
Normale geluiden
Hoor jij wat ik hoor? Deze geluiden zijn normaal
Voordat u met een monteur contact opneemt …
Probleem Mogelijke oorzaken Oplossing
Voordat u met een monteur contact opneemt…
Maar de temperaturen
Hebt Cubed ICE
Oranje schijn
De koelkast ruikt
246
√‰ËÁ›Â˜ ÏÂÈÙÔ˘ÚÁ›·˜
¶ÚÈÓ ÂÙ¿ÍÂÙ ÙÔ ·ÏÈfi Û·˜ „˘ÁÂ›Ô ‹ ÙÔÓ ·ÏÈfi Û·˜ ηٷ„‡ÎÙË
248 æ˘ÎÙÈο
„ µÁ¿ÏÙ ÙȘ fiÚÙ˜ Î·È ÂÙ¿ÍÙ ÙȘ ͯˆÚÈÛÙ¿
„ ∂¿Ó ÙÔ „˘ÁÂ›Ô ¤¯ÂÈ ÎÏÂȉ·ÚÈ¿, ·¯ÚËÛÙ¤„Ù ÙËÓ
∞ÓÙÈηٿÛÙ·ÛË ÙÔ˘ ηψ‰›Ô˘ Û‡Ó‰ÂÛ˘ ÛÙÔ ÎÂÓÙÚÈÎfi ‰›ÎÙ˘Ô
¶ÂÚÈÔÚÈÛÌÔ› ıÂÚÌÔÎÚ·Û›·˜ ÂÚÈ‚¿ÏÏÔÓÙÔ˜ ¯ÒÚÔ˘
·ÙËÁÔÚ›· ‡Ì‚ÔÏÔ
¶ÏËÚÔÊÔڛ˜ Û¯ÂÙÈο Ì ٷ ¯ÂÈÚÈÛÙ‹ÚÈ· ıÂÚÌÔÎÚ·Û›·˜
¶ÂÚÈÔÚÈÛÌÔ› ıÂÚÌÔÎÚ·Û›·˜ ¯ÒÚÔ˘
¶È¤ÛÙ ÙÔ ‰È·ÎfiÙÔ˘ TurboCool. £· ·Ó¿„ÂÈ Ô ‰Â›ÎÙ˘
¶ÏËÚÔÊÔڛ˜ Û¯ÂÙÈο Ì ÙÔ CustomCoolTM Û ÔÚÈṲ̂ӷ ÌÔÓ٤Ϸ
∆Ô CustomCool TM Â›Ó·È ¤Ó· Û‡ÛÙËÌ· ÌÂ
¿ÊËÌ· CustomCool TM
‡ÛÈÁÁ· Ê›ÏÙÚÔ˘ ÓÂÚÔ‡
‡Ó‰ÂÛÌÔ˜ ·Ú¿Î·Ì„˘ Ê›ÏÙÚÔ˘
¶fiÚÙ˜ „˘Á›Ԣ
¢ÂÓ ˘¿Ú¯Ô˘Ó fiÏ· Ù· ÂÍ·ÚÙ‹Ì·Ù· Û fiÏ· Ù· ÌÔÓ٤Ϸ
ªÂÁ¿ÏÔÈ ·ÔıË΢ÙÈÎÔ› ¯ÒÚÔÈ
ªÈÎÚÔ› ·ÔıË΢ÙÈÎÔ› ¯ÒÚÔÈ
˘ÚfiÌÂÓÔ Ú¿ÊÈ Ô˘ ‰ÂÓ ÛÙ¿˙ÂÈ
¿ÊÈ QuickSpaceTM
∞Ê·ÈÚÔ‡ÌÂÓË ı‹ÎË ÌԢηÏÈÔ‡
¿ÊÈ fiÚÙ·˜ ÁÈ· ÎÚ·Û› / ·Ó·„˘ÎÙÈο Û ÌÂÚÈο ÌÔÓ٤Ϸ
·Ï¿ıÈ· ηٷ„‡ÎÙË
˘ÚfiÌÂÓ· Ú¿ÊÈ· ηٷ„‡ÎÙË
·ıÂÚ¿ Ú¿ÊÈ· ηٷ„‡ÎÙË
¿Ú¯Ô˘Ó ‰‡Ô ÂȉÒÓ ÛÙ·ıÂÚ¿ Ú¿ÊÈ· ηٷ„‡ÎÙË
∆ÔÔı¤ÙËÛË ÙÚÔÊ›ÌˆÓ ÛÙÔ ¯ÒÚÔ ÙÔ˘ ηٷ„‡ÎÙË
∞fi‰ÔÛË ÙÔ˘ ηٷ„‡ÎÙË
¿Ùˆ ·fi -18C
˘ÚÙ¿ÚÈ· ÊÚ¤ÛÎˆÓ ÙÚÔÊ›ÌˆÓ Ì ڢıÌÈ˙fiÌÂÓË ˘ÁÚ·Û›·
· ·Ó ·Ê·ÈÚ¤ÛÂÙ ÙÔ Î¿Ùˆ Û˘ÚÙ¿ÚÈ ÊÚ¤ÛÎˆÓ ÙÚÔʛ̈Ó
¿Óˆ Î·È ¤Íˆ
ÂÚÈÛÙÚ¤ÊÔÓÙ·˜ ÙȘ Ûùëó ·ÛÊ·ÏÈṲ̂ÓË ı¤ÛË
∞˘ÙfiÌ·ÙË ·ÁÔÌ˯·Ó‹
˘ÚÙ¿ÚÈ ·Ôı‹Î¢Û˘ ¿ÁÔ˘
¤Íˆ Î·È ·Ó·ÛËÎÒÛÙ ÙÔ ¤Ú· ·fi ÙÔ ÛÙÔ
· Ó· ¯ÚËÛÈÌÔÔÈ‹ÛÂÙ ÙÔ ‰È·ÓÔ̤·
„ ªÂ ÂÈÏÂÁ̤ÓË ÙË ı¤ÛË Cubed ICE, ‰ÂÓ
˘ÚÙ¿ÚÈ ·Ôı‹Î¢Û˘ ¿ÁÔ˘ ÛÙ· ÌÔÓ٤Ϸ Ì ‰È·ÓÔ̤·
·ı·ÚÈÛÌfi˜ ÙˆÓ ÂÛˆÙÂÚÈÎÒÓ ¯ÒÚˆÓ
¶›Ûˆ ·fi ÙÔ „˘Á›Ô
¶ÚÔÂÙÔÈÌ·Û›· fiÙ·Ó ÚfiÎÂÈÙ·È Ó· ʇÁÂÙ ÁÈ· ‰È·ÎÔ¤˜
¶ÚÔÂÙÔÈÌ·Û›· ÁÈ· ÌÂÙ·ÎfiÌÈÛË
fiÚÙ˜ ·ÓÔȯ٤˜
ÃÒÚÔ˜ „˘Á›Ԣ-∂ʈ˜
ÃÒÚÔ˜ „˘Á›Ԣ-¿Ùˆ ʈ˜
¢È·ÓÔ̤·˜
ΜÁ¿ÏÙ ÙÔ „˘ÁÂ›Ô ·ÙËÓ
¢È·‚¿ÛÙ fiϘ ÙȘ Ô‰ËÁ›Â˜ ÚÔÛÂÎÙÈο
¶Ï·›ÛÈ· ¿¯Ô˘˜ ÏÈÁfiÙÂÚÔ˘ ·fi 6 ¯ÈÏ
19 ¯ÈÏ. ‹ ÀÂÚ˘„ˆÌ¤ÓÔ Ï·›ÛÈÔ
¢È·ÛÙ¿ÛÂȘ ÙˆÓ ÈÔ Û˘ÓıÈÛÌ¤ÓˆÓ Í‡ÏÈÓˆÓ Ï·ÈÛ›ˆÓ
∂ÈÛ·ÁˆÁ‹ ÙˆÓ Ï·ÈÛ›ˆÓ ı˘ÚÒÓ
ÙÔ˘ „˘Á›Ԣ Î·È ÙÔ Â¿Óˆ Ï·›ÛÈÔ ÙÔ˘ ηٷ„‡ÎÙË
269
∂·Ó·ÙÔÔı¤ÙËÛË ÙˆÓ ı˘ÚÒÓ
∂·Ó·Û˘Ó‰¤ÛÙ ÙËÓ ÏÂÍÔ‡‰· ηψ‰›ˆÛ˘
271
21’ Î·È 23’ 25’, 27’ Î·È 29’ ¶Ï¢ڤ˜
∂¿Óˆ
¶›Ûˆ
272
∆· ÚÔ‰¿ÎÈ· Â͢ËÚÂÙÔ‡Ó 3 ÛÎÔÔ‡˜
· Ó· Ú˘ıÌ›ÛÂÙ ٷ ÚÔ‰¿ÎÈ· ÛÙ· ÌÔÓ٤Ϸ 25, 27 ηÈ
· Ó· Ú˘ıÌ›ÛÂÙ ٷ ÚÔ‰¿ÎÈ· ÛÙ· ÌÔÓ٤Ϸ 21 ηÈ
¢π∞∆∞∂π ∞𠶃√¢π∞ƒ∞º∂
273
¶ƒ√√Ã∏! ˘Ó‰¤ÂÙ ÙÔ „˘ÁÂ›Ô ÌfiÓÔ Ì ·ÚÔ¯‹ fiÛÈÌÔ˘ ÓÂÚÔ‡
· ÌÔÓ٤Ϸ fiÔ˘ ¯ÚËÛÈÌÔÔÈ›ٷÈ
‚ϤÂÙ Ûùëó ÂÈÎfiÓ·
ÙËÓ ¤ÓˆÛË
275
Ù˘ ·ÁÔÌ˯·Ó‹˜ Â›Ó·È Ûùëó ı¤ÛË
Òûùâ Ó· ʤÚÂÈ ·ÚÎÂÙfi ÓÂÚfi Ûùëó ·ÁÔÌ˯·Ó‹
Àƒ¡∞∂π
¶ÚÈÓ Î·Ï¤ÛÂÙ οÔÈÔÓ ÁÈ· ÂÈÛ΢‹
¶Úfi‚ÏËÌ· ¶Èı·Ó¤˜ ·Èٛ˜ ∆È Ó· οÓÂÙÂ
278
279
280