Page
Page
Contents
Absolute Reset
Setting the Robot
Specifications
Installation
Fxyx
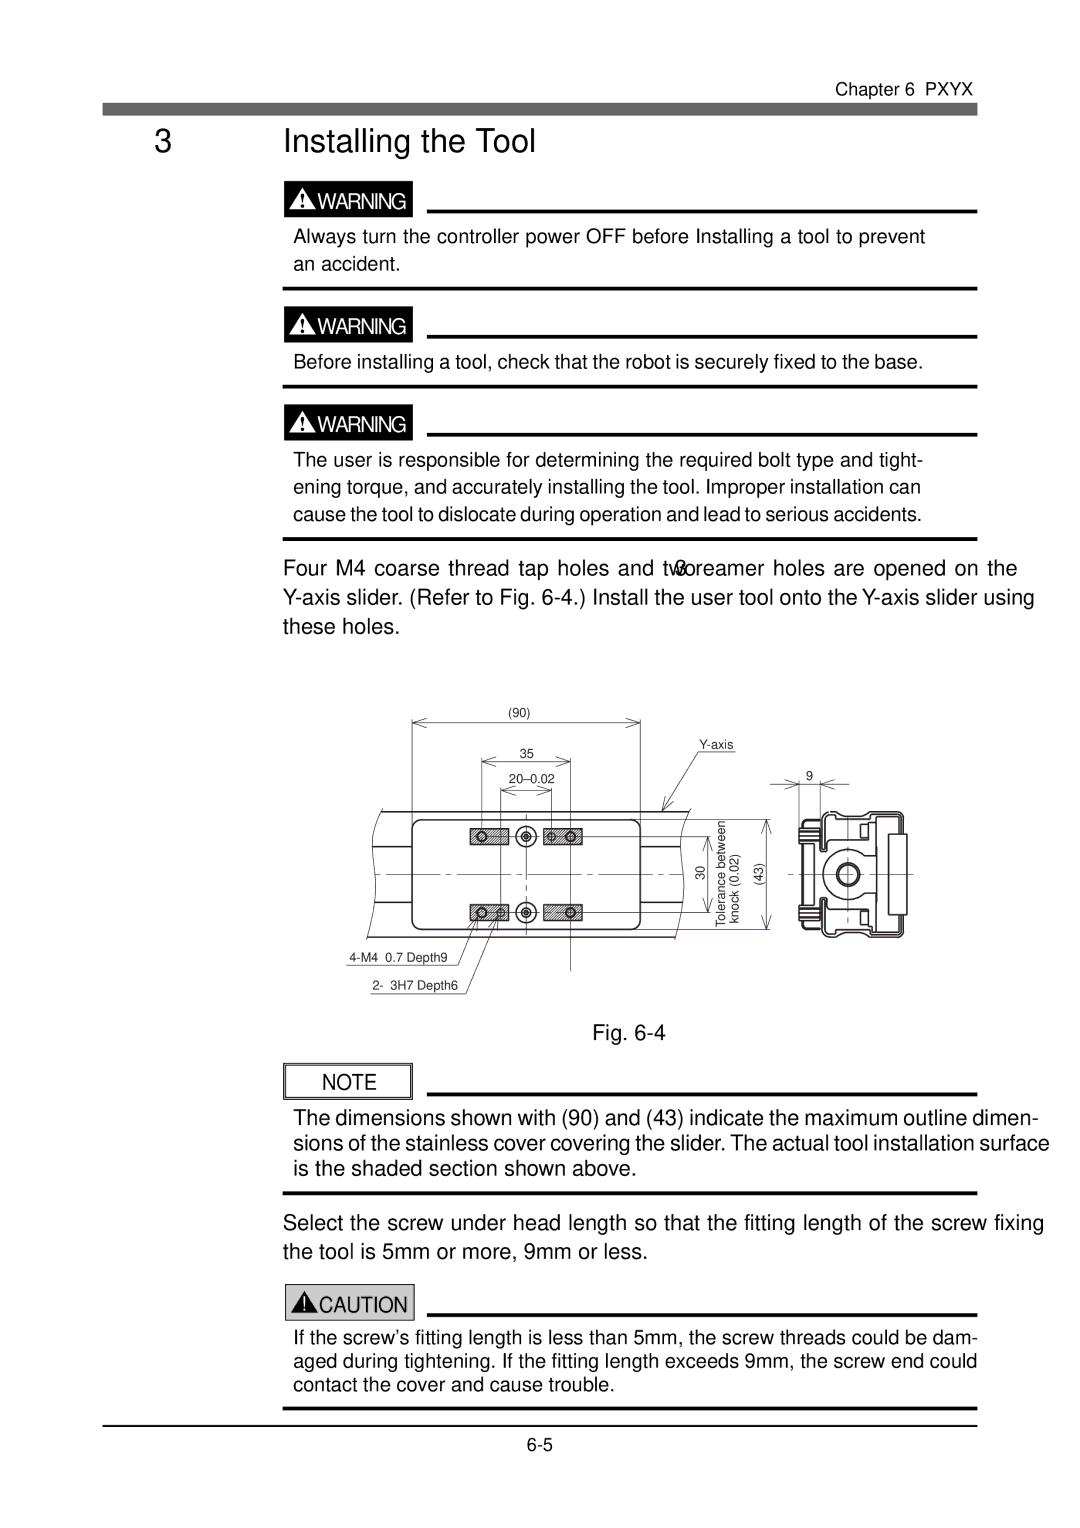
Installing the Tool
Mxyx
Installing the Tool 10-10
Installation 10-1
User Wiring and User Piping 10-18
Protective Connections 10-7
Changing the Motor Installation Position
Installing the Tool 11-7
Installing the Cover
Adjusting the Timing Belt Tension
Installing the Tool 12-8
Installation 12-1
User Wiring and User Piping 12-15
Protective Connections 12-6
Memo
Chapter
Memo
Safety Information
Observe the following cautions during automatic operation
Essential Caution Items
Using the Robot Safely
Provide safety measures for end effector gripper, etc
10Z-axis movement when air supply is stopped
13Use caution when removing the Z-axis brake
12Use caution when disassembling and replacing the motor
20Be sure to make correct parameter settings Part
18Do not remove, alter or stain the warning labels
19Protective connections
Do not use the robot for tasks requiring motor thrust
21Be sure to make correct parameter settings Part
Special Training for Industrial Robot Operation
Robot Safety Functions
Safety Measures for the System
Check the following points before turning the controller on
Trial Run
Teaching
Work Within the Safeguard Enclosure
Automatic Operation
Adjustment and Inspection
Repair and Modification
Check the following before starting automatic operation
Warranty
Warranty description
Warranty Period
CE Marking
Product Outline
Memo
Robot
Names of each part
Arm type with cable carrier
Arm type with whipover cable
Gantry type
Moving arm type with whipover cable
Moving arm type with cable carrier
Pole-type with whipover cable
Pole-type with cable carrier
XZ-type with whipover cable
XZ-type with cable carrier
Robot Controller
Robot Controller
Memo
Preparing the Robot
Memo
Specifications
Robot Installation Environment
Unpacking the Robot
Example of combination with RCX40 controller
Checking the Product
Example of combination with Drcx controller
Example of combination with Trcx controller
Transporting the Robot
Preparing the Robot
Installation base
Installation
Fix the installation base at the specified position
Installing the Robot
Protective connections
Symbol 417-IEC-5019
Connecting the Robot Cables
Preparing the Robot
Drcx
Connecting with the Drcx controller
Connection to Drcx controller
Trcx
Connecting with the Trcx controller 1 3-axis model
Connection to Trcx controller 3-axis model
2 4-axis model
Connection to Trcx controller 4-axis model
RCX40, Qrcx
Connecting to the Qrcx or RCX40 controller
Connection to Qrcx controller
Installing the Tool
User Wiring and User Piping
Cable carrier type
Whipover cable carrier type
Setting the payload
Setting the Robot
List of payload parameters
For Drcx or Trcx controller
Setting the maximum speed
Models requiring lower maximum speed setting
For ERCX, SRCX, Drcx or Trcx controller
Setting the acceleration
List of acceleration parameters
Controller Acceleration parameter
Absolute Reset
For Qrcx controller
For RCX40 controller
Setting the origin position
For robot configured of only linear movement axis
When robot contains a rotary axis Target rotary axis
Preparing the Robot
Example ZRS
Periodic Inspections
Memo
Outline
Precautions
Daily inspection
Three-month inspection
Check point Check items
ZRS, Hxylx
Six-month inspection
Three-year inspection
Replenishing the grease
Maintenance and inspection of harmonic drives
Harmonic grease replacement period
Memo
Specifications
Memo
Specifications
Robot cable
Axis robot cable
Axis robot cable For Trcx controller
Wire
MB+ ZBK
Axis robot cable For RCX40 controller
YBK ZBK RBK ORG
Maker Connector type
User I/O cable
Recommended crimping tool
Memo
Pxyx
Memo
Tightening torque
Installation bolt nominal length
Hexagon socket head Cap screw M4 Strength 8.8T
Recommended torque 9N·m to 4.4N·m 30kgf·cm to 45kgf·cm
Installation methods
Ground terminal
Wiring method
Ground wire
Installing the Tool
User Wiring and User Piping
Cable carrier specifications
Replenishing grease to the linear guide
Periodic Inspections
Replenishing grease to the ball screw
Memo
Fxyx
Memo
Hexagon socket head cap screw M6 Strength 8.8T
Installation bolt types
Recommended nominal length 35mm or more
Recommended torque
Installation methods
Axis Axis wiring box Ground terminal
Ground wire
Arm type
Arm type 2-axis model
Fxyx
Example For split clamp Recommended bolt
ZS 3rd-axis option
Quantity
Tightening torque
Cable carrier type
Example of wiring and piping methods using cable carrier
Loosen Remove Same on opposite side
Harness retainer
Cable carrier specifications
User I/O cable specifications
Axis, Y-axis
Recommended grease nipple A-M6X1 type JIS B1575
Axis
Axis
Axis ZS
Sxyx
Periodic inspection of the ZS/ZRS unit
Sxyx
Method a
Method B
Sxyx
XZ type with cable carrier
Wiring methods
Arm type with cable carrier
Opening the wiring box
Ground terminal Ground wire
Arm type with whipover cable, moving arm type, pole type
XZ type
14 Arm type
Arm type, pole type 2-axis model
15 Pole type
16 Moving arm type
Moving arm type 2-axis model
17 ZF
18 RF
Example For split clamp
19 ZS/ZRS
21 Tool installation ZFH
22 ZFL
Harness retainer
Sxyx
State of X-axis wiring box when wiring is completed
State with cover installed
ZFH
User I/O cable specifications
Whipover cable type
Examples of wiring and piping with whipover cable
Sxyx
Periodic inspections
Axis ZF
Recommended grease gun
Recommended grease
26 ZS
27 Adjusting the belt tension
Adjusting the R-axis belt tension ZRS
Specified torque
Replacing the R-axis harmonic drive ZRS
Replacement period
Replacement period =8.4⋅108/n⋅60⋅h⋅D⋅N⋅θ years
Replacement period
Mxyx
Memo
Recommended nominal length
Hexagon socket head cap screw M8 Strength 8.8T
MXY X-axis
MXY box position
Adjustment of gantry type support rail
Installation methods Gantry type support axis
Axis wiring box Ground terminal
Return the X-axis wiring box cover to the original position
Installing the Tool
Arm type, gantry type
10 Moving arm type
11 ZF
Arm type, moving arm type, gantry type 3rd-axis option
12 RF
13 Tool installation ZFH
14 ZFL
User Wiring and User Piping
Return each wiring box cover to the original position
Power wire φ7.6 User I/O wire φ10.1 Signal wire φ8.2
User I/O cable specifications
16 Whipover cable user-wire specifications
Mxyx
Periodic Inspections
Recommended grease gun MG70 THK H-type nozzle
Recommended grease gun MG70 THK H-type nozzle
Hxyx
Whipover cable type 10-22
Hxyx
22.5N .m to 36.3N .m 230kgf .cm to 370kgf .cm
10-3
Installation method 2 XZ type
Installation bolt
Hexagon socket bolt M8 Strength 8.8T
10-5
Installation method 3 Gantry type support axis
Protective Connections
XZ type
10-9
10-10
10 Hxyx arm type, gantry type
Arm type, gantry type 2-axis model
11 Hxyx moving arm type
12 Hxyx pole type
Pole type 2-axis model
13 Tool installation ZH
14 ZL
15 ZPH
ZPH Pole type 3rd-axis option
16 RH
User Wiring and User Piping
10-19
ZRH
10-21
18 Whipover cable user-wire specifications
10-23
Periodic Inspections
Recommended grease nipple
Replenishment methods
FXYBX/SXYBX
Installing the Cover 11-21
Replacing the speed reduction belt 11-31
Fxybx
Hexagon socket head cap screw Strength 8.8T
Recommended torque 60 to 90kgf .cm
Sxybx
Cable carrier model
Whipover cable type
Wiring methods Cable carrier type
11-5
Wiring methods Whipover cable type
Fxybx arm type
Fxybx arm type 2-axis model
10 Sxybx arm type
Sxybx arm type 2-axis model
SXYBX-ZF XZ type 2-axis, arm type 3rd-axis option
ZS/ZRS FXYBX, Sxybx 3/4-axis option
14 Tool installation ZFH
15 ZFL
User Wiring and User Piping
11-14
Cable carrier Axis specifications Axis I/O specifications
17 Whipover cable user-wire specifications
11-17
11-18
Changing the motor installation position
Changing the Motor Installation Position
11-20
Installing the Cover
19 Adjusting the speed reduction belt tension
Adjusting the Timing Belt Tension
Adjusting the drive belt tension
Fxybx X-axis, Sxybx X, Y axes
Fxybx Y-axis
Measurement method
Recommended tension meter U-505 Unitta
Adjusting the speed reduction belt tension
Recommended tension gauge U-505 Unitta
Reference
Replacing the motor
Replacing the drive belt
Fxybx X-axis, Sxyb X, Y axes
11-30
Replacing the speed reduction belt
Replacing the slider
11-33
Axis ZF
Axis, Y-axis
Alvania No Showa Shell Daphne Eponex No Idemitsu
Replenishing grease to the ball screw ZF
22 ZS
23 Adjusting the belt tension
24 ZRS belt tension
11-39
11-40
Hxylx
User Wiring and User Piping 12-15
Hxylx
12-2
12-3
Protective bonding
Installation method 3 Gantry type support axis
Cable box Ground terminal Robot cable Cable carrier
Cable lead-out port
Hxylx arm type, gantry type
Hxylx moving arm type
Hxylx pole type
Arm type, gantry type, moving arm type 3rd-axis option
Tool installation ZH
ZL Arm type, gantry type
10 ZPH
11 RH
RH Arm type, gantry type 4th-axis option
User Wiring and User Piping
12-16
12-17
12-18
Whipover cable type moving arm type/pole type 3-axis
Open the X-axis wiring box movable cover
Periodic Inspections
Replenishing grease to the ball screw
12-23
Adjusting the timing belt tension X-axis
Replacing the motor X-axis
12-26
Installing and removing the cover Stroke cover
Installing the stroke cover
Removing the stroke cover
Removing the belt cover
Installing the belt cover
Installing the motor cover
Motor cover
Removing the motor cover
Cartesian robot