GuestWorks and DEFINITY ECS Release 9 | Issue 1 |
Technician Handbook for Hospitality Installations | November 2000 |
Installing the System |
|
Connecting the Hospitality Adjuncts | 63 |
|
|
8400B Options
The options on the 8400B must be set using an ASCII data terminal or a PC using a terminal emulation package. You must connect the data terminal or PC to the EIA interface connector on the back of the 8400B. For the journal/log printers, a subset of options must be changed. These options are changed using the AT command set. Use the following steps to set the options on the 8400B:
1.Set the speed on the data terminal or terminal emulation package to match the speed of the printer. By doing this, the speed on the 8400B will autobaud to match the correct speed.
2. From the data terminal or PC, type at Enter . This automatically sets the speed and parity for the connection. The OK prompt should display.
3.Type the following commands as shown. (The character 0 is the number
zero.) Before you press Enter for each command, make sure that the command has been entered correctly. The e0 option on the last command turns off keyboard echo, which means that after you enter this command, any future keyboard entries will not be displayed, and the OK prompt is not displayed.
at&f Enter | (the | OK prompt displays) | |
ats24=1 | Enter | (the | OK prompt displays) |
at&c1&d2&s1s0=1 | Enter (the OK prompt displays) | ||
ate0q1&w0&y0&v | Enter | ||
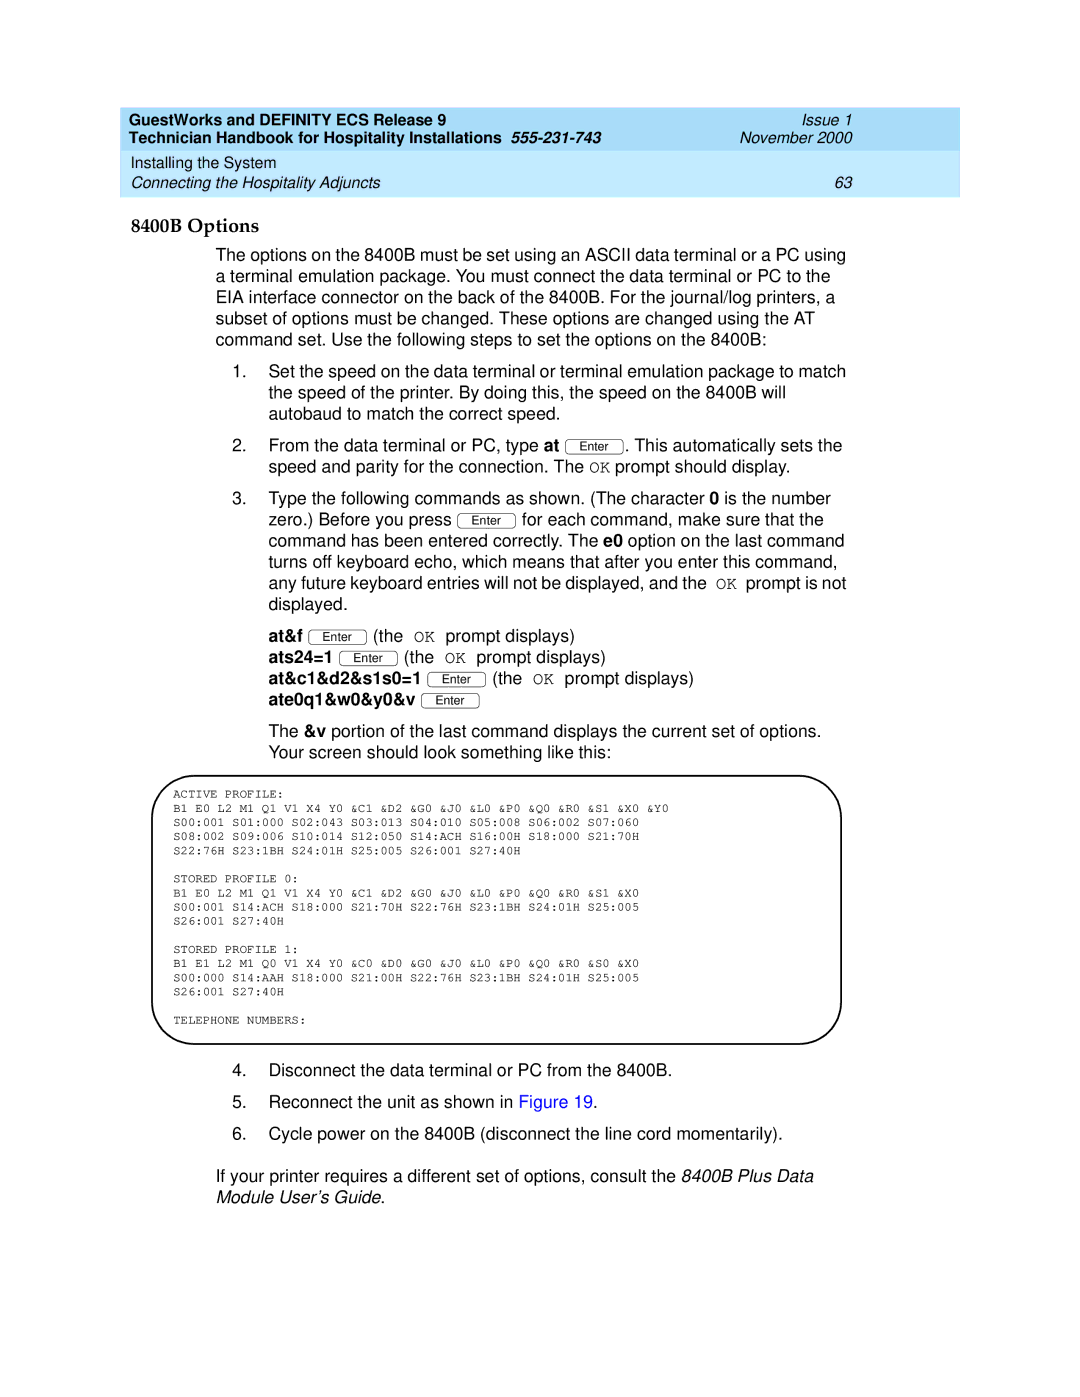
The &v portion of the last command displays the current set of options.
Your screen should look something like this:
ACTIVE PROFILE:
B1 E0 L2 M1 Q1 V1 X4 Y0 &C1 &D2 &G0 &J0 &L0 &P0 &Q0 &R0 &S1 &X0 &Y0
S00:001 S01:000 S02:043 S03:013 S04:010 S05:008 S06:002 S07:060
S08:002 S09:006 S10:014 S12:050 S14:ACH S16:00H S18:000 S21:70H
S22:76H S23:1BH S24:01H S25:005 S26:001 S27:40H
STORED PROFILE 0:
B1 E0 L2 M1 Q1 V1 X4 Y0 &C1 &D2 &G0 &J0 &L0 &P0 &Q0 &R0 &S1 &X0
S00:001 S14:ACH S18:000 S21:70H S22:76H S23:1BH S24:01H S25:005
S26:001 S27:40H
STORED PROFILE 1:
B1 E1 L2 M1 Q0 V1 X4 Y0 &C0 &D0 &G0 &J0 &L0 &P0 &Q0 &R0 &S0 &X0
S00:000 S14:AAH S18:000 S21:00H S22:76H S23:1BH S24:01H S25:005
S26:001 S27:40H
TELEPHONE NUMBERS:
4.Disconnect the data terminal or PC from the 8400B.
5.Reconnect the unit as shown in Figure 19.
6.Cycle power on the 8400B (disconnect the line cord momentarily).
If your printer requires a different set of options, consult the 8400B Plus Data