ENGLISH
FRANÇAIS
Miscellaneous Information | Divers | |||
|
|
| ||
Printing Your Pictures – Using the PictBridgeTM |
| Impression de vos images avec PictBridge <PictBridge> |
| |
✤ By connecting the camera to printers with PictBridge support (sold separately), | ✤ En connectant l’appareil photo à une imprimante avec Pictbridge (vendu séparément), vous | |||
you can send images from the memory card directly to the printer with a few | pouvez envoyer des images à partir de la carte mémoire directement vers l’imprimante en | |||
simple operations using the camera buttons. | faisant quelques opérations simples nécessitant l’utilisation des boutons de l’appareil photo. | |||
✤ Grâce à Pictbridge, vous pouvez commander l’imprimante directement à partir de votre | ||||
✤ With the PictBridge Support, you can control the printer directly through your | ||||
appareil photo afin d’imprimer les images enregistrées. | ||||
camera in order to print out stored pictures. For direct printing of your stored | ||||
✤ Pour imprimer directement vos images enregistrées en vous servant de la fonction | ||||
pictures using the PictBridge function, you must connect your camera to a | ||||
Pictbridge, connectez votre appareil à une imprimante Pictbridge par l’intermédiaire d’un | ||||
PictBridge printer using a USB cable. | câble USB.Pour imprimer des images enregistrées sur la carte mémoire à l’aide de | |||
✤ To print out images stored in the memory card using PictBridge support, follow the | PictBridge, suivez la procédure indiquée | |||
steps: | ■ Branchez votre appareil photo à l’imprimante compatible PictBridge puis sélectionnez | |||
■ Connect your camera to a PictBridge supporting printer and then select | les images à imprimer. | |||
images to print. | ■ Choisissez, le cas échéant, vos options d’impression en suivant les instructions de la | |||
page 139 puis imprimez les images que vous avez sélectionnées | ||||
■ Customize print options as described in page 139 if desired and then print | ||||
page 141). | ||||
your selected images (refer to page 141). | ||||
Connexion à une imprimante | ||||
|
| |||
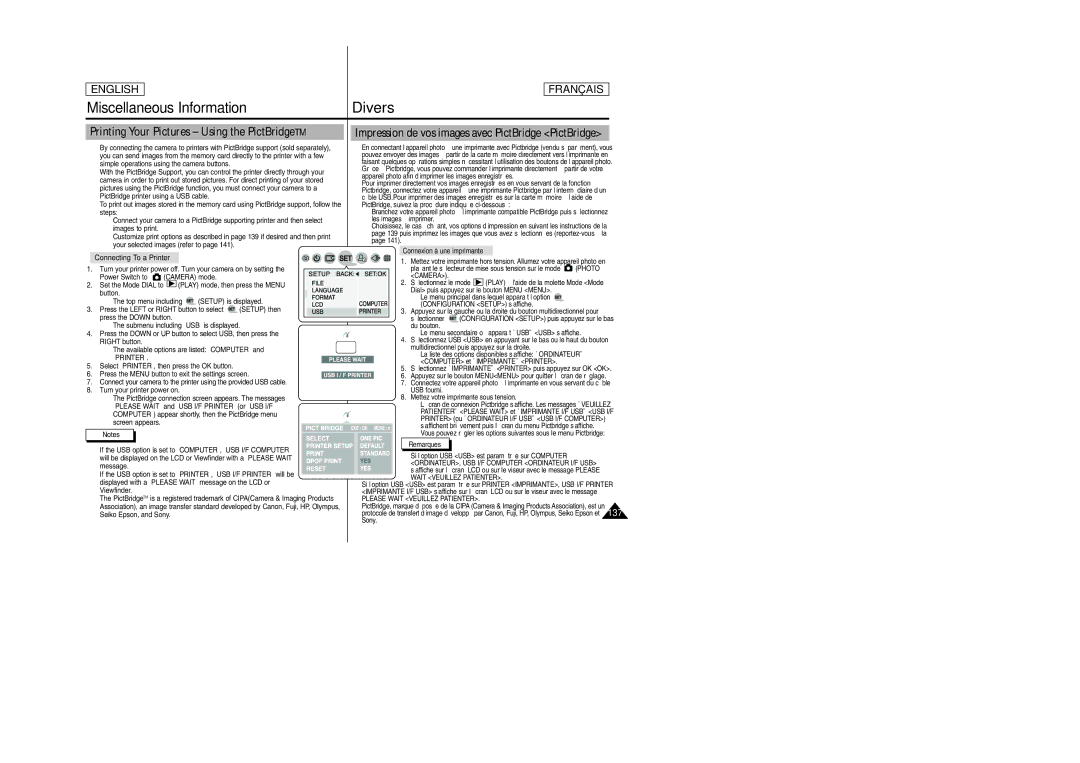
| Connecting To a Printer |
|
| 1. Mettez votre imprimante hors tension. Allumez votre appareil photo en |
| ||||
1. Turn your printer power off. Turn your camera on by setting the | plaçant le sélecteur de mise sous tension sur le mode | (PHOTO |
| ||||||
| Power Switch to | (CAMERA) mode. |
| <CAMERA>). |
| (PLAY) à l'aide de la molette Mode <Mode |
| ||
2. | Set the Mode DIAL to | (PLAY) mode, then press the MENU | 2. Sélectionnez le mode |
| |||||
Dial> puis appuyez sur le bouton MENU <MENU>. |
|
| |||||||
| button. |
|
|
|
|
| |||
|
|
|
| ■ Le menu principal dans lequel apparaît l’option |
|
| |||
| ■ The top menu including | (SETUP) is displayed. |
|
| |||||
| (CONFIGURATION <SETUP>) s’affiche. |
|
| ||||||
3. | Press the LEFT or RIGHT button to select | (SETUP) then |
|
| |||||
3. Appuyez sur la gauche ou la droite du bouton multidirectionnel pour |
| ||||||||
| press the DOWN button. |
|
| sélectionner | (CONFIGURATION <SETUP>) puis appuyez sur le bas | ||||
| ■ The submenu including “USB” is displayed. | du bouton. |
|
|
|
| |||
4. Press the DOWN or UP button to select USB, then press the | ■ Le menu secondaire où apparaît «USB» <USB> s’affiche. |
| |||||||
| RIGHT button. |
|
|
| 4. Sélectionnez USB <USB> en appuyant sur le bas ou le haut du bouton | ||||
| ■ The available options are listed: “COMPUTER” and | multidirectionnel puis appuyez sur la droite. |
|
| |||||
| ■ La liste des options disponibles s’affiche: «ORDINATEUR» |
| |||||||
| “PRINTER”. |
|
|
|
| ||||
|
|
|
| <COMPUTER> et «IMPRIMANTE» <PRINTER>. |
|
| |||
5. | Select “PRINTER”, then press the OK button. |
|
|
| |||||
| 5. Sélectionnez «IMPRIMANTE» <PRINTER> puis appuyez sur OK <OK>. | ||||||||
6. Press the MENU button to exit the settings screen. | 6. Appuyez sur le bouton MENU<MENU> pour quitter l’écran de réglage. |
| |||||||
7. Connect your camera to the printer using the provided USB cable. | 7. Connectez votre appareil photo à l’imprimante en vous servant du câble | ||||||||
8. Turn your printer power on. |
|
| USB fourni. |
|
|
|
| ||
| ■ The PictBridge connection screen appears. The messages | 8. Mettez votre imprimante sous tension. |
|
| |||||
| “PLEASE WAIT” and “USB I/F PRINTER” (or “USB I/F | ■ L’écran de connexion Pictbridge s’affiche. Les messages «VEUILLEZ | |||||||
| COMPUTER”) appear shortly, then the PictBridge menu | PATIENTER» <PLEASE WAIT> et «IMPRIMANTE I/F USB» <USB I/F | |||||||
| PRINTER> (ou «ORDINATEUR I/F USB» <USB I/F COMPUTER>) |
| |||||||
| screen appears. |
|
|
|
| ||||
|
|
|
| s’affichent brièvement puis l’écran du menu Pictbridge s’affiche. |
| ||||
|
|
|
|
|
| ||||
| Notes |
|
|
| Vous pouvez régler les options suivantes sous le menu Pictbridge: |
| |||
✤ If the USB option is set to “COMPUTER”, “USB I/F COMPUTER” | Remarques |
|
|
|
| ||||
✤ Si l’option USB <USB> est paramétrée sur COMPUTER |
|
| |||||||
| will be displayed on the LCD or Viewfinder with a “PLEASE WAIT” |
|
| ||||||
| <ORDINATEUR>, USB I/F COMPUTER <ORDINATEUR I/F USB> |
| |||||||
| message. |
|
|
|
| ||||
|
|
|
| s’affiche sur l’écran LCD ou sur le viseur avec le message PLEASE |
| ||||
✤ If the USB option is set to “PRINTER”, “USB I/F PRINTER” will be |
| ||||||||
WAIT <VEUILLEZ PATIENTER>. |
|
| |||||||
| displayed with a “PLEASE WAIT” message on the LCD or |
|
| ||||||
| ✤ Si l’option USB <USB> est paramétrée sur PRINTER <IMPRIMANTE>, USB I/F PRINTER | ||||||||
| Viewfinder. |
|
|
| <IMPRIMANTE I/F USB> s’affiche sur l’écran LCD ou sur le viseur avec le message |
| |||
✤ The PictBridgeTM is a registered trademark of CIPA(Camera & Imaging Products | PLEASE WAIT <VEUILLEZ PATIENTER>. |
|
|
| |||||
| Association), an image transfer standard developed by Canon, Fuji, HP, Olympus, | ✤ PictBridge, marque déposée de la CIPA (Camera & Imaging Products Association), est un | 137 | ||||||
| Seiko Epson, and Sony. |
|
| protocole de transfert d’image développé par Canon, Fuji, HP, Olympus, Seiko Epson et | |||||
|
|
|
|
| Sony. |
|
|
|
|