ENGLISH
FRANÇAIS
The Camera: Functions | L’appareil photo: Fonctions |
Setting the Clock
✤A
Réglage de l’horloge
✤ Une horloge interne permet d’inscrire la date en mode Photo. Pour davantage d’informations sur l’inscription de la date,
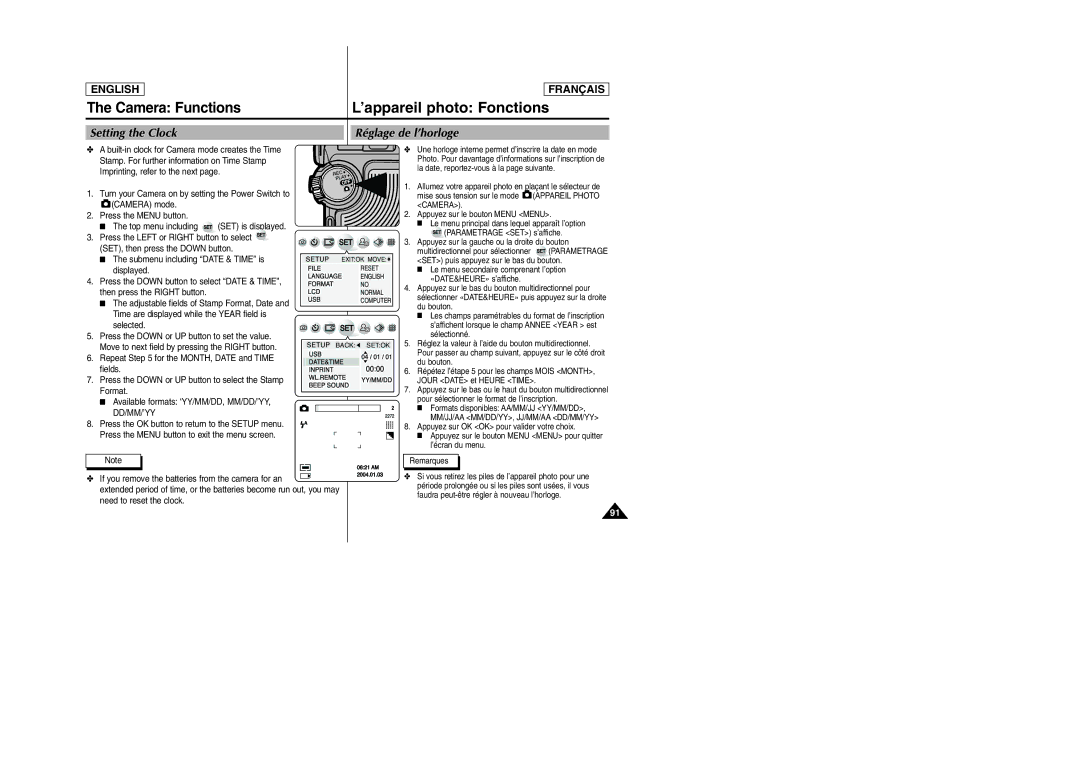
1.Turn your Camera on by setting the Power Switch to
![]() (CAMERA) mode.
(CAMERA) mode.
2.Press the MENU button.
■The top menu including ![]()
![]()
![]()
![]() (SET) is displayed.
(SET) is displayed.
3.Press the LEFT or RIGHT button to select ![]()
![]()
![]()
![]() (SET), then press the DOWN button.
(SET), then press the DOWN button.
■The submenu including “DATE & TIME” is displayed.
4.Press the DOWN button to select “DATE & TIME”, then press the RIGHT button.
■The adjustable fields of Stamp Format, Date and Time are displayed while the YEAR field is selected.
5.Press the DOWN or UP button to set the value. Move to next field by pressing the RIGHT button.
6.Repeat Step 5 for the MONTH, DATE and TIME fields.
7.Press the DOWN or UP button to select the Stamp Format.
■Available formats: ‘YY/MM/DD, MM/DD/’YY, DD/MM/’YY
8.Press the OK button to return to the SETUP menu. Press the MENU button to exit the menu screen.
EXIT:OK MOVE: ![]()
RESET
ENGLISH
NO
NORMAL
COMPUTER
BACK: ![]() SET:OK
SET:OK
'
1.Allumez votre appareil photo en plaçant le sélecteur de
mise sous tension sur le mode ![]() (APPAREIL PHOTO <CAMERA>).
(APPAREIL PHOTO <CAMERA>).
2.Appuyez sur le bouton MENU <MENU>.
■ Le menu principal dans lequel apparaît l’option
![]()
![]()
![]()
![]() (PARAMETRAGE <SET>) s’affiche.
(PARAMETRAGE <SET>) s’affiche.
3.Appuyez sur la gauche ou la droite du bouton
multidirectionnel pour sélectionner ![]()
![]()
![]()
![]() (PARAMETRAGE <SET>) puis appuyez sur le bas du bouton.
(PARAMETRAGE <SET>) puis appuyez sur le bas du bouton.
■Le menu secondaire comprenant l’option «DATE&HEURE» s’affiche.
4.Appuyez sur le bas du bouton multidirectionnel pour
sélectionner «DATE&HEURE» puis appuyez sur la droite du bouton.
■Les champs paramétrables du format de l’inscription s’affichent lorsque le champ ANNEE <YEAR > est sélectionné.
5.Réglez la valeur à l’aide du bouton multidirectionnel. Pour passer au champ suivant, appuyez sur le côté droit du bouton.
6.Répétez l’étape 5 pour les champs MOIS <MONTH>, JOUR <DATE> et HEURE <TIME>.
7.Appuyez sur le bas ou le haut du bouton multidirectionnel pour sélectionner le format de l’inscription.
■Formats disponibles: AA/MM/JJ <YY/MM/DD>, MM/JJ/AA <MM/DD/YY>, JJ/MM/AA <DD/MM/YY>
8.Appuyez sur OK <OK> pour valider votre choix.
■Appuyez sur le bouton MENU <MENU> pour quitter l’écran du menu.
Note
✤ If you remove the batteries from the camera for an ![]() extended period of time, or the batteries become run out, you may need to reset the clock.
extended period of time, or the batteries become run out, you may need to reset the clock.
Remarques
✤Si vous retirez les piles de l’appareil photo pour une période prolongée ou si les piles sont usées, il vous faudra
91