Sftos Command Reference for the S2410
Copyright 2008 Force10 Networks
Major Changes
Sftos Command Reference for the S2410, Version
Other Changes
Deprecated Commands
New Features
Contents
Using the Command Line Interface
Contents
Show running-config
Chapter System Configuration Commands 105
127
System Log
Port-securitymac-address move 166
Dhcp Server Commands
Sntp Commands
Chapter Igmp Snooping Commands 235
Chapter LAG/Port Channel Commands 249
Chapter Quality of Service QoS Commands 275
List of Figures
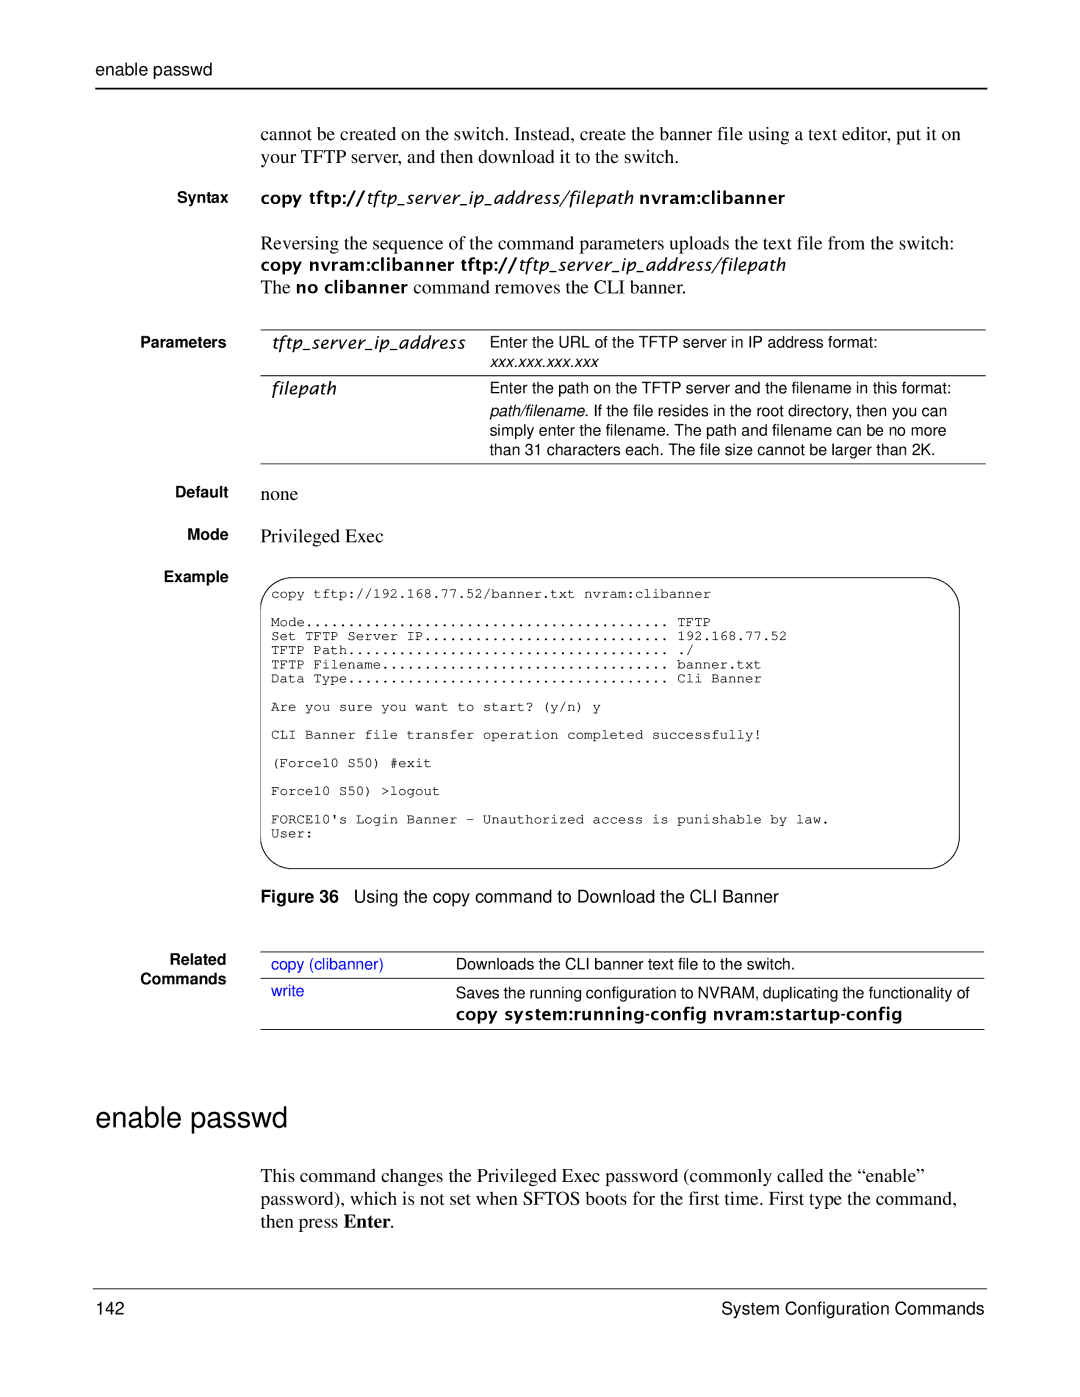
141
List of Tables
Page
About This Guide
Objectives
Audience
How to Use this Guide
About This Guide
Related Documents and Sources of Additional Information
Products and Services Liability
Contact Information
Documentation Feedback
Sftos Command Reference for the S2410, Version
About This Guide
Chapter Sftos Overview
Sftos 2.4.1 Features
Sftos Overview
Ingress Rate Limiting Login Access Control
Igmp Snooping Layer 2 Multicast Forwarding
Sftos Overview
Starting the Switch
Chapter Quick Start
Using the Boot Menu
Press 2 and Enter quickly to access the Boot menu
Boot Menu Options
System Info and System Setup
Show hardware
Physical Port Data
User Account Management
Management IP Address
SSH
Serviceport protocol
Managementethernet Address command Ip address ipaddr
Default gateway
None bootp dhcp
Uploading from the Switch through Xmodem
Downloading to the Switch through Xmodem
Downloading from a Tftp Server
Using Factory Defaults
Clear config
Copy tftp//ip address
Keyword
Command Syntax Conventions
Parameter
Ip address ipaddr subnetmask
Using the Command Line Interface
Loc is a parameter-a placeholder for a required value
Mtrace sourceipaddr destination group
No Form of a Command
Ipaddr
Network Address Syntax
Macaddr
Obtaining Help at the Command Line
Keyboard Shortcuts
Using Command Modes
Partial Keyword Example
Mode-based Topology
CLI Mode Diagram
Enter the ip dhcp pool
Pool-name command
Enter logout or quit
Enter the interface range
Extended command
Mode-based Command Hierarchy
Enter the mac access-list
Enter the tacacs-server
Command Prompt hostname Interface #
Flow of CLI Operation
Using the Web User Interface
Follow these steps to bring up the switch Web UI
Configuring for Web Access
To enable Web browser access to the switch
Web Page Layout
Command Buttons
Switch Navigation Icon in Web UI
Using the Web User Interface
General System Management and Information Commands
This section describes the following commands
None Privileged Exec
System Management Commands
Dir
Dir
Characters
Hostname
Change the text that appears as part of the CLI prompt
Hostname hostname
Interface managementethernet
Interface managementethernet
Ip address management
Syntax ip address ipaddr subnetmask
None Interface ManagementEthernet
Mac-address
Mac-type
Mac-address mac-address
Management route default gateway
Management route default
Management route default
Use no management route default to remove the gateway
Mtu
Mtu
Syntax no mtu
Network parms
Network mac-address
Network mac-type
Network protocol
Serviceport ip ipaddr netmask gateway
Serviceport ip
Protocol none bootp dhcp
Protocol
Communicating with the switch
Serviceport protocol
Show arp switch
Report fields include
Show interface
This command displays inventory information for the switch
Show hardware
Syntax show interface unit/slot/port
Fields in Output of show interface unit/slot/port Command
Show interface
Unit/slot/port
Show interface ethernet
3965
Example of show interface ethernet switchport Output
Show interface ethernet
Recent reboot Address Entries Currently in Use
Packets Received
Packets Received Successfully
Packets Transmitted Octets
Packets Transmitted Successfully
Statistics for this port were last cleared
Show interface managementethernet
Show interface managementethernet
Show interface managementethernet
Show interface switchport
Show interface switchport
Show interface switchport
Fields in Output of show interface switchport Command
Description unit/slot/port
Show interfaces
Show interfaces
Port
Show mac-addr-table
Show logging
Show logging
All
S2410, If Index values are
Count
Show msglog
Show msglog
Show running-config all scriptname
Show running-config
Enabled
Show network
Show serviceport
Show serviceport
Show sysinfo
This command displays switch information
Show sysinfo
Syntax show sysinfo
Show version
Fields in Output of show sysinfo Command
Fields in Output of show version Command
Show version
Show version Fields in Output of show version Command
SNMP-COMMUNITY-MIB
Show tech-support
Show tech-support Fields in Output of show version Command
Syntax show tech-support
This section describes the following Sftos Telnet commands
Telnet Commands
This command assigns the management Vlan of the switch
Vlan participation management
Ip telnet maxsessions
Ip telnet timeout
Minutes, to the default
Time is a decimal value from 1to
Session-timeout
Ip telnet server enable
Session-limit
Show telnet
Telnetcon timeout
Telnet
Serial baudrate
Serial Commands
Telnetcon maxsessions
Telnetcon maxsessions
Console activity to the 5-minute default
Serial timeout
9600 default
Show serial
Show serial Fields of show serial Command Output
Router Ospf Config mode
Snmp Management Commands
Global Config mode
Show serial
Show snmpcommunity
Show snmpcommunity
Show snmptrap
Syntax show snmptrap
Show trapflags
Show trapflags Fields of show snmptrap Command Report
Fields of show trapflags Command Report
Show trapflags
No snmp-server community
Snmp-server
Snmp-server community
None
Snmp-server community ipmask
Snmp-server community mode
Snmp-server community ipaddr
Syntax snmp-server community ipaddr ipaddr name
Snmp-server community ro
Snmp-server enable traps bcaststorm
Snmp-server community rw
No version of this command disables Multiple User traps
Snmp-server enable traps linkmode
Snmp-server enable traps multiusers
Syntax no snmp-server enable traps linkmode
Snmp-server traps enable
Snmp-server enable traps stpmode
Snmp-server enable trap violation
This command enables the Authentication traps
Snmptrap
Snmptrap mode
Snmptrap ipaddr
Snmp trap link-status all
Snmp trap link-status
Snmptrap snmpversion
Snmptrap snmpversion 104 System Management Commands
System Configuration Commands
Sftos Command Reference for the S2410, Version 105
Bridge aging-time
Configure
106 System Configuration Commands
Bridge aging-time
Password for the command
Enable
Modes to which the Global Config mode provides a gateway
User Exec
Interface range
Configuration
Interface
Specified interface
Range,range
Ethernet
Port-channel
Vlan
Commands Available in Ethernet Range Mode
110 System Configuration Commands
Bulk Configuration Warning Message
Single Range Bulk Configuration
Destination interface
Monitor session
Be only one destination port
Mode
No monitor
Monitor session 1 mode
Syntax no monitor session 1 mode
Syntax no monitor
Show forwardingdb agetime
This command displays the timeout for address aging
No monitor session
Show mac-address-table
For 1-3965, you have the option of entering a valid Vlan ID
Show mac-address-table multicast
By specifying the MAC address as an optional parameter
Show mac-address-table multicast macaddr
Displays the Multicast Forwarding Database Mfdb
Show mac-address-table stats
Show monitor session
Information
Show port
Sftos Command Reference for the S2410, Version 117
Show port
Syntax show monitor session
Show port all Command Output Example
118 System Configuration Commands
Shutdown all
Show port protocol
Shutdown Interface
For the indicated group
Virtual LAN Vlan Commands
Virtual LAN Vlan commands in this section are
Clear vlan
Sftos Command Reference for the S2410, Version 121
Clear vlan
Syntax clear vlan
Enter a description for the selected interface port or Vlan
122 System Configuration Commands
Description
Description
Interface vlan
Sftos Command Reference for the S2410, Version 123
Encapsulation Vlan
Interface Vlan
Makestatic
124 System Configuration Commands
Makestatic
Syntax makestatic
Mtu Vlan
Name Vlan
Participation Vlan
126 System Configuration Commands
Network mgmtvlan
Priority Vlan
Group that is identified by this groupid
Except when Gvrp is expected to create the Vlan
Protocol group
Such as conf-if-range-vlan 10-20#
Pvid Vlan
Configure the Vlan ID for a specific port Interface Vlan
Protocol vlan group all
Fail and the interfaces will not be added to the group
Id vlanid
Show vlan
Show vlan brief id vlanid name port Brief
Name
Display 802.1Q port parameters
130 System Configuration Commands
Show vlan port
Show vlan port
Tagged
Sftos Command Reference for the S2410, Version 131
Tagged
Tagged unit/slot/port
Vlan
132 System Configuration Commands
Untagged
Untagged
Vlan ingressfilter
Vlan acceptframe
Vlan database
Vlan participation interface
Vlan port acceptframe
This command changes the Vlan ID for all interfaces
Vlan participation all
Vlan port ingressfilter all
Vlan port untagging all
Sftos Command Reference for the S2410, Version 135
Vlan port tagging all
Vlan port tagging all
Vlan protocol group add protocol
Vlan protocol group
Vlan protocol group remove
Vlan tagging
Sftos Command Reference for the S2410, Version 137
Vlan pvid
Vlan untagging
Syntax clear config
Clear config
System Utility Commands
Clear counters
Clear igmpsnooping
Clear port-channel
Clear traplog
Copy
Copy
Specify a URL for the destination in this form
Trap log nvramtraplog
Path/filename nvramstartup-config
Copy systemrunning-config nvramstartup-config
Nvramstartup-config and copy tftp //tftpserveripaddress
Copy clibanner
Copy nvramclibanner tftp//tftpserveripaddress/filepath
Enable passwd
No clibanner command removes the CLI banner
Tftpserveripaddress
Quit
Enable passwd password
Logout
Quit
Show terminal length
Ping
Reload
Reload
Lines Use Exec or Privileged Exec
Terminal length
Traceroute
Destination through the network on a hop-by-hop basis
Write
Configuration Scripting
Commands in this section are
Functionality of this
Script list
Script apply
Script delete
Present
Script validate
Format of display is Line no Line contents
Script show
Script file
Logging buffered
Sftos Command Reference for the S2410, Version 149
Syntax logging buffered severitylevel
No logging cli-command
Logging cli-command
Commands issued on the system
Logging buffered wrap
Logging console
Logging host
Logging host remove
Logging host reconfigure
This command removes the identified host
Logging persistent
Logging syslog
Use no logging syslog to disable syslog logging
Disabled local0
Logging syslog
Show logging buffered
This command displays buffered logging the System log
Show logging buffered
Show logging buffered
Unit variable is the host index
This command displays configured logging hosts
Show logging hosts
Show logging hosts unit
Show logging traplogs
Show logging traplogs
Show logging traplogs
156 System Log
Clear pass
Sftos Command Reference for the S2410, Version 157
Syntax clear pass
Disconnect
Show loginsession
Login Session ID
Show users
Username passwd
Users snmpv3 authentication
Users snmpv3 accessmode
Users snmpv3 encryption
No encryption
Sftos Command Reference for the S2410, Version 161
Associated with the specified encryption
Users snmpv3 encryption
Users snmpv3 encryption 162 User Account Commands
This section contains the following commands
Sftos Command Reference for the S2410, Version 163
Port-security max-dynamic
164 Security Commands
Port-security
Port-security
Port-security mac-address
Sftos Command Reference for the S2410, Version 165
Port-security max-static
Port-security max-static
Port-security mac-address move
Show port-security
MAC Address MAC address of the dynamically locked MAC
Sftos Command Reference for the S2410, Version 167
Show port-security dynamic
Show port-security dynamic
MAC Address-MAC Address of statically locked MAC
Show port-security static
Show port-security violation
Locked port
No authentication login listname
Authentication login
Authentication login
Sftos Command Reference for the S2410, Version 169
Clear radius statistics
Dot1x defaultlogin
Clear dot1x statistics
Clear dot1x statistics unit/slot/port all
Dot1x initialize
Dot1x login
Be a configured authentication login list
Dot1x max-req
Dot1x port-control force-unauthorized force-authorized auto
Dot1x port-control
Dot1x port-control all
Auto
Unauthorized
Dot1x re-authenticate
Dot1x re-authentication
Authorized
Dot1x system-auth-control
Dot1x timeout
Switch
Can be changed, but is not activated
Dot1x user
Show authentication
Sftos Command Reference for the S2410, Version 175
Dot1x user
User column
Show authentication users
Show dot1x
Displayed
Sftos Command Reference for the S2410, Version 177
Show dot1x
Example of Output from the show dot1x detail Command
178 Security Commands
Show dot1x users
Show users authentication
Show users authentication
Show dot1x users unit/slot/port
Users will be authenticated using local authentication only
Users defaultlogin
Users login
Accidental lockout from the switch
Value i.e. the Radius accounting function is disabled
Radius accounting mode
Radius server host
Radius server key
Authentication server
182 Security Commands
Radius server key
Radius server primary
Previously configured Radius authentication server
Radius server msgauth
Radius server retransmit
Radius server timeout
Show radius
Show radius accounting statistics
Radius Accounting Mode
Show radius accounting statistics
Show radius accounting statistics IP address
Radius Accounting Server
Show radius statistics authentication
186 Security Commands
Otherwise all the following listed fields are displayed
Show radius statistics authentication
Sftos Command Reference for the S2410, Version 187
Tacacs-server key
Not configured
Tacacs-server host
To delete a key, use the no tacacs-server key key
To restore the default, enter no tacacs-server timeout
Tacacs-server timeout
Specify a global timeout value for all TACACS+ hosts
Seconds Global Config
Specify a server port number for a particular Tacacs host
Port
Priority
Priority priority
Single-connection
Timeout
Specify the timeout value for a particular Tacacs host
Show tacacs
Ip ssh maxsessions
192 Security Commands
Ip ssh maxsessions
Ip ssh maxsessions
Disabled Global Config
Ip ssh server enable
Enable SSH No version of this command disables SSH
Ip ssh protocol
Show ip ssh
Ip ssh timeout
This command displays the SSH settings
Report fields
Sshcon maxsessions
Sshcon timeout
Sftos Command Reference for the S2410, Version 195
Sshcon maxsessions
SSL3 and TLS1 Global Config
Ip http javamode enable
This command is used to set the Sslt port
Ip http secure-port
No ip http secure-server enable disabled
Ip http secure-server enable
Ip http server enable
No ip http server enable
Show ip http
Show ip http
Show ip http
Show storm-control
This command displays switch configuration information
Show storm-control
Show storm-control unit/slot/port all
Storm-control flowcontrol
This command enables 802.3x flow control for the switch
Storm-control broadcast
No storm-control broadcast
Sftos Command Reference for the S2410, Version 201
Storm-control flowcontrol
Storm-control flowcontrol 202 Security Commands
Dhcp Server Commands
Sftos Command Reference for the S2410, Version 203
Clear ip dhcp binding
Bootfile
Mode Dhcp Pool Config
Clear ip dhcp server statistics
Client-identifier
Clear ip dhcp conflict
Client-name
Dns-server
Default-router
Domain-name
From 0 to 255. IP address 0.0.0.0 is invalid
Hardware-address
Host
Prefix-length is an integer from 0 to
Ip dhcp conflict logging
Ip dhcp bootp automatic
Ip dhcp excluded-address
Ip dhcp pool
Ip dhcp ping packets
Lease
Netbios-node-type
Netbios-name-server
Network
Next-server
Option
Show ip dhcp binding
Service dhcp
Service dhcp
No option code
Show ip dhcp global configuration
Show ip dhcp global configuration
Show ip dhcp pool configuration
Show ip dhcp pool configuration name all
Show ip dhcp conflict
This command displays Dhcp server statistics
Show ip dhcp server statistics
Specified, all the conflicting addresses are displayed
Sntp broadcast client poll-interval
Where poll-interval can be a value from 6 to
Sftos Command Reference for the S2410, Version 215
Sntp broadcast client poll-interval poll-interval
Sntp client port
Sntp client mode
This command sets the Sntp client port ID to a value from
Processed
Sntp unicast client poll-interval
Sntp unicast client poll-timeout
Sntp unicast client poll-retry
Show sntp
This command is used to display Sntp settings and status
Sntp server
Sntp servers
Show sntp client
This command is used to display Sntp client settings
Sftos Command Reference for the S2410, Version 219
Show sntp client
Show sntp server
For each configured server
220 Sntp Commands
Show sntp server
Dvlan-tunnel ethertype 802.1Q vman custom
Sftos Command Reference for the S2410, Version 221
Dvlan-tunnel ethertype
Vman
Interface. By default, Double Vlan Tunneling is disabled
Mode dot1q-tunnel
Mode dvlan-tunnel
Interface Config
Show dot1q-tunnel
Sftos Command Reference for the S2410, Version 223
Show dot1q-tunnel interface unit/slot/port all
Show dvlan-tunnel
224 VLAN-Stack Commands
Show dvlan-tunnel
Show dvlan-tunnel interface unit/slot/port all
Commands in this sections are
Set garp timer join
Garp Commands
Sftos Command Reference for the S2410, Version 225
Set garp timer join No set garp timer join
Set garp timer leave
Set garp timer leave
Syntax set garp timer leave
Show garp
Set garp timer leaveall
Syntax set garp timer leaveall
Show garp
Garp Vlan Registration Protocol Gvrp Commands
Gvrp adminmode enable
Gvrp interfacemode enable
This command enables Gvrp globally
Show gvrp configuration
Gvrp interfacemode enable all
Set gvrp adminmode
Set gvrp interfacemode
Show gvrp configuration
230 GARP, GVRP, and Gmrp Commands
Gmrp adminmode
Gmrp adminmode
Garp Multicast Registration Protocol Gmrp Commands
Syntax gmrp adminmode enable
Changed to gmrp adminmode
Set gmrp adminmode
Gmrp interfacemode enable all
Gmrp interfacemode enable all
Set gmrp interfacemode all
Show gmrp configuration
Set gmrp interfacemode
One or all interfaces
Multicast Forwarding Database Mfdb table
234 GARP, GVRP, and Gmrp Commands
Show mac-address-table gmrp
Show mac-address-table gmrp
Igmp Snooping Commands
Sftos Command Reference for the S2410, Version 235
Disabled Interface Config Interface Vlan
Igmp enable interface
Igmp enable global
Revised from set igmp. Added Interface Vlan mode
Entry
Igmp fast-leave interface
Igmp groupmembership-interval interface
To 3600 seconds
No igmp interfacemode enable all
Igmp interfacemode enable all
Igmp interfacemode enable all
238 Igmp Snooping Commands
Igmp maxresponse
Mode and Interface Vlan mode
Igmp mcrtexpiretime interface
No igmp mcrtexpiretime
Igmp mrouter interface
Igmp mrouter interface enable
No igmp mrouter interface enable
No igmp mrouter vlanId
Set igmp fast-leave
Set igmp interface
Set igmp system
Set igmp groupmembership-interval global
Set igmp groupmembership-interval interface
Version 2.3 Revised to igmp mrouter interface enable
242 Igmp Snooping Commands
Set igmp interfacemode all
Set igmp maxresponse interface
Sftos Command Reference for the S2410, Version 243
Set igmp maxresponse global
Set igmp maxresponse global
Set igmp mcrtexpiretime interface
244 Igmp Snooping Commands
Set igmp mcrtexpiretime global
Set igmp mcrtexpiretime global
Revised to igmp mrouter
Set igmp mrouter
Show igmpsnooping
Show igmpsnooping unit/slot/port Unit/slot/port
Show igmpsnooping mrouter interface unit/slot/port vlan
Show igmpsnooping fast-leave
Show igmpsnooping mrouter interface
Vlan
Show mac-address-table igmpsnooping
Sftos Command Reference for the S2410, Version 247
Show mac-address-table igmpsnooping
Syntax show mac-address-table igmpsnooping
Page
Sftos Command Reference for the S2410, Version 249
Addport
250 LAG/Port Channel Commands
Deleteport interface config
Deleteport interface config
Addport unit/slot/port
Deleteport unit/slot/port all
Deleteport global config
Port-channel
No port-channel name
Port-channel enable interface
Port-channel enable all global
Port-channel linktrap
Port-channel name
This command renames a LAG port channel or all LAGs
All configured LAGs
Port-channel staticcapability
Port lacptimeout global
Port lacpmode enable all
Port lacpmode
Interface Config Interface Range
Port lacptimeout interface
Show port-channel brief
Syntax show port-channel brief
Show port-channel
For each LAG, the following information is displayed
Show port-channel Lagid all
Port channel/LAG Summary
Sftos Command Reference for the S2410, Version 257
Show port-channel summary
Show port-channel summary
258 LAG/Port Channel Commands
This command disables the selected LAG port channel
No version of this command enables the selected LAG
Shutdown
Sftos Command Reference for the S2410, Version 259
Are displayed
260 Spanning Tree STP Commands
Show spanning-tree
Show spanning-tree
Show spanning-tree interface
Following details are displayed on execution of the command
Show spanning-tree interface unit/slot/port
Show spanning-tree mst port detailed
262 Spanning Tree STP Commands
Show spanning-tree mst detailed
Show spanning-tree mst detailed
Sftos Command Reference for the S2410, Version 263
Show spanning-tree mst port detailed
Show spanning-tree mst summary
Switch. On execution, the following details are displayed
Show spanning-tree mst port summary
For each Mstid
Show spanning-tree vlan
Details are displayed on execution of the command
Show spanning-tree summary
Spanning-tree
No spanning-tree configuration name name
Spanning-tree configuration name
Spanning-tree configuration revision
Spanning-tree bpdumigrationcheck
Spanning-tree forceversion
Spanning-tree configuration revision
Spanning-tree edgeport
Words
Spanning-tree hello-time
Internal spanning tree to the default value, in other words
Spanning-tree forward-time
Value being greater than or equal to Bridge Max Age / 2 +
Spanning-tree mst
Spanning-tree max-age
Spanning-tree max-hops
Syntax spanning-tree max-age No spanning-tree max-age
No spanning-tree mst
Cost auto external-cost auto port-priorty Interface Config
270 Spanning Tree STP Commands
No spanning-tree mst
Maximum number of multiple instances supported by Sftos is
Spanning-tree mst instance
Spanning-tree mst priority
Multiple spanning tree instance to be removed
Spanning-tree mst vlan mstid vlanid
Spanning-tree port mode enable
Spanning-tree mst vlan
No spanning-tree mst vlan mstid vlanid
No spanning-tree port mode enable
Spanning-tree port mode enable all
Spanning-tree port mode enable all
No spanning-tree port mode enable all
Page
Class of Service CoS Commands
Sftos Command Reference for the S2410, Version 275
Classofservice dot1p-mapping userpriority trafficclass
Classofservice dot1p-mapping
No form of this command is not supported
Userpriority range is
Cos-queue max-bandwidth
Classofservice trust
Classofservice trust dot1p
Syntax no cos-queue max-bandwidth bw-0…bw-3
Up to four in the S2410
Cos-queue min-bandwidth
Cos-queue random-detect
Operation for the specified queues
Cos-queue strict
Random-detect exponential-weighting-constant
Random-detect exponential-weighting-constant commands
Four in the S2410
Random-detect queue-parms
280 Quality of Service QoS Commands
Random-detect queue-parms
Queue-id-1 queue-id-2
System-wide port trust mode used for all interfaces
Show classofservice dot1p-mapping
Show classofservice trust
For a specific interface
Show interfaces random-detect
Settings are displayed
Show interfaces cos-queue
Report Fields Non-IP Traffic
Show interfaces tail-drop-threshold
Sftos Command Reference for the S2410, Version 283
Show interfaces tail-drop-threshold
Syntax show interfaces random-detect slot/port
Tail-drop queue-parms
Global Config and Interface Config
284 Quality of Service QoS Commands
Tail-drop queue-parms
Provisioning Ieee 802.1p Commands
Classofservice dot1pmapping
Differentiated Services DiffServ Commands
Traffic-shape
Vlan port priority all
Show classofservice dot1pmapping
Configuration will override this configuration setting
Vlan priority
This chapter covers the following commands
Sftos Command Reference for the S2410, Version 287
Any bpdu
Ibmsna, ipv4, ipv6, ipx, mplsmcast, mplsucast, netbios
Denypermit
Vlan eq
Assign-queue
Secondary-vlan
Secondary-cos
Redirect
Mac access-list extended name
Mac access-list extended
Mac Access List Config
Access-list extended command
Sftos Command Reference for the S2410, Version 291
Mac access-list extended rename
Mac access-list extended rename name newname
Newname
Mac access-group name 1-4294967295in
Mac access-group
Show mac access-lists
Show mac access-lists name
Show mac access-lists
Sftos Command Reference for the S2410, Version 293
Show mac access-lists 294 ACL Commands
Sftos Command Reference for the S2410, Version 295
Index
Copy 37-38
296 Index
Sftos Command Reference for the S2410, Version 297
Html Http
298 Index
Sftos Command Reference for the S2410, Version 299
PDUs 225
Show inventory 114-116, 119, 169, 227, 229
300 Index
Sftos Command Reference for the S2410, Version 301
Show sysinfo 83, 222
75-77
302 Index
Sftos Command Reference for the S2410, Version 303
Gvrp IDs 134
304 Index