Start-Up, Operation, and Maintenance Instructions
Safety Considerations
Page
Page
Page
Page
Page
Contents
Analog Signal
Summary Details Oil Reclaim System
Definitions
General PIC System Components
Digital Signal Volatile Memory
General Alarm and Alerts
LID Operation and Menus
Safety Controls
PIC System Functions
Shunt Trip
Oil Cooler Remote Start/Stop Controls Spare Safety Inputs
Spare Alarm Contacts
Condenser Pump Control Condenser Freeze Protection
Ice Build Control
Ice Build Initiation
Changing Refrigerant Types Attaching to Other CCN Modules
Service Operation
Attach to Network Device Control
To Log On To Log Off Holiday Scheduling
Chilled Water Recycle Mode Safety Shutdown
Before Initial Start-Up
Oil Charge Power Up the Controls and Check the Oil Heater
Software Version
Input Service Configurations
To Confirm Refrigerant Type To Change Refrigerant Type
Charge Refrigerant into Machine
If Rotation Is Proper If the Motor Rotation Is Not Clockwise
Operator Duties
Preparation Operating the Optional Pumpout Compressor
To Read Refrigerant Pressures
Machines with Storage Tanks
Machines with Isolation Valves
Return Refrigerant to Normal Operating Conditions
Trim Refrigerant Charge
Test After Service, Repair, or Major Leak
Checking the Auxiliary Switch on Guide Vane Actuator
Check the Lubrication System
Oil Changes
To Change the Oil
Cooler Condenser
Control Algorithms Checkout Procedure
Optional Pumpout System Maintenance
Ordering Replacement Chiller Parts
Transducer Replacement
Control Test Control Modules
Processor Module Psio
Starter Management Module SMM
Solid-State Starters
Physical Data
List of Tables
Major PIC Components and Panel Locations LID Screens
Temperature F
HCFC-22 Pressure Temperature F
HCFC-22 Pressure Temperature C
Temperature C
Contents
Contents
19XL Identification
Control Sensors Temperature
Power Panel with Options
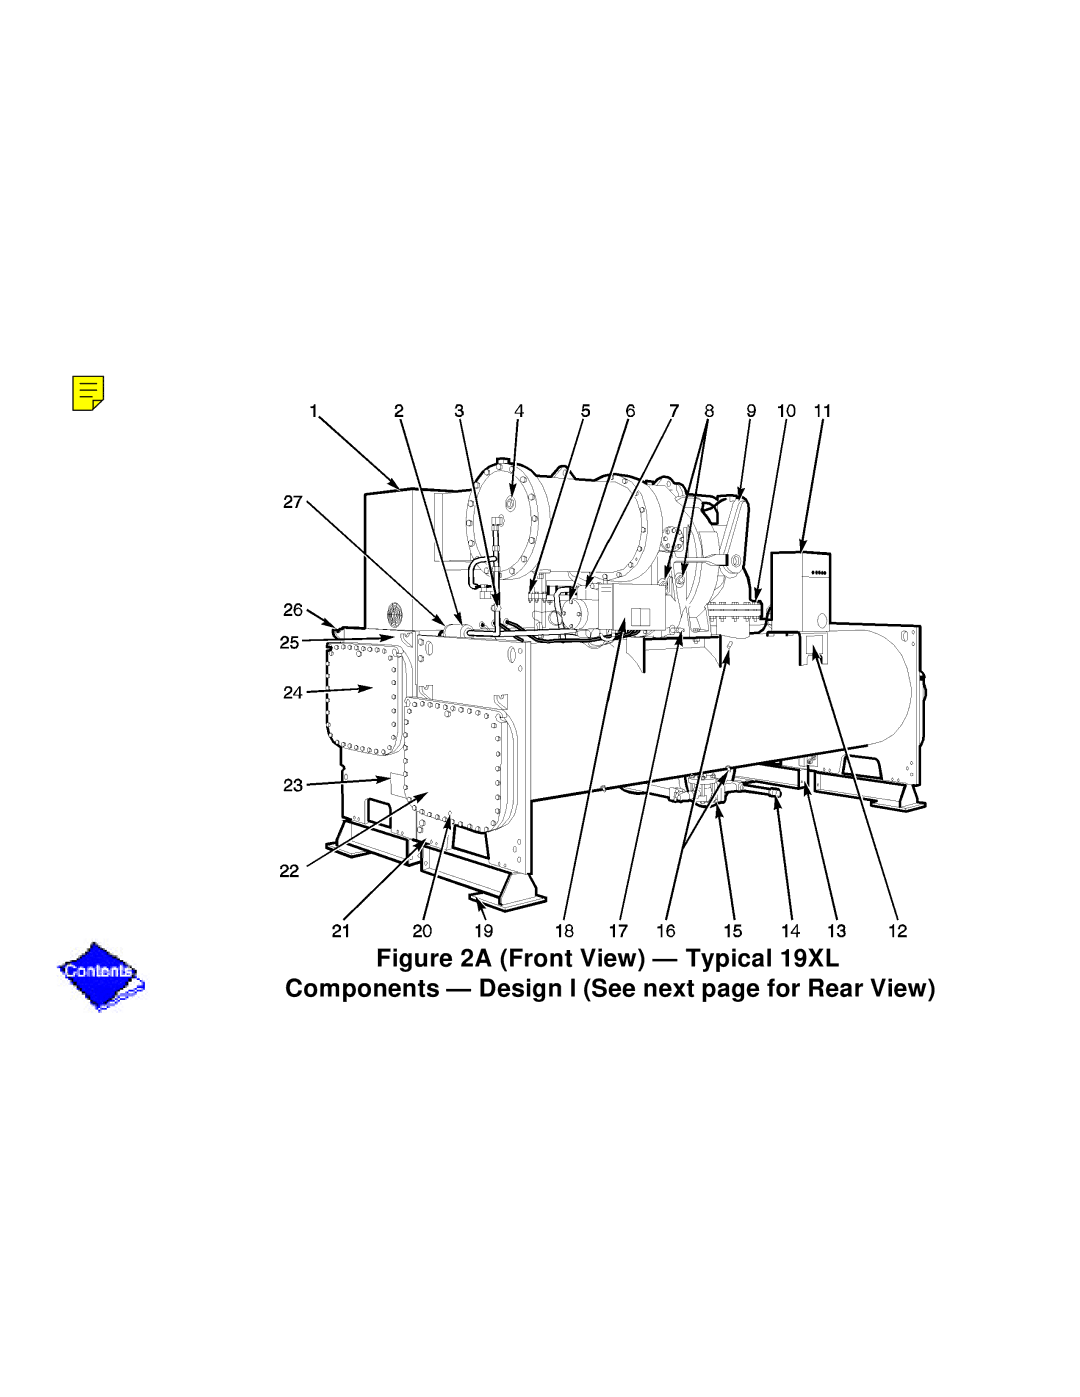
Typical 19XL Components Design
LID Default Screen
Dehydration Cold Trap
Optional Pumpout System Controls
Compressor Fits and Clearances
Introduction
Page
Abbreviations and Explanations
Frequently used abbreviations in this manual include
Machine Familiarization
Machine Information Plate
Factory-Mounted Starter Optional
Storage Vessel Optional
Refrigeration Cycle
Motor/Oil Refrigeration Cooling Cycle
Page
Lubrication Cycle
Summary
Page
Click here for Lubrication System
Page
Starting Equipment
Unit-Mounted Solid-State Starter Optional
Page
Unit-MountedWye-Delta Starter Optional
Digital Signal
Controls
General
Processor Module Psio
Starter Management Module SMM
Pack Relay Board
Hot Gas Bypass Contactor Relay 3C Optional
Control Transformers T1-T4
LID Operation and Menus , , , , , , and Figure
General
Alarms and Alerts
Menu Structure
Next Previous Select Exit
Status Schedule Setpoint Service
To View Point Status Figure
Next Previous Select Enter
To Override a Value or Status
Click here for 19XL Service Menu Structure
To Remove an Override
Override Indication
Time Schedule Operation Figure
Press Select to access and view the time schedule
Enable Disable Enter Exit
Click here for Example of Time Schedule Operation Screen
To View and Change Set Points Figure
Click here for Example of Set Point Screen
Service Operation
LID Screens
Click on an example to view
LID Screens Click on an example to view
Capacity Control
Entering Chilled Water Control
Deadband
Control Point
Demand Limiting
Occupancy Schedule
Psio Software Version 08 and Lower
Psio Software Version 09 and Higher
Safety Controls
Page
Default Screen Freeze
Ramp Loading Control
Capacity Override Table
High Discharge Temperature Control
Oil Sump Temperature Control
Psio Software Version 08 and Lower
Oil Cooler
Psio Software Version 09 and Higher
Remote Start/Stop Controls
Condenser Pump Control
Condenser Freeze Prevention
Tower-Fan Relay
Page
Auto. Restart After Power Failure
Page
Page
Surge Prevention Algorithm
Page
Surge Protection
Lead/Lag Control
Common Point Sensor Installation
Machine Communication Wiring
Lead/Lag Chiller Configuration and Operation
Page
Standby Chiller Configuration and Operation
Lag Chiller Start-Up Requirements
Lag Chiller Shutdown Requirements
WATER/BRINE Deadband
Faulted Chiller Operation
Auto. Restart After Power Failure
Ice Build Control
Ice Build Initiation
Start-Up/Recycle Operation
Temperature Control During Ice Build
Return to Non-Ice Build Operations
Attach to Network Device Control
Changing Refrigerant Types
Click here for Example of Attach to Network Device Screen
Enter a 4 Digit Password
To Log On
Holiday Scheduling Figure
Status Schedule Setpoint Service
Next Previous Select Exit
Press Select to modify the month, day, or duration
Click here for Example of Holiday Period Screen
Start-Up/Shutdown/Recycle Sequence Figure
Local Start-Up
Click here for Control Sequence
Page
Chilled Water Recycle Mode
Page
Safety Shutdown
Before Initial Start-Up
Job Data Required
Using the Optional Storage Tank and Pumpout System
Remove Shipping Packaging
Check Machine Tightness
Click here for 19XL Leak Test Procedures
Page
Page
Standing Vacuum Test
Page
Machine Dehydration
Page
Click here for Dehydration Cold Trap
Check Optional Pumpout Compressor Water Piping
Check Relief Devices
Page
Page
Carrier Comfort Network Interface
Manufacturer Cable No
Check Starter
Mechanical-Type Starters
Benshaw, Inc. Solid-State Starter
Page
Print and use for job file
Potentiometer Adjustment
Page
Current Limit
Ramp Time Adjustable Current Ramp
Changing Adjustments
Pulse Start
Oil Charge
Voltage Measurements
Power Up the Controls and Check the Oil Heater
Set Up Machine Control Configuration
Input the Design Set Points
Input the Local Occupied Schedule OCCPC01S
To Confirm Refrigerant Type
Password
Input Time and Date
Configure SERVICE1 Table
Estimated Maximum Load Conditions
Calculate Maximum Load
Calculate Minimum Load
Load Surge Prevention Occurs Too Soon Occurs Too Late
Modify Amp Correction Factors
Config Table Modifications
Owner-Modified CCN Tables
Check Voltage Supply
Page
Check Optional Pumpout System Controls and Compressor
19XL Machine Equalization without Pumpout Unit
Click here for Control Test Menu Functions
19XL Machine Equalization with Pumpout Unit
Page
Initial Start-up
Preparation
Trimming Refrigerant Charge
Page
Manual Operation of the Guide Vanes
Check Rotation
Click here for Correct Motor Rotation
Check Oil Pressure and Compressor Stop
Check Machine Operating Condition
Cooler-Condenser
Refrigerant, motor cooling, lubrication, and oil reclaim
Operating Instructions
Prepare the Machine for Start-Up
Page
To Stop the Machine
Extended Shutdown
Cold Weather Operation
Click here for Refrigeration Log For Print
Pumpout and Refrigerant Transfer Procedures
Machines with Storage Tanks
Transfer Refrigerant from Storage Tank to Machine
Valve Condition
Page
Open valves 2
Transfer the Refrigerant from Machine to Storage Tank
Page
Page
Transfer All Refrigerant to Condenser Vessel
Page
Transfer All Refrigerant to Cooler/Compressor Vessel
Valve Condition
Return Refrigerant to Normal Operating Conditions
Page
General Maintenance
Refrigerant Properties
Adding Refrigerant
Refrigerant Leak Testing
Refrigerant Tracer
Repair the Leak, Retest, and Apply Standing Vacuum Test
Checking Guide Vane Linkage
Click here for Guide Vane Actuator Linkage
Weekly Maintenance
Scheduled Maintenance
Service Ontime
Check Safety and Operating Controls Monthly
Page
ISO Viscosity Grade
Refrigerant Filter
Click here for 19XL Float Valve Designs
Compressor Bearing and Gear Maintenance
Cooler
Water Leaks
Water Treatment
Inspect the Starting Equipment
Check Pressure Transducers
Optional Pumpout Compressor Oil Charge
Optional Pumpout Safety Control Settings Figure
Troubleshooting Guide
Overview
Resistance Check
Voltage Drop
Checking Pressure Transducers
Page
Page
Transducer Replacement
MAINT01 MAINT02 MAINT03 MAINT04
Control Test
Page
Page
Control Modules
Red Led
LID Module
Psio Module
Input Modules and SMM
Module Address
SW1 SW2
Page
Processor Module Psio Figure
Inputs
Starter Management Module SMM Figure
Options Modules 8-Input
Option Module
Click here for Options Module
Installation
Page
Restore chiller to normal operation, calibrate motor amps
Page
Damage to the starter may result if wires are reversed
Page
Electronic Protection Relay EPR
Page
Page
Physical Data
Page
Page
Major PIC Components and Panel Locations
Pic Component Panel Location
Description Range Units Reference Point Name Alarm History
Example 1 Status01 Display Screen
Example 1 Status01 Display Screen
Entering Chilled Water
Example 2 Status02 Display Screen
Example 2 Status02 Display Screen
Example 3 Status03 Display Screen
Example 3 Status03 Display Screen
Example 4 Setpoint Display Screen
Example 4 Setpoint Display Screen
Press Setpoint
Example 5 Configuration Config Display Screen
Example 5 Configuration Config Display Screen
Example 6 Lead/Lag Configuration Display Screen
Example 6 Lead/Lag Configuration Display Screen
Example 7 Service1 Display Screen
Example 7 Service1 Display Screen
Surge/HGBP Delta P2
Example 8 Service2 Display Screen
Example 8 Service2 Display Screen
Spare 2 20 mA Power Source
Example 9 Service3 Display Screen
Example 9 Service3 Display Screen
Example 10 Maintenance Maint01 Display Screen
Example 10 Maintenance Maint01 Display Screen
Description Range/Status Units Reference Point Name
Example 11 Maintenance Maint02 Display Screen
Example 11 Maintenance Maint02 Display Screen
Example 12 Maintenance Maint03 Display Screen
Example 12 Maintenance Maint03 Display Screen
Example 13 Maintenance Maint04 Display Screen
Example 13 Maintenance Maint04 Display Screen
Protective Safety Limits and Control Settings
Monitored Parameter Limit Applicable Comments
Flow Switches Field Supplied
Starter Transition
Capacity Overrides
Active
Demand Limit
Temper Pressure psi Ature F Absolute Gage
Temper Pressure kPa Ature C Absolute Gage
HFC-134a Pressure Temperature F
Temperature, F Pressure psig
71.18
HFC-134a Pressure Temperature C
Temperature, C Pressure Gage kPa
17.8
CCW
Volt/ Hz Motor Code
Options Thermistors
Tests To Be Performed Devices Tested Automated Tests
Psio Thermistors
Transducers
Terminate Lockout
Tests To Be Performed Devices Tested Discrete Outputs
Pumpdown/Lockout
Refrigerant Type
2400
Shutdown with On/Off/Reset-Off
Primary Message Secondary Message Probable Cause/Remedy
Timing Out or Timed Out
Ready To Start In XX Min
Recycle Shutdown
Prestart Alert
Normal or Auto.-Restart
AutoRestart in Progress
Start
Mechanism
Compressor Jumpstart and Refrigerant Protection
Normal Run with Reset, Temperature, or Demand
Normal Run Overrides Active Alerts
Out-of-Range Sensor Failures
Machine Protect Limit Faults
Protective
Power Loss Power Loss Check
SRP
Machine Alerts
Spare Sensor Alert Messages
Other Problems/Malfunctions
Failure
Disabled
Communications
High Oil
Thermistor Temperature F vs Resistance/Voltage Drop
Temperature Voltage Resistance Drop Ohms 116
Temperature C Voltage Resistance Drop Ohms
594 670
Problem Probable Causes Area of Correction
Benshaw, Inc. Solid-State Starter Troubleshooting Guide
Cutler-Hammer Solid-State Starter Troubleshooting Guide
Problem Probable Cause Area of Correction
Cutler-Hammer Solid-State Starter Troubleshooting Guide
Cutler-Hammer Solid-State Starter Troubleshooting Guide
Exchanger Design Water Code Tubes Gal
Cooler
Additional Data for Marine Waterboxes
Compressor Weights
Component Weight
Compressor/Motor Weights
Waterbox Description Nozzles Exchanger 150 300 Psig
Waterbox Cover Weights* English lb
Frame Frames, Std Heat Flanged
Coolers
Waterbox Cover Weights* SI kg
Frame Frames
Motor Code Condenser Unit Volts-PH-HZ Max RLA
LRA
19XL Identification
Page
Rear View Typical 19XL Components Design
Page
Rear View Typical 19XL Components Design
Refrigerant Motor Cooling and Oil Cooling Cycles
Lubrication System
Cutler-Hammer Solid-State Starter, Internal View
Benshaw, Inc. Solid-State Starter Internal View
Typical Starter Front View Solid-State Starter Shown
19XL Controls and Sensor Locations
Control Sensors Temperature
Control Sensors Pressure Transducer, Typical
Control Panel Front View With Options Module
Power Panel with Options
LID Default Screen
LID Service Screen
Example of Point Status Screen Status01
19XL Menu Structure
19XL Service Menu Structure
Example of Time Schedule Operation Screen
Example of Set Point Screen
19XL Hot Gas Bypass/Surge Prevention
19XL with Default Metric Settings
Example of Attach to Network Device Screen
Example of Holiday Period Screen
Control Sequence
Typical Wet-Bulb Type Vacuum Indicator
19XL Leak Test Procedures
Page
Page
Dehydration Cold Trap
Benshaw, Inc. Solid-State Starter Power Stack
Ramp Up and Starting Torque Potentiometers
Typical Potentiometer Adjustment
Typical Cutler-Hammer Solid-State Starter
Correct Motor Rotation
Refrigeration Log
19XL Pumpout Unit Wiring Schematic
Optional Pumpout System
Guide Vane Actuator Linkage
19XL Float Valve Designs
Optional Pum pout System Controls
Psio Module Address Selector Switch Locations LED Locations
LID Module Rear View LED Locations
Processor Psio Module
SSM
Options Module
Typical Benshaw, Inc. Solid-State Starter Internal View
Resistance Check
SCR and Power Poles
Typical Cutler-Hammer Solid-State Starter Internal View
Cutler-HammerTerminal Functions
Page
Page
Compressor Assembly Torques
Description Torque Ft-lb
Compressor Fits and Clearances
Compressor Fits and Clearances
Electronic PIC Controls Wiring Schematic page 1
Electronic PIC Controls Wiring Schematic page 2
Starter Cabinet Wiring Field Wiring Carrier Factory Wiring
Starter Cabinet Wiring Field Wiring Carrier Factory Wiring
Page
Page
Machine Information
PIC Caution
19XL
19XL PIC Time Schedule Configuration Sheet Occpc
ICE Build Termination
Load Balance Option
Motor Temp Override
Motor Rated Load Amps
CL-9
CL-10
Days
Activate