340/350/450
Introduction
HOW to Read this Manual
Symbols
Table of Contents
When using as a facsimile
System Settings this manual
When using as a copier
Manuals for this Machine
Machine Types
Additional Functions Provided by Optional Memory Units
Copy Mode
Copier hard disk Image enhance kit
Options for Memory Expansion MB memory card
Facsimile Mode Option
Dpi high resolution card
Fax hard disk
Modes
Changing Modes
MULTI-ACCESS
Multi-accessing example
Mission Immedi Ate Trans Memory Recep Tion
Interrupt key
Changing To Copy Mode
Copy Mode
Interrupt Copying To Make Urgently Needed Copies
When Print Priority = Interleave
Copying And Multi-accessing
When Print Priority = Fax or Dis- play default
Reset the previous original. B Press the Start key
Printing a Received Fax
FAX Mode
Changing To Facsimile Mode
Printing a received fax in a hurry
Sending a fax while copying
Sending a Fax
Fax
Complete the usual Operations For sending a fax, then press
While outputting copy
Panel Display
Keys for User Tools System Settings
Keys Cursor keys
Accessing the User Tools System Settings
Enter 1 with the Number keys
⇒ P.19 Settings You Can Change With The User Tools
Exiting from User Tools
User Tools Menu System Settings
Settings YOU can Change with the User Tools
System Settings 1
System Settings 2/6
Default 15 minutes
System Settings 3/6
See Changing The Paper Size in the Copy Reference
System Settings 4/6
⇒ P.6 Multi-Access
System Settings 5/6
System Settings 6/6
Default ADF External Tray
Index
Means Power ON. c means Stand by
340/350/450 Operating Instructions
Copy Reference
Introduction
Safety During Operation
Safety Information
Examples Of Indications
Page
Iii
Page
Page
Low Pwr. Shift Time
Auto Off Timer
Energy Star
Duplex Priority
Vii
What YOU can do with this Machine Copy Mode
12 11
RR Rrrr
Basics
Preset REDUCE/ENLARGE-REDUCING and Enlarging Using
111
102
108
113
165
148
150
166
Xiv
Machine Types
Guide to Components
Paper tray
Front cover
Paper tray unit option
Right side cover
Bypass tray option for Type
Ventilation hole
Lower right cover
Guide
To copy onto A3, 11 × 17 paper
If the end of the sheet is curled
Options
Type
Sheet finisher
Type 2 and Type
Sheet finisher only for Type
Function List Based on Options
Page
Page
Indicators
Operation Panel
Function keys
Operation switch
Shortcut keys
Selection keys
Copy initial display
Panel Display
Displays And Key Operations
Displays items which can be selected or specified
Function menu display
Common keys
Display Panel Layout
Sample Display for Erasing the Center/Border
Main power switch left side of the ma- chine
Turning On The Power
Operation switch right side of the op- eration panel
Starting the Machine
Press the operation switch to make the On indicator go off
Turning Off The Power
When the Clear Modes/Energy Saver indicator is lit
Er key
Changing Modes
Metric version
Sizes And Weights Of Recommended Originals
Originals
Inch versions
Sizes detectable by the Auto Paper Select Metric version
Sizes Difficult To Detect
Inch version
Exposure glass
Original Sizes And Scanning Area/Missing Image Area
Document feeder
Copy Paper
Recommended Paper Sizes And Types
Reference
Non-recommended Paper
Paper Storage
Toner Storage
Toner
Used Toner
Basics
Make sure that there are no previ- ous settings remaining
Basic Procedure
Make sure that the machine is Copy mode
Set your originals
Auto Reset
Lift the platen cover or the docu Ment feeder
Setting Originals
Setting Originals On Exposure Glass
Lower the platen cover or the doc- ument feeder
Setting Originals Document Feeder
Set the next original while Auto Feed indicator is lit
Press the Menu key
Using SADF, Mixed Sized, and Thin Paper modes
Sadf mode
Press the ↓Next key until DF Set- ting is displayed
Press the Select key
Mixed sizes mode
Select DF Setting with the keys, then press the Select key
Press the Exit key
Align the rear and left edges
Thin paper mode
Select Mixed Sizes with the keys, then press the Select key
Originals as shown in the il
Select Thin Paper with the keys, then press the Select key
Adjusting Copy Image Density
Basic Functions
Press the Lighter or Darker key to adjust the image density
Enhanced Image Copy
Selecting Original Type Setting
Manual Paper Select
Selecting Copy Paper
Auto Paper Select
Dens. Orig. with the keys, then press the OK key
Select the copy paper
Make sure that the Auto Auto Paper Select is selected
Auto Reduce/Enlarge-Having
Machine Choose Reproduction Ratios
Select the paper tray by pressing the Paper or
Stack
SORT/STACK/STAPLE
Sort
Staple the optional 1000-sheet finish- er required
⇒ P.144 y Removing Punch Waste
Sort-Sorting Into Sets 123, 123
Sort Rotate Sort Shift Sort
Set the original, then press the Start key
To make punch holes, press the Punch key
Make sure that on is selected, then press the OK key
Set the next original, then press the Start key
Rotate Stack
Stack-Stacking Together All Copies Of a Page 111, 222
Rotate Stack Shift Stack
Shift Stack optional finisher re- quired
Make sure that on is selected
Press the Sorter key until Stack indicator bottom is lit
Then, press the OK key
Staple
A4KL B5K B5KL
Sheet finisher
Select one of four stapling posi- tions
Press the OK key
Press the No key
Press the Clear/Stop key
Press the Yes key
Press the Start key
Adjust the guides to copy paper size
Copying from the Bypass Tray
When copying onto non-standard size copy paper
Press the ↓Next key until your desired size is displayed
Make sure the k indicator is selected
Press the # key Press the Ppr. Size key
Set your originals, then press the Start key
When copying onto OHP transparencies or thick paper
Press the # key Press the Ppr. Type key
Set your originals and press the Start key
Storing Your Settings
PROGRAM-STORING Your Copy Settings in Memory
Storing Your Settings
Deleting a Program
Deleting a Program
Press the Delete key
Recalling a Program
Energy Saver Mode-Saving Energy
Reset the previous originals. Then, press the Start key
Other Functions
User Codes
Auto Start-Entering Copy Job Settings During Warm-up Period
Original Beeper
Original → Copy paper Ratio % Size
Press the Enlarge or Reduce key to select a ratio
Enter the ratio
ZOOM-REDUCING and Enlarging in 1 % Steps
Press the Zoom key
Enter the desired reproduction ratios with the o or n key
Set your originals, then press the Start key
Metric version Mm steps Inch version 99.9 Steps
Copying
Horizontal % Vertical %
ND2C0104
Select Left left margin or Right right margin with the keys
Margin ADJUSTMENT-ADJUSTING the Margin
Enter the desired margin width with the Number keys
ND2C0101
Center
Erase Center
Erase Border
Border
Press the Center key
Select the part to be erased
Press the Border key
Set your originals, then press the Start key
Pages→booklet
COMBINE-COMBINING Originals Into ONE Copy
Pages→1-sided
Duplex unit
COMBINE-COMBINING Originals Into ONE Copy
Press the ↓Next key until the Combine is displayed
Making a booklet
Book → 1-Sided
Press the ↓Next key until Series
Without the optional document
Feeder
Is displayed
Select Series with the keys
Sided Originals
Sided→1-Sided-Making
Press the ↓Next key until Series is displayed
Sided → 2-sided
DUPLEX-MAKING TWO-SIDED Copies
Book → 2-sided
Originals and copy direction
Top
Specifying Orientation of Bound Originals
Original Copy paper
When setting a stack of originals in the document feeder
Adding a Front Cover
COVER/PAPER DESIGNATE-ADDING or Inserting Sheets
Front Cover-Copying Or
Press the Menu key
Press the ↓Next key until Cover Ppr. Des. is displayed
Both Covers-Copying Or Adding Front And Back
Press the Both key
Press the Exit key
Press the Ppr. Des. key
OHP Slip SHEET-COPYING or Inserting Slip Sheet
Press the ↓Next key until OHP Slip Sheet is displayed
OHP Slip SHEET-COPYING or Inserting Slip Sheet
Press the Menu key Press the Select key
POSITIVE/NEGATIVE-COPYING in Complementaly Colors
Press the ↓Next key until Posi- tive/Negative is displayed
Image Repeat
Image REPEAT-REPEATING AN Image
Double Copies
Double Copies-Copying The Image Twice On One
Image Repeat-Repeating An Image Over The Entire Copy
Press the ↓Next key until Image Repeat is displayed
Press the ↓Next key until Image
Original 51/2 × 81/2K/Copy
× 81/2L/Copy paper 81/2 × 11K
Set your original, then press the Start key
Printing a List Of The Stored Images
Storing The Images
Deleting The Stored Images
Recalling The Stored Images
Storing The Images
Press the ↓Next key until Archive File is displayed
Select the type of originals with the keys. Then, press
OK key
Deleting The Stored Images
You can delete images already stored
Printing a List Of The Stored Images
Keys
With the keys
Recalling The Stored Images
Select the desired file number
Enter the number of copies with the Number keys
Combination Chart
Following shows the combinations of functions
Ìíä
Ììí
If Your Machine does not Operate AS YOU Want
Message
Features
Display
⇒ P.37 Adjusting Copy Im Age Density
If YOU Cannot Make Clear Copies
114
If YOU Cannot Make Copies AS YOU Want
Jammed Staples
Adjust Image
Originals
Combine
Originals Into One Copy
Duplex
Loading Paper
Square the paper and set it in the tray
Loading Paper In The Large
Capacity Tray
Adding Toner
121
122
123
Clearing Misfeeds
125
When D is lit
When E is lit
When R is lit
129
When P is lit
When Z is lit
Changing the Paper Size
Adjust the back fence to the new paper size
Fasten the fences with screws
To adjust the paper size
Adding Staples
Sheet Finisher
135
136
137
138
Removing Jammed Staples
140
141
142
143
Reinstall the punch waste box
Pull out the punch waste box and remove punch waste
Accessing the User Tools Copy Features
Enter 2 with the Number key
Ìéç
Ìéæ
User Tools Menu Copy Features
Ìéå
Ìéä
General Features 1/4
Ìèí
Ìèì
General Features
Ìèê
Ìèé
Adjust Image 1/2
Ìèè
Ìèç
Adjust Image 2/2
Ìèæ
Ìèå
Ìèä
Input/Output 1/2
Ìçí
Ìçì
Input/Output 2/2
Ìçë
Ìçê
Shortcut Keys
Remarks
DOS and Donts
Optimum environmental conditions
Where to PUT Your Machine
Machine Environment
Environments to avoid
Power Connection
Access To Machine
Cleaning The Exposure Glass
Cleaning The Platen Cover
Cleaning The Document Feeder
Cleaning the machine
170
Mainframe
First copy time
Copy paper weight
Non-reproduction area
Copying speed Type 1 and Type
Continuous copying count
Reproduction ratio
Copy paper capacity
Dimensions W × D × H up to exposure glass
Power consumption
Space for main frame W × D
Weight
Noise Emission
Document Feeder Option
Available paper size
Paper Tray Unit Option
Paper capacity
Internal Tray 2 1 BIN Tray Option
Number of bins Available paper size
Sheet Finisher Option
180
181
Paper size 2 holes version
Punch KIT Option
Paper size 3 holes version
Large Capacity Tray LCT Option
Power consumption Max
Duplex Unit Option
Bypass Tray Option
Approx kg, 6.7 lb
MB Copier Memory Unit Electric Sort KIT Option
Memory capacity Additional functions
Originals stored for Archive File function
Copier Hard Disk Image Enhance KIT
Originals scanned
Additional function
Numerics
Ìæä
Ìçæ
Ìäí
Means Power ON. c means Stand by
Errata
UE USA A2318607
FAX Option Type
Page
Page
Energy Saving Information
Iii
Function MAP
Info
Table of Contents
Substitute Reception
Vii
Viii
103
111
109
110
112
164
159
161
166
226
223
225
234
Xii
Document Feeder ADF / Platen Internal Tray Cover
Guide to Components
Front View
Exposure Glass
Optional Handset
Operation Switch
Rear View
Optional Upper Tray
Guide to Components
Features Programmed by Default
Operation Panel
Program key
Speed Dial key
On Hook Dial key
User Tools/Counter key
Clear/Stop key
Interrupt key
Start key
Original Type key
Operation switch
Turning On The Power
Power switches
Main power switch
Turn off the operation switch to
Turning Off The Power
Make the On indicator go off
Switching Between Copy Mode and FAX Mode
Limitation
Communication Display
Reading the Display
Standby Display
Memory Transmission Immediate Transmission
Display Prompts
Instructions and Requests Questions Selections Status
Personal Code Access
Automatic Power Reception Function
Dual Access
Useful Functions
Useful Functions
Acceptable Original Sizes
Acceptable Types of Originals
Originals Unsuitable for the Document Feeder ADF
Original Sizes Difficult to Detect
Inch Version
Document Feeder ADF
Paper Size and Scanned Area
Exposure glass
Maximum Scan Area
If the Machine Cannot Detect the Size of Your Original
HOW to SET AN Original
Inals
How to set A4, B4, A3, LT, LG and DLT size originals
How to set A4, A5 and B5 size originals
Close the Document Feeder ADF
Setting Originals Document Feeder ADF
Bound Original Page Order
Reference
Scanning In Mixed Sized Originals
Feeder ADF face up
When the Finisher is Installed
When the Selected Output Tray Becomes Full
Overview
Overview
Memory Transmission
Make sure that the Memory Transmission indicator is lit
Mode key
Set the original
Start key Reference
Press the Start key
Automatic Redial
Sending a Fax Message Immediately
Checking the Transmission Result
Broadcasting Sequence
If Memory Runs Out While Storing an Original
ECM Error Correction Mode
Broadcasting Checking Progress
Batch Transmission
Memory Storage Report
Parallel Memory Transmission
Transmission Result Report Memory Transmission
Communication Failure Report
Press the Clear/Stop key
Canceling a Memory Transmission
Press Info
Press Yes
Press Exit
Immediate Transmission
Check that the Immediate Trans- mission indicator is lit
Set your original
Transmission Result Report Immediate Transmission
Cancel then OK
If the Connection Could Not Be Made
Press the On Hook Dial key
Set your original and select any scan settings you require
On-hook Dial
Modes/Energy Saver key and return
Manual Dial
Pick up the external telephone
Press the Clear Modes/Energy Sav
Canceling a Transmission
Canceling a Transmission After You Have Pressed Start Key
Er key
Scan Settings
Resolution
Image Density Contrast
Text Default Setting
Original Type
Text·Photo
Auto Image Density
Mixing Scan Settings in a Multiple Page Original
When Setting Originals on the Exposure
Manual Image Density
When Setting Originals in the Document Feeder ADF
Changing Line Type
To Switch to G4
To Switch to G3
Which line is used for G3 transmissions?
Auto Identification
Number keys
Dialing
Number Keys
Quick Dials
Restrictions When Dialing with the Number Keys
Pause
Tone
Sending Tonal Signals by Isdn Isdn Option Required
Subaddress Isdn option required
Example
Quick Dials
Chain Dial
Quick Dial
Telephone Directory
Speed Dials
Press the Speed Dial key
Press Tel.Dir
Groups
Preparation
−Prev. or ↓Next
Optional Group Dial
Enter an Optional Group number with the number keys
Redial
Press the Pause/Redial key
Code for the number you wish to redial e.g
ID Transmission
Transmission Features
Press the F5 key
Code SUB
Code PWD
Jbig Transmission
Immediate Reception
Reception Resolution
Display During Reception
Memory Reception
Substitute Reception
When an RTI or CSI is Received
Screening messages from anonymous senders
Free
Telephone Mode
Selecting the Reception Mode
Fax Mode Auto Reception Mode
Receiving a Fax in Telephone Mode
Requesting Party
Reception Functions
Transfer Station
Transfer Station
Code SEP
Transfer Result Report
Sending the Transfer Result Report
Default ID Polling Reception
Enter the function number for Sepp on the number keys
Jbig Reception
Press OK Press Exit
Checkered Mark
Printing Functions
Print Completion Beep
Center Mark
Multi-copy Reception
Sided Printing
Degree Rotation Printing
Image Rotation
Two In One
Reverse Order Printing
Reduction
CIL/TID Print
When There is No Paper of the Correct Size
TSI Print
Priority Table
Received Image Size
Just Size Printing
Out Of Paper Display Message
Having Incoming Messages Printed on Paper From Bypass Tray
Advanced Transmission Features
Send Later
⇒ P.208 Date/Time
Press OK
Dial and press the Start key
Confidential Transmission
Default ID
ID Override
Default ID
Press the or keys to turn Default ID on and press OK
Personal Code Transmission
Enter a Personal Code function number with the number keys
Personal Code Transmission
Sending AN Auto Document
Sending AN Auto Document
Sided Transmission DOUBLE-SIDED Transmission
Sided Transmission DOUBLE-SIDED Transmission
Book FAX
Bound Original Page Order
Choosing the Area to be Scanned Yourself Irregular Scan Area
Choosing the Area to be Scanned Yourself Irregular Scan Area
Transmission Deadline TRD
Enter the deadline with the num- ber keys
Transmission Deadline TRD
Free Polling Transmission
Default ID Polling Transmission
Polling Transmission
Override ID Polling Transmission
Enter the Polling TX function number with the number keys
Press the or key to select Default ID and press OK
Press the or key to select ID Override and press OK
Polling Transmission Clear Report
Polling Transmission
Override ID Polling Reception
Default ID Polling Reception Free Polling Reception
Polling Reception
Enter the Polling RX function number with the number keys
Polling Reserve Report
Press the or key to select the Default ID and press OK
Polling Result Report
Transfer Request
Press Recv. Stn
Enter a Transfer Stations
Enter one or more End Receivers
Quick Dial
Specifying an End Receiver
Group Dial
Speed Dial
Label Insertion
Transmission Options
TTI Transmit Terminal Identification Print
Auto Reduction
ID Transmission
Selecting Transmission Options for a Single
100
Press the or key to switch Auto Reduction on or off
101
102
Checking and Canceling Transmission Files
103
Printing a File
104
Checking and Editing a File
105
106
Enter the transmission time 4 digits with the number keys
Enter the start time with the number keys
107
Stop key
108
Printing a List of Files in Memory Print TX File List
109
110
Checking the Transmission Result TX Status
Press Info Press −Prev. or ↓Next to scroll through the list
111
Checking the Reception Result RX Status
Press −Prev. or ↓Next to scroll through the messages
Printing a Confidential Message
112
Confidential File Report
113
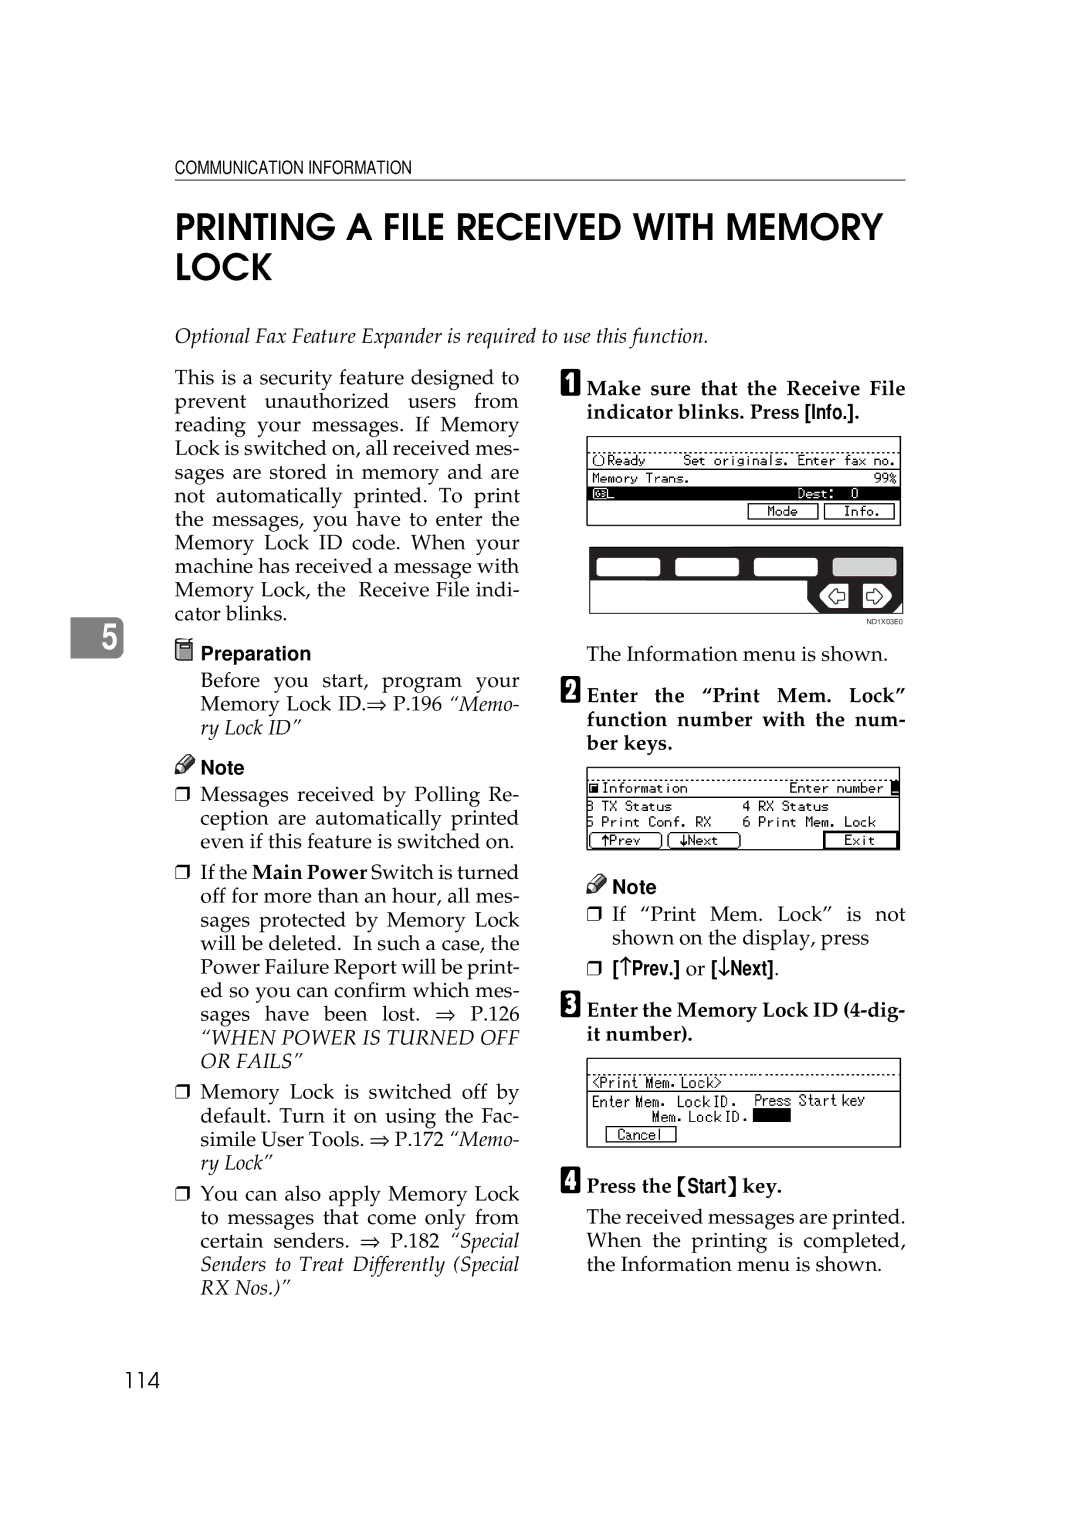
Printing a File Received with Memory Lock
114
115
Enter the Print TCR function number with the number keys
Printing the TCR
116
Press the or key to select the format you want to print
Displaying the Memory Status
Usage is displayed. When you have finished, press OK
117
118
When Toner Runs OUT
119
Error Messages and Their Meanings
120
Solving Problems
121
122
When the Receive File Indicator is Lit or Flashing
Indicators
123
When the Fax key is Lit in Red
When the Confidential File Indicator is Lit
124
When AN Error Report is Printed
125
When Power is Turned OFF or Fails
126
Accessing the User Tools
128
Exiting User Tool mode
Press the User Tools/Counter key
Registering Quick Dials
REGISTER/DELETE Menu
129
Press Name
Enter a fax number using the number keys
130
Press OK to register the new set- ting
Quick Dial List
Enter the number of the Fax mode
Deleting Quick Dials
131
Quick Dial Key and Function Key Label Dial label
132
Non-transparent label paper
133
Transparent label paper
134
Registering Groups
135
136
137
Deleting Groups
Group Dial list
Press OK to register the Group
138
Press the Quick Dial key whose Group you wish to delete
Registering Optional Groups
139
Enter
140
Number Fax
Mode
141
Press OK to store the information you have just entered
Deleting Optional Groups
Checking the Contents of Optional Groups
142
143
Registering Speed Dials
Press Yes to delete the Optional Group
144
Speed Dial list
Deleting Speed Dials
145
146
Storing Keystroke Programs
147
Press Feature
148
149
Using a Keystroke Program
Keystroke program list
Press OK Press Name
150
Press the OK key then the Start key
Registering Auto Documents
151
152
Enter the Auto Document name
Auto Document list
Deleting an Auto Document
153
154
Registering Irregular Area
Enter the number of the Fax Press Yes
Press Vert
155
Press Area 1 or Area
Reference
156
Enter a length using the number keys and press OK
Deleting an Irregular Area
Press Horiz
157
REPORTS/LISTS
158
Enter a function number using Number keys
Initial Setup TX
159
Resolution Example
Transmission Mode Example
160
Change the setting with the and keys and press OK
Initial Setup RX
161
Checkered Mark Example
Reception Mode Example
To set the Bypass Paper Size
162
163
Press Horiz
Storing/Editing the Contents of a User Function Key
Assigning User Function Keys
Using a User Function
165
Personal Codes
KEY Operator Settings
Enter the function number for Key Op. Settings using
Registering Personal Codes
167
Enter the name Enter a Personal Code using the number keys
Number keys and press the # Enter key within 3 seconds
Press OK to register the code
Deleting a Personal Code
168
Name
Personal Code Access
169
170
Printing the Personal Code List
Enter the number for Personal Code using the number keys
Press PrevMenu twice
ECM
171
172
Memory Lock
Press PrevMenu Press the User Tools/Counter key
Multistep Transfer
173
174
175
Forwarding
Specify a Transfer Station
Registering Forwarding Stations
176
Deleting a Forwarding Station
177
Registering Specific Senders Forwarding
178
Press RTI/CSI
179
Register an RTI or CSI of a sender Press OK
180
Deleting a Specific Sender Forwarding
Press Receiver
Specified Sender/Forwarding Station list
181
Special Senders to Treat Differently Special RX Nos
182
Registering Specific Senders Special X Nos
183
184
Enter an RTI or CSI of a sender and press OK
Tray Select
Reverse Printing
Multi-copy
Sided Printing
Deleting a Specific Sender
186
Specified Sender List
187
Authorized Reception
Cancel
188
189
Programming Specified Senders
Reference Press RTI/CSI
Deleting a Specific Sender Authorized Reception
190
Sender/Authorized Reception List
191
Monitor Volume
RTI/TTI
193
194
Enter the number of the Fax Enter an RTI and press OK
Press TTI
Registering The Economy Transmission Time
195
Enter a TTI and press OK
Memory Lock ID
ID Code
Polling ID
Confidential ID
Enter the function number for ID Code using the number keys
197
G3 Analog Line
198
G3 Digital Line
199
G4 Digital Line
200
201
202
Press PrevMenu
User Parameter List
Switches and Bits
Changing the User Parameters
203
204
205
How to Specify a User Parameter
206
Printing the User Parameter List
207
Date/Time
208
Counters
Summer Time
209
210
Auto Reset
When you have checked the total
Pages, press OK
211
RDS Remote Diagnostic System
Paper Feed Selection
Select the interval with Keys. Then press OK key
212
Available Characters
Entering and Modifying Text
Keys
Using a wild card
How To Enter Text
Not using a wild card
Entering symbols
Deleting characters
Entering numbers
215
216
When using a modular type connector
Connecting The Telephone Line
Where to connect the machine
217
Connecting The Optional External Telephone
Connecting The Machine To The Isdn
218
Selecting The Line Type
Adjusting the handset bell volume
219
220
Replacing the Stamp Cartridge
Pull out the cartridge
Set a new cartridge
Stamp Cover Layout
221
Replace the stamp cover until it clicks
222
Optional Equipment
Fax Feature Expander and Hard Disk
Extended Features
Memory Capacity
Duplex Unit AD340
Isdn Unit Isdn Option Type
Stamp FAX Stamp Type
224
Power Consumption
Specifications
225
Function List
Advanced Transmission Features
226
227
Deadline TRD
Communication Information
228
User Tools
229
230
REPORTS/LISTS
Settings
231
232
193 RTI/TTI
233
Index
234
235
236
237
FAX Option Type 450 Operating Instructions