Administrator Manual
Publication Information
Contents
Managing Trunks and Spans
Managing Users and Stations
Managing Workgroups
Handling Inbound Calls
System Prompts
Extending Strata CS
Appendix E. Using Performance Counters
Overview of Upgrading and Configuring Strata CS
Significant Strata CS features
Welcome to Strata CS
New features in Toshiba Strata CS 4.0 include the following
What’s New in Strata CS
Beta Document Preliminary & Confidential
Beta Document Preliminary & Confidential
Miscellaneous new features
What’s automatically upgraded
Changes in Strata CS from version 2.1 to 3.0 or later
Before you begin
More information
Changes in Strata CS 3.0 or later
Configuring Strata CS for the first time
Strata CS documentation
Where to get help
Strata CS includes the following documentation
Your Strata CS provider
Document Printed Online Book
Page
Strata CS Administrator
About the Strata CS Administrator
Linking computers and phones
Administrator interface
Logging on to the Administrator
Workgroups
Dialing Services
Users
Trunks
IVR Plug-Ins
Maintenance
Working in views
IP Gateways
Using the Administrator toolbar
Using commands in a view
New Workgroup Create a new workgroup
Create a new auto attendant
Creating items
Performing basic actions in the Administrator
To create a new item that is based on an existing item
Copying and pasting items
Deleting items
Renaming items
Customizing columns
Working with voice files
Using the audio controls
Changing the voice file format
Importing and exporting voice files
Changing audio output
Page
Strata CS Licenses
About Strata CS licenses
Entering licenses
To enter your Strata CS Server license
Removing licenses
To enter all other license types
To remove the Server license
To remove all licenses
Verify that you have removed all other licenses
Page
Defining System Settings
Customizable settings
About system settings
Emergency. Use to configure emergency dialing options
General tab
Changing Windows NT/2000 registry settings
Server Configuration
Rerecording voice prompts
Windows Event Log notifications
No events. This is the default. No notifications are sent
Select one of the following from the drop-down list
Defining business hours and holidays
Business Hours
To define business hours and holidays
Beta Document Preliminary & Confidential
Archiving the Call Log
Call Log tab
Logging internal calls
To log internal calls as well as external calls
To archive Call Log information
Storage tab
Disk usage
Allocating disk space
Moving voice files
Dialing tab
Defining special access codes
To move voice message files
Setting dialing timeouts
Using extended 911 service with Strata CS
Using standard 911 service with Strata CS
Emergency tab
How emergency numbers are handled
To set emergency dialing options
Beta Document Preliminary & Confidential
Setting dial-by-name directory options
Other tab
Setting up Microsoft Exchange synchronization
Presenting a confirmation menu before voice mail
To set up Microsoft Exchange synchronization for a user
Exchange Server Mailbox Permissions
Setting the minimum password length
Managing Trunks and Spans
About trunks
Trunk types
Monitoring trunks
Adding trunks
Naming trunks
Deleting trunks
Matching trunk settings with your phone company
Configuring trunks
Inbound and outbound calls and hunt groups
Routing inbound calls on a trunk
ANI/DID digit collection
Placing outbound calls on a specific trunk
Collecting ANI/DID digits
Using did with Robbed Bit T1 lines
Setting up fax routing
Using did with analog lines
Trunks view
Customizing fax routing
About digital and Internet spans
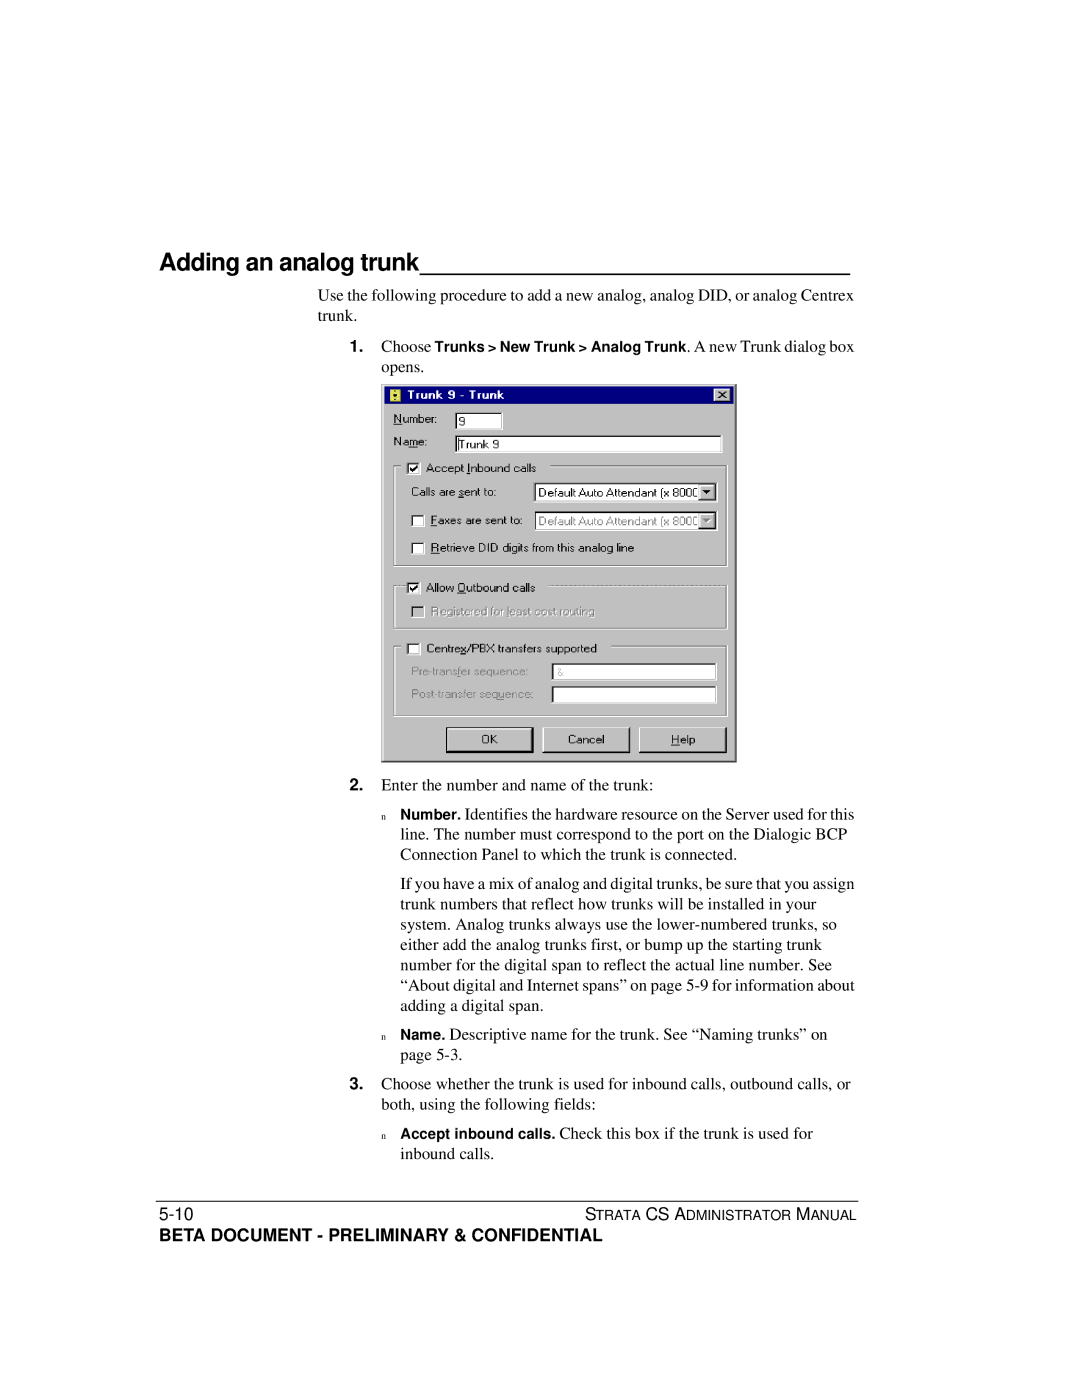
Adding an analog trunk
Setting up digit collection on an analog trunk
To collect digits on an analog trunk
Trunks view, select the trunk
Adding a digital Robbed Bit T1 span
Configuring signaling using the Robbed Bit T1 Experimenter
Adding the Robbed Bit T1 span in the Trunks view
Beta Document Preliminary & Confidential
Using a signaling template
Entering trunk defaults for a span
To enter trunk defaults for a span
Adding a digital Isdn or CAS span
Adding a digital Isdn BRI span
Optimizing your Isdn settings
To set your Isdn parameters
Enabling Isdn Megacom support
Adding an Internet span
Modifying Strata CS IP codecs
GSM .0 kbs
To modify Strata CS IP codecs
Fine-tuning your IP connection
To change an IPLink board parameter
Beta Document Preliminary & Confidential
Page
Managing Users and Stations
Extension
Users view
Station
Greeting Usage
Title
Mail Usage
Disk Usage
About users and roles
Admin and Operator users
Configuring a system without an Operator
Users
How callers are transferred to Operators
Setting up workgroups for the Operator
Understanding personal Operators
Changing the Operator’s extension from
Roles
Setting user options
Where to set user options
Described in detail in this chapter
About adding a user
Adding a user at the telephone
Adding a user in the User dialog box
Adding a user by using a template
Identifying the user
Assigning an extension
Assigning a station ID
Linking users and phones
Assigning a did number
Editing a user’s Client settings
Creating a password
Setting up a personal operator
Choosing a language for telephone prompts
Allocating space for voice messages
Recordings tab
Allocating space for recorded greetings and voice titles
To enable synchronization
Setting up call recording
Enabling Microsoft Exchange Server synchronization
Notifications tab
Setting e-mail notification
Setting pager notification
Scheduling notifications
Defining a schedule for e-mail and pager notification
To add a schedule entry
Setting up custom time rules
To set up a custom time rule
Click OK to add the custom date
Call Handling tab
Setting up call forwarding
To turn on call forwarding
Issues with forwarded calls on
Forwarding calls over Centrex/PBX trunks
Mobile phone issues with forwarded calls
Call forwarding and voice mail
Listing a user in the dial-by-name directory
Activating features for Class phones
Phone tab
Padding extensions sent as caller ID on internal calls
Setting the number of seconds to ring the phone
Sending Dtmf digits to stations
Activating features on Toshiba digital phone
Hands free answering
Secondary Directory Number parameters
Dialing tab
Global dialing permissions
To set dialing permissions
Setting account code modes
Other settings
Permissions tab
By default, Strata CS creates the following two roles
Individual permissions and roles
New Role
To create a new role
Other tab contains user options for hands-free mode
Other tab
Helping new users get started
Managing users
Recording the new user’s voice title and greeting
After you create a new user, do the following
Moving a user
Updating users’ mail, greeting, and disk usage totals
Deleting a user
Supported phones
Managing stations
Adding a station
Supporting different types of Class phones
Visual message waiting indicator information
Viewing station activity
Managing Workgroups
About Workgroups
Creating a Workgroup
Using the General tab
Workgroups view
Using the Dialing tab
Transferring unanswered calls
Assigning a did number to a workgroup
Adding a voice title
Listing workgroups in the dial-by-name directory
Page
Managing Outbound Calls
Dialing service types
About dialing services
See Adding an Internet-to-Phone Number service on
Default dialing service
Using routing services to manage other dialing services
Dialing Services view
How you can use dialing services
Deleting or disabling a dialing service
Hiding dialing services in the Client
Using dialing services to install and troubleshoot trunks
Access codes
Tips on access codes and names for services
Disabling dialing services while creating them
Updating phone numbers after changing an access code
How Strata CS uses access codes
Avoiding dialing ambiguities
Creating a dialing service with access code
Setting default access codes for ringbacks
Where the default access codes appear
Adding a Phone Number dialing service
Beta Document Preliminary & Confidential
Adding a Centrex/PBX Extension service
Beta Document Preliminary & Confidential
Adding an Internet Address service
Adding an Internet-to-Phone Number service
Beta Document Preliminary & Confidential
Adding an Internet-to-Centrex/PBX Extension service
Trunks tab
Beta Document Preliminary & Confidential
Location Settings tab
Codecs tab
Dialing Exceptions tab
To change the codecs used by a dialing service
Click the Codecs tab
Do not need to specify dialing exceptions
Beta Document Preliminary & Confidential
Exporting and importing dialing exceptions
To import dialing exceptions
Permissions tab
An example of how to set dialing service permissions
To set dialing service permissions
Beta Document Preliminary & Confidential
Routing services
Following numbers are allowed
How you can use routing services
An example of routing rules
Processing phone numbers received from the Client
Adding a routing service
Applying permissions in routing services
Beta Document Preliminary & Confidential
Routing Rules tab
Add a new routing rule
Use this rule under the following conditions
Execute the following action
Defining patterns to match the dialed digits
Adding new routing variables
Click Variables on the Routing Rules tab see
To add a routing variable
Click Add. The Routing Variable dialog box opens
Defining a new number for a routing rule
Characters Digits placed in the new number
1NxxNxxxxxx 16173540600 Nxx5-11 567891011
Page
Handling Inbound Calls
About call routing
Route calls to an automatic call distribution ACD workgroup
Handling Inbound Calls
Using auto attendants
About auto attendants
Default Auto Attendant
What callers hear
Auto Attendants view
Description
Setting up an auto attendant
Creating a new auto attendant
Defining menu choices
Description. Information that describes the auto attendant
Send to voice mail
User login
Transfer to user
Play message
To add or modify a menu choice
Key
Beta Document Preliminary & Confidential
Click the Advanced tab
These fields as follows
Menu choice Variable Name Variable Value
Scheduling transfers and greetings
To schedule transfers or greetings
Action Action that will be performed
Beta Document Preliminary & Confidential
Deleting auto attendants
Setting up hold music
To set up hold music for an auto attendant
Auto Attendant dialog box, click the Hold tab
Robbed Bit T1
Routing calls directly to a user
Analog trunk
Span Internet span
Routing calls to workgroups
Page
Using Account Codes
About account codes
Setting up account codes
Setting general account code options
Setting a user’s account code modes
Creating a text file of valid account codes
To set a user’s account code modes
Using wild card characters
Formatting the text file
How users enter account codes
Using a verbal account code prompt
Setting general account code options on
To use the verbal account code prompt instead of the beep
Generating account code reports
Viewing account codes in the Call Log
Indicating the end of an account code
Monitoring & Backing UP
About monitoring and backing up your Strata CS system
Using the Device Monitor
Monitoring station activity
Monitoring trunk activity
Logged Name of the user currently logged in at the station
Status
Enabling and disabling trunks
Out
To restart a station or trunk
Restarting stations or trunks
Do one of the following
Using the Call Log
Starting a new Server log
From Number
From
Answered By
To Number
Message
Result
Supervised transfer. a supervised transfer
From Device
Displaying a specific number of Call Log entries
Exporting the Call Log
Monitoring database and disk usage
Backing up Strata CS
To perform an offline backup of the Strata CS voice files
To perform an online backup of the Strata CS database
To perform an offline backup of the Strata CS database
Restoring Strata CS data
To restore the Strata CS database from an offline backup
To restore the Strata CS database from an online backup
To restore voice files from an offline backup
Moving a Strata CS Server to another machine
Shutting down the Strata CS Server
Viewing the Windows Event Log
Strata CS-related Windows Event Log messages
Device # Restarted
Error Dssql Error
Error No Voice Resource Available
Inbound call detected on outbound trunk #
Informational Started Strata CS Mail Server
Error Strata CS Server Restarted
No loop current detected on outbound trunk n
Error Unable to open device ##
Error Failed to Stop Device Handle ##
Error
Error Unable to delete temporary message file for device ##
Error Unable to start IVR Plugin License count exceeded
T1 alarms
Error Insufficient licenses ##
Using the Maintenance Log view
Reporting problems
Problem report package
Using the Problem Report Wizard
To e-mail a problem report package
Reporting a problem with a specific call or voice message
Reporting Strata CS Server problems
To report a Strata CS Server problem
To report a workstation application problem
Reporting workstation application problems
Reporting distributed problems
To report a distributed problem
Call record from the Call Log on the Server
Page
System Prompts
File name
About system prompts
System Prompts view
Text
Playing system prompts
Managing system prompts
Controlling the prompt display
Comment
Exporting and importing system prompt audio files
Exporting system prompt text
Importing system prompt text
Changing the encoding format of system prompts
About the sentence file
Recording system prompts
Recording options
About the .VAP and .VOX files
Selecting a voice
Recording system prompts professionally
Recording process
American English .VAP and .VOX files are located
Testing the recorded prompts
Using the standard Strata CS voices
Providing a script for the vendor
Deploying the new prompts
Default location is
Recording over system prompts yourself
Recording over .VOX files
To record over a prompt
Testing the new prompts
Recording over the .VAP file
System Prompts view, double-click the prompt name
Testing system prompts
To use the Sentence Tester
12-11
Localizing the telephone commands
Configuring Internet Telephony Support
Placing calls to H.323 terminals such as NetMeeting
About IP telephony and Strata CS
Internet telephony requirements
Placing calls to Net Meeting from a Strata CS phone
Placing calls to Net Meeting from the Strata CS Client
IP address
Calling Strata CS from H.323 terminals such as Net Meeting
Calling a Strata CS did number from Net Meeting
Calling a Strata CS Server from Net Meeting
Start NetMeeting
Using Windows 2000 Phone Dialer as an H.323 terminal
Enhancing a Web page with a Call Us! button
Connecting two Servers using IP Gateways
Placing calls involving a remote Strata CS Server
Receiving Internet calls from a remote Strata CS Server
Using the IP Gateway Configuration Worksheet
Overview of creating an IP Gateway connection
Codec use with IP Gateway connections
Illustration of an IP Gateway
Creating an IP Gateway
IP Gateways view
Remote Address
Password
Creating an IP Gateway
Remote
To set up an IP Gateway
Add Comments to further identify the IP Gateway
Creating IP Gateway dialing services
Calling Strata CS extensions on the remote Server
13-14
Immediately connecting to dial tone on the remote Server
Placing phone calls through the remote Server
Placing Centrex/PBX calls through the remote Server
When you configure two Servers in this way, users can
Creating Gateway users to unify two Strata CS Servers
Overview of IP Gateway users
Dial any user’s extension directly, without an access code
Before creating IP Gateway users
To create an IP Gateway user
Fine-tuning your IP connection
Using Contact PINs with IP Gateway users
Extending Strata CS
About extending Strata CS
Extending Strata CS with off-the-shelf applications
In-band signaling applications
Tapi applications
Extending Strata CS with third-party devices
Sending call type and extension number to a device
Type of call Dtmf digits sent
14-7
Strata CS SDK
Follow the instructions in the Strata CS SDK Setup window
Installing the Strata CS SDK
To install the Strata CS SDK
Strata CS SDK Application Programming Interfaces
IVR Plug-in sample programs
Developing IVR Plug-ins with a telephony toolkit
IVR Plug-in licensing
Device Status API
Device Status sample program
Client API
Strata CS Configuration Settings
About Strata CS configuration settings
Strata CS Server registry settings
\Server\Settings\
Default path is empty string
EmptySentItemsFolder
Default is 0 no time-out
Mail
Default is 10000 bytes
NumLogs
Strata CS Workstation applications registry settings
TruncateRecordings
String value specifying the user’s extension Default is
Current User Settings
String value specifying the user’s station ID Default is
Local Machine Settings
\Client\Client\App
\Client\TSP\Logon
Strata CS currently uses the following locale codes
Strata CS Server language locale settings
Locale definitions
English
Defining custom tones
Disabling Dialogic devices
Example Defining a disconnect detection tone
To connect a fractional T1 or E1 line to Strata CS
To disable Dialogic devices in the Windows NT/2000 registry
Create a string value under Settings named DisableDevices
Create the following key if it does not already exist
Dialogic voice board device names
Dialogic device names
Save the changes to the registry
Board Board ID Channel
Dialogic modular station interface MSI device names
Dialogic Internet telephony board device names
Dialogic voice board settings
VoiceBoard settings
Minimum DTI Off. Minimum time required
Off-hook Delay. Period after off-hook, during
Make interval for valid loop pulse detection
Between ring-received events
VoiceBoard channel settings
Dword value for Dtmf detection edge select Default is
Dxchdtinitset
Dxchmfmode
E1 and T1 board settings
\Server\DTIBoardn\GlobalCall
Isdn Megacom service settings
\Server\BRIBoardn\ISDN
Default is 20 1000 milliseconds
MSI station board settings
Default is 1 Mdmf format
Default is 6 300 milliseconds
To use TVSettings
Using the Strata CS Settings program
Logging
Viewing current values
Modifying other supported Strata CS settings
Changing key values
Database\ConnectionTimeout
Default value is 30 seconds
Server\AllowGatewayUserLogin
Default value is
Default value is 180000 milliseconds
Default value is 60000 milliseconds
Default value is 6000 milliseconds
Default value is 12000 milliseconds
Default value is 1800 milliseconds
System\MinClientBuild
Page
Command Line Options
Starting Strata CS from the command line
Password=password
IP Gateway Configuration Worksheet
IP Gateway Configuration Worksheet
To Server
Name Type From Server Access To Server IP Gateway
Page
Using Quicknet and E-TEL with Strata CS
Using Quicknet with Internet Switchboard
Using Quicknet hardware with Strata CS
Setting up Quicknet to dial Strata CS
Appendix D. Using Quicknet and E-TEL with Strata CS
Using a Preferred address to dial extensions directly
Setting up the Strata CS IP address as a Hot Line
To make a Gateway preferred
Setting up Quicknet to connect to Strata CS
Creating the Gateway
Beta Document Preliminary & Confidential
Eliminating access code conflicts
Transferring and handling calls with a Quicknet phone
Forwarding your calls to a Quicknet phone
Calling a Quicknet card from Strata CS
Important note about Quicknet Hot Lines
For More Information
Using the Strata CS Client with a Quicknet card
See , Configuring Internet Telephony Support in Strata CS
Contacting Quicknet
Using an E-tel FreeRide IP phone with Strata CS
Setting up a FreeRide phone to connect to Strata CS
Click Settings and Support
My Phone Number, enter your Strata CS extension
Beta Document Preliminary & Confidential
Transferring and handling calls with a FreeRide phone
Tel contact information
Page
Using Performance Counters
Strata CS performance counters
Viewing performance counters in Windows NT/2000
Appendix E. Using Performance Counters
Beta Document Preliminary & Confidential
Glossary
ActiveX Control Also called control
Tor
Application Programming Interface API Also called API
Analog Trunk Also called analog line
Automatic Number Identification ANI Also called ANI
Business Communications Platform BCP Also called BCP
Call Announcing Also called call screening, screening a call
Call Control Also called call handling
Call Pursuit Also called follow me service
Call Center Agent Also called agent
Call Detail Recording CDR Also called call accounting, CDR
Call Routing Also called routing a call
Central Office CO Also called CO
Channel Associated Signaling CAS Also called CAS
Channel Service Unit CSU Also called CSU
Computer Telephone Integration CTI Also called CTI
Competitive Local Exchange Carrier Clec Also called Clec
Computer Telephony CT Also called CT
Dialed Number Identification Service Dnis Also called Dnis
See also T-1 p. G-24
Dialogic SCBus Device Also called SCBus
Digital Signal Processor Also called DSP
Digital Trunk Also called digital line
Direct Inward Dial did Also called did
Dual Tone Multi-Frequency Dtmf Also called Dtmf
Fax-On-Demand Also called fax-back
Grab-and-Hold Greeting Also called hold greeting
Graphical User Interface Also called GUI
Hold Audio Also called hold music
Recognition ASR, IVR, speech recognition
Integrated Services Digital Network Isdn Also called Isdn
Internet Protocol Also called IP
Phony, Voice Over IP
Internet Service Provider Also called ISP, service provider
Local Exchange Carrier Also called ILEC, LEC
Microsoft Windows NT Server Also called NT Server
Modular Station Interface Also called MSI
Multi-Frequency Also called MF
Network Interface Card Also called NIC
Parking a Call Also called call park
Plain Old Telephone Service Also called Pots
Personal Information Number Also called contact PIN, PIN
Primary Rate Interface Also called PRI
Public Switched Telephone Network Also called Pstn
Private Branch Exchange Also called PABX, PBX
Regional Bell Operating Company Also called Rboc
Remote Access Server Also called RAS
Redundant Array of Inexpensive Disks Also called RAID
Remote Office/Branch Office Also called Robo
GLOSS-22 Strata CS Administrator Manual
Small Office/Home Office Also called Soho
Tapi Service Provider Also called TSP
Telephony Application Programming Interface Also called Tapi
Unified Messaging Also called integrated messaging
GLOSS-27
Page
Index
To an auto attendant, 9-2to an IVR Plug-in,9-2
Disabling
For caller ID
Types supported
Digital spans
Folders, working with Follow me call forwarding, ??-6-27
Using command line arguments, C-1
Indicator, visual message waiting Integrating
Internet-to-Phone Number dialing service, adding
IP Gateways view, 2-5IP network Codecs for
Customizing trunk disconnect tones, A-12permissions
Adding
Audio outpub over your computer speakers, 2-11audio output
Dialing timeouts, 4-12disk space
Permissions, dialing services
Shortcut menu
Spanish language prompts, 4-4spans, digital
Station ID
Did
Disconnect tones, customizing, A-12
Moving, 6-42Operator
Converting, 12-3,12-4