ProSafe M4100 and M7100 Managed Switches
Revision History
Support
Trademarks
Table of Contents
LAGs
Ospf
ACLs
DiffServ
Security Management
Sntp
Switch Stacks
Snmp
Spanning Tree Protocol
Dvmrp
Index
Documentation Resources
This chapter provides the following examples
VLANs
Virtual LANs
CLI Create Two Vlans
Create Two VLANs
Web Interface Create Two Vlans
Web Interface Assign Ports to VLAN2
Select Switching Vlan Advanced Port Pvid Configuration
Assign Ports to VLAN2
CLI Assign Ports to VLAN2
Web Interface Create Three Vlans
Select Switching Vlan Basic Vlan Configuration
Create Three VLANs
CLI Create Three Vlans
ProSafe M4100 and M7100 Managed Switches
CLI Assign Ports to VLAN3
Assign Ports to VLAN3
Acceptable Frame Types list, select Admit All
Web Interface Assign Ports to VLAN3
CLI Assign VLAN3 as the Default Vlan for Port 1/0/2
Assign VLAN3 as the Default Vlan for Port 1/0/2
Add port 1/0/23 to VLAN3
Create a MAC-Based Vlan
CLI Create a MAC-Based Vlan
Add all the ports to VLAN3
Select Switching Vlan Advanced Vlan Membership
Web Interface Assign a MAC-Based Vlan
Map MAC 00000A000002 to VLAN3
ProSafe M4100 and M7100 Managed Switches
MAC Address field, enter 00000A000002
Create a Protocol-Based Vlan
CLI Create a Protocol-Based Vlan
Screen similar to the following displays
Enable protocol Vlan group 1 and 2 on the interface
Web Interface Create a Protocol-Based Vlan
Create the protocol-based Vlan group vlanipx
ProSafe M4100 and M7100 Managed Switches
Create an IP subnet-based Vlan
Virtual VLANs Create an IP Subnet-Based Vlan
CLI Create an IP Subnet-Based Vlan
Assign all the ports to Vlan
Web Interface Create an IP Subnet-Based Vlan
Vlan 1 to 4093 field, enter Click Add
Voice VLANs
Subnet Mask field, enter
Create Vlan
CLI Configure Voice Vlan and Prioritize Voice Traffic
Include the ports 1/0/1 and 1/0/2 in Vlan
Configure Voice Vlan globally
Configure Voice Vlan mode in the interface 1/0/2
Configure Vlan 10 as the matching criteria for the class
ProSafe M4100 and M7100 Managed Switches
ProSafe M4100 and M7100 Managed Switches
Select the 1/0/2 check box
Select Switching Vlan Advanced Voice Vlan Configuration
Interface Mode list, select Vlan ID
Select QoS Advanced DiffServ Class Configuration
Class Name field, enter ClassVoiceVLAN
Select QoS DiffServ Advanced Policy Configuration
Policy Name field, enter PolicyVoiceVLAN
Set the Policy Name field as PolicyVoiceVLAN
Click the Policy PolicyVoiceVLAN
Screen similar to the following displays Click Apply
Private VLANs
Private VLANs
Packet flow within a Private Vlan domain VLANs
CLI Assign Private-VLAN Type Primary, Isolated, Community
Assign Private-VLAN Types Primary, Isolated, Community
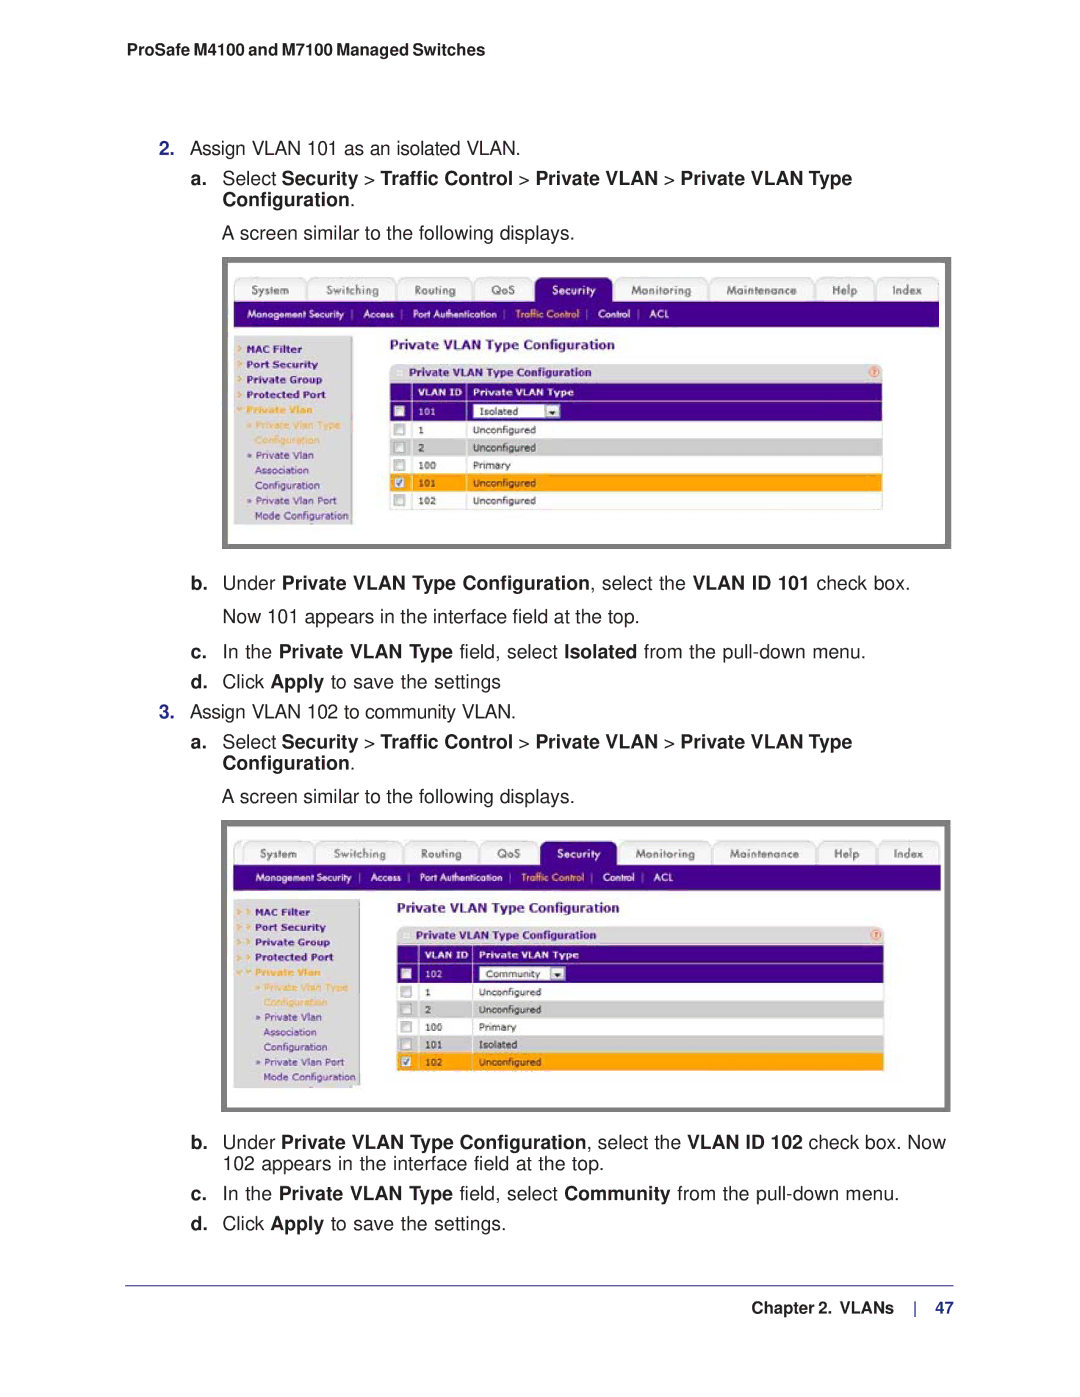
Assign Vlan 101 as an isolated Vlan
Web Interface Configure Private-VLAN Association
Configure Private-VLAN Association
CLI Configure Private-VLAN Association
Configure port 1/0/1 to promiscuous port mode
Configure Private-VLAN Port Mode Promiscuous, Host
CLI Configure Private-VLAN Port Mode Promiscuous, Host
CLI Configure Private-VLAN Host Ports
Configure Private-VLAN Host Ports
Web Interface Assign Private-VLAN Port Host Ports
Web Interface Map Private-VLAN Promiscuous Port
Map Private-VLAN Promiscuous Port
CLI Map Private-VLAN Promiscuous Port
Promiscuous Primary Vlan field, enter
Link Aggregation Groups
LAGs
Web Interface Create Two LAGs
Select Switching LAG LAG Configuration
Create Two LAGs
CLI Create Two LAGs
Add Ports to LAGs
CLI Add Ports to the LAGs
Web Interface Add Ports to LAGs
By default, the system enables link trap notification
Enable Both LAGs
CLI Enable Both LAGs
Web Interface Enable Both LAGs
This chapter provides the following sections
Port Routing
Layer 3 switch configured for port routing Port Routing
Port Routing Configuration
Web Interface Enable Routing for the Switch
Enable Routing for the Switch
Enable Routing for Ports on the Switch
CLI Enable Routing for the Switch
IP Address field, enter Subnet Mask field, enter
CLI Enable Routing for Ports on the Switch
Web Interface Enable Routing for Ports on the Switch
Routing Mode field, select Enable
IP Address field, enter Subnet Mask field, enter
Select Routing Routing Table Basic Route Configuration
Add a Default Route
CLI Add a Default Route
Web Interface Add a Default Route
CLI Add a Static Route
Route Configuration screen displays
Route Type list, select DefaultRoute
Add a Static Route
Web Interface Add a Static Route
Vlan Routing
Layer 3 switch configured for port routing
Web Interface Create Two VLANs
Select Switching Vlan Advanced Port Pvid Configuraton
Scroll down and select 1/0/1 and 1/0/2 check boxes
Select Routing Vlan Vlan Routing
Set Up Vlan Routing for the VLANs and the Switch
CLI Set Up Vlan Routing for the VLANs and the Switch
Click Add to save the settings
Routing Information Protocol
Network with RIP on ports 1/0/2 and 1/0/3
Routing for the Switch
Routing for Ports
Web Interface Enable Routing for the Ports
RIP for the Switch
RIP for Ports 1/0/2 and 1/0/3
CLI Enable RIP on the Switch
Web Interface Enable RIP on the Switch
Web Interface Enable RIP for Ports 1/0/2 and 1/0/3
CLI Enable RIP for Ports 1/0/2 and 1/0/3
ProSafe M4100 and M7100 Managed Switches
Vlan Routing with RIP
CLI Configure Vlan Routing with RIP Support
Netgear Switch Config#ip routing
Enable RIP for the switch Route preference defaults to
IP Address field, enter Network Mask field, enter
Web Interface Configure Vlan Routing with RIP Support
Network Mask field, enter
Open Shortest Path First
Ospf
Inter-area Router
CLI Configure an Inter-area Router
Assign IP addresses to ports
Select Routing IP Advanced IP Interface Configuration
Web Interface Configure an Inter-area Router
ProSafe M4100 and M7100 Managed Switches
RFC 1583 Compatibility field, select Disable
Ospf on a Border Router
CLI Configure Ospf on a Border Router
Select Routing IP Basic IP Configuration
Web Interface Configure Ospf on a Border Router
Set disable 1583compatibility to prevent a routing loop
Enable IP routing on the switch
IP Address field, enter Network Mask field, enter
Admin Mode field, select Enable
ProSafe M4100 and M7100 Managed Switches
Router Priority 0 to 255 field, enter
Select Routing Ospf Advanced Interface Configuration
Stub Areas
CLI Configure Area 1 as a Stub Area on A1
Enable routing on the switch
Enable Ospf area 0.0.0.1 on 2/0/19
Configure area 0.0.0.1 as a stub area
Switch a injects a default route only to area
Enable Ospf area 0 on ports 2/0/11
Web Interface Configure Area 1 as a Stub Area on A1
IP Address field, enter Network Mask field, enter
Select Routing Ospf Advanced Interface Configuration
Import Summary LSAs field, select Disable
CLI Configure Area 1 as a Stub Area on A2
Set the router ID to
Web Interface Configure Area 1 as a Stub Area on A2
Enable Ospf area 0.0.0.1 on the 1/0/15
IP Address field, enter Network Mask field, enter
ProSafe M4100 and M7100 Managed Switches
Stop importing summary LSAs to area
CLI Configure Area 1 as an nssa Area
Configure area 0.0.0.1 as an nssa area
Nssa Areas
Enable area 0.0.0.1 on port 2/0/19
Web Interface Configure Area 1 as an nssa Area on A1
IP Address field, enter Network Mask field, enter
Subnet Mask field, enter
Import Summary LSA’s field, select Disable
CLI Configure Area 1 as an nssa Area on A2
Redistribute the RIP routes into the Ospf
Configure the area 0.0.0.1 as an nssa area
Enable Ospf area 0.0.0.1 on port 1/0/15
Web Interface Configure Area 1 as an nssa Area on A2
Select Routing RIP Advanced Interface Configuration
Select Routing Ospf Advanced Nssa Area Configuration
Vlan Routing Ospf
ProSafe M4100 and M7100 Managed Switches
Specify the router ID and enable Ospf for the switch
CLI Configure Vlan Routing Ospf
Enable Ospf for the Vlan and physical router ports
Web Interface Configure Vlan Routing Ospf
IP Address field, enter Network Mask field, enter
ProSafe M4100 and M7100 Managed Switches
OSPFv3
CLI Configure OSPFv3
On A1, enable IPv6 unitcast routing on the switch
Enable OSPFv3, and assign 2.2.2.2 as the router ID
Enable OSPFv3, and assign 1.1.1.1 to router ID
On A2, enable IPv6 unitcast routing on the switch
Select Routing IPv6 Basic IPv6 Global Configuration
Web Interface Configure OSPFv3
Enable IPv6 unicast routing on the switch
Click Add to save the settings Enable OSPFv3 on port 1/0/1
Autonomous Flag field, select Disable
ProSafe M4100 and M7100 Managed Switches
CLI show ip interface
Proxy Address Resolution Protocol
Proxy ARP Examples
CLI ip proxy-arp
Web Interface Configure Proxy ARP on a Port
Virtual Router Redundancy Protocol
Vrrp
Vrrp on a Master Router
CLI Configure Vrrp on a Master Router
Enable Vrrp for the switch
Enable Vrrp on the port
Select Routing Vrrp Advanced Vrrp Configuration
Web Interface Configure Vrrp on a Master Router
Primary IP Address field, enter
Vrrp on a Backup Router
CLI Configure Vrrp on a Backup Router
Mode field, select Active Click Apply to save the settings
Set the priority for the port. The default priority is
Web Interface Configure Vrrp on a Backup Router
Status list, select Active
Priority 1 to 255, enter Primary IP Address field, enter
Click Add to save the settings
Access Control Lists
IP ACLs
ACL Configuration
MAC ACLs
Apply the ACL to one or more interfaces
Set Up an IP ACL with Two Rules
CLI Set Up an IP ACL with Two Rules
Select Security ACL IP ACL IP Extended Rules
Web Interface Set Up an IP ACL with Two Rules
ProSafe M4100 and M7100 Managed Switches
ProSafe M4100 and M7100 Managed Switches
This is a two-step process
One-Way Access Using a TCP Flag in an ACL
CLIConfigure One-Way Access Using a TCP Flag in an ACL
Configure the Switch
ProSafe M4100 and M7100 Managed Switches
Create an ACL that permits all the IP packets
Configure the GSM7352S
Enter the following commands
ProSafe M4100 and M7100 Managed Switches
Select Routing Vlan Vlan Routing Wizard
Configuring the Switch
This is a two-part process
Create Vlan 30 with IP address 192.168.30.1/24
IP Address field, enter Network Mask field, enter
Select Routing IP Basic IP Configuration
Select Routing Routing Table Basic Route Configuration
Select Security ACL Advanced IP ACL
ProSafe M4100 and M7100 Managed Switches
ProSafe M4100 and M7100 Managed Switches
ProSafe M4100 and M7100 Managed Switches
Create Vlan 40 with IP address 192.168.40.1/24
Configuring the GSM7342S Switch
IP Address field, enter Network Mask field, enter
Select Routing Routing Table Basic Route Configuration
ProSafe M4100 and M7100 Managed Switches
Using ACLs to isolate VLANs on a Layer 3 switch
Use ACLs to Configure Isolated VLANs on a Layer 3 Switch
Enter the following CLI commands
Create ACL 103 to permit all other traffic
IP Address field, enter Network Mask field, enter
IP Address field, enter
Select Security ACL Advanced IP ACL
Select Security ACL Advanced IP Extended Rules
Select Security ACL Advanced IP Extended Rules
Select Security ACL Advanced IP Extended Rules
Select Security ACL Advanced IP Binding Configuration
ProSafe M4100 and M7100 Managed Switches
Set up a MAC ACL with Two Rules
Select Security ACL MAC ACL MAC Rules
CLI Set up a MAC ACL with Two Rules
Web Interface Set up a MAC ACL with Two Rules
Select Security ACL MAC ACL
Select Security ACL MAC ACL MAC Binding Configuration
ACL Mirroring
ACL mirroring
CLI Configure ACL Mirroring
Bind the ACL with interface 1/0/1
Web Interface Configure ACL Mirroring
View the configuration
ProSafe M4100 and M7100 Managed Switches
ProSafe M4100 and M7100 Managed Switches
ProSafe M4100 and M7100 Managed Switches
CLI Redirect a Traffic Stream
ACL Redirect
Web Interface Redirect a Traffic Stream
Create an IP access control list with the name redirectHTTP
ProSafe M4100 and M7100 Managed Switches
Redirect Interface list, select 1/0/19
ProSafe M4100 and M7100 Managed Switches
Configure IPv6 ACLs
Create the access control list with the name ipv6-acl
CLI Configure an IPv6 ACL
Netgear Switch #show ipv6 access-lists
Select Security ACL Advanced IPv6 ACL
Web Interface Configure an IPv6 ACL
ProSafe M4100 and M7100 Managed Switches
Select Security ACL Advanced IP Binding Configuration
ProSafe M4100 and M7100 Managed Switches
CoS Queuing
Class of Service Queuing
CoS queue mapping uses trusted and untrusted ports
CoS Queue Mapping
Trusted Ports
Untrusted Ports
To use the CLI to show CoS trust mode, use these commands
CoS Queue Configuration
Show classofservice Trust
CLI Show classofservice Trust
Web Interface Set classofservice Trust Mode
Set classofservice Trust Mode
Web Interface Show classofservice Trust
CLI Set classofservice Trust Mode
Global Trust Mode list, select trust dot1p
Show classofservice IP-Precedence Mapping
CLI Show classofservice IP-Precedence Mapping
Web Interface Show classofservice ip-precedence Mapping
IP precedence to queue mapping of the interface is displayed
Scheduler Type list, select Weighted
Set CoS Trust Mode for an Interface
Interface Trust Mode list, select trust dot1p
Configure Traffic Shaping
CLI Set CoS Trust Mode for an Interface
Web Interface Set CoS Trust Mode for an Interface
Interface Shaping Rate 0 to 100 field, enter
CLI Configure traffic-shape
Web Interface Configure Traffic Shaping
Click Apply to save the settings
Auto VoIP on
Differentiated Services
DiffServ
This chapter provides the following examples DiffServ on
DiffServ
Class B subnet with differentiated services
Ensure that the DiffServ operation is enabled for the switch
CLI Configure DiffServ
Netgear Switch Config policy-map#exit
Class Name field, enter financedept
Web Interface Configure DiffServ
Class Name field, enter marketingdept
Source IP Address field, enter Source Mask field, enter
Source IP Address field, enter Source Mask field, enter
Class Name field, enter developmentdept
Policy Selector field, enter internetaccess
Member Class list, select testdept
Member Class list, select marketingdept
Member Class list, select developmentdept
ProSafe M4100 and M7100 Managed Switches
ProSafe M4100 and M7100 Managed Switches
ProSafe M4100 and M7100 Managed Switches
Select QoS CoS Advanced Interface Queue Configuration
Policy In list, select internetaccess
ProSafe M4100 and M7100 Managed Switches
ProSafe M4100 and M7100 Managed Switches
ProSafe M4100 and M7100 Managed Switches
DiffServ for VoIP
CLI Configure DiffServ for VoIP
Attach the defined policy to an inbound service interface
Web Interface Diffserv for VoIP
Select QoS DiffServ Advanced DiffServ Configuration
Click classvoip
Click classef
Screen similar to the following displays
Select QoS DiffServ Advanced Service Configuration
Auto VoIP
Auto VoIP
CLI Configure Auto VoIP
View the auto VoIP information
Web Interface Configure Auto-VoIP
DiffServ for IPv6
DiffServ for IPv6
Associate the previously created class classicmpv6
CLI Configure DiffServ for IPv6
Define matching criteria as protocol ICMPv6
Create the policy policyicmpv6
Class Name field, enter classicmpv6
Web Interface Configure DiffServ for IPv6
Select QoS DiffServ Advanced IPv6 Class Configuration
ProSafe M4100 and M7100 Managed Switches
Policy Name field, enter policyicmpv6
ProSafe M4100 and M7100 Managed Switches
Select the Interface 1/0/1, 1/0/2, and 1/0/3 check boxes
Policy Name list, select policyicmpv6
Screen similar to the following displays Click Apply
Create classes classvlan and classcolor
CLI Configure a Color Conform Policy
Color Conform Policy
Apply this policy to port 1/0/13
Web Interface Configure a Color Conform Policy
ProSafe M4100 and M7100 Managed Switches
Select QoS DiffServ Advanced Class Configuration
Class Name field, enter classcolor
Policy Name field, enter policyvlan
For Conform Action, select the Send radio button
Member Class field, enter classvlan
Committed Rates field, enter
Committed Burst Size field, enter
Policy Name list, select policyvlan
Igmp
Igmp Snooping and Querier
Igmp Snooping
CLI Enable Igmp Snooping
Web Interface Enable Igmp Snooping
Following example shows how to enable Igmp snooping
Web Interface Show igmpsnooping
Show mac-address-table igmpsnooping
CLI Show igmpsnooping
Web Interface Show mac-address-table igmpsnooping
CLI Configure the Switch with an External Multicast Router
External Multicast Router
CLI Show mac-address-table igmpsnooping
CLI Configure the Switch with a Multicast Router Using Vlan
Multicast Router Using Vlan
Igmp Querier
Multicast Router field, select Enable
CLI Enable Igmp Querier
Enable Igmp Querier
Web Interface Enable Igmp Querier
Querier IP Address field, enter
Web Interface Show Igmp Querier Status
To see the Igmp querier status, use the following command
Show Igmp Querier Status
CLI Show Igmp Querier Status
MVR Multicast Vlan Registration
MVR switch GSM7212P in this case
Configure MVR in Compatible Mode
Create MVlan, VLAN1, VLAN2, and VLAN3
CLI Configure MVR in Compatible Mode
Configure multicast Vlan on the source port
Configure the receive ports
ProSafe M4100 and M7100 Managed Switches
Show mvr status
Web Interface Configure MVR in Compatible Mode
ProSafe M4100 and M7100 Managed Switches
ProSafe M4100 and M7100 Managed Switches
ProSafe M4100 and M7100 Managed Switches
Configure MVR in dynamic mode
Configure MVR in Dynamic Mode
CLI Configure MVR in Dynamic Mode
Configure the receive ports
Show the MVR status
Web Interface Configure MVR in Dynamic Mode
ProSafe M4100 and M7100 Managed Switches
ProSafe M4100 and M7100 Managed Switches
ProSafe M4100 and M7100 Managed Switches
Port Security
Security Management
CLI Set the Dynamic and Static Limit on Port 1/0/1
Set the Dynamic and Static Limit on Port 1/0/1
Click Apply to save the settings
Select the Convert Dynamic Address to Static check box
Create a Static Address
Static MAC Address field, enter
Protected Ports
CLI Create a Static Address
Web Interface Create a Static Address
Protected ports
Create one Vlan 192 including PC 1 and PC
Create a Dhcp pool to allocated IP addresses to PCs
Enable IP routing and configure a default route
Enable a protected port on 1/0/23 and 1/0/24
Create one Vlan 202 connected to the Internet
ProSafe M4100 and M7100 Managed Switches
IP Address field, enter Network Mask field, enter
IP Address field, enter Network Mask field, enter
Next Hop IP Address field, enter
802.1x Port Security
CLI Authenticating dot1x Users by a Radius Server
Select Routing Basic IP Configuration
Web Interface Authenticating dot1x Users by a Radius Server
Select Routing Advanced IP Interface Configuration
IP Address field, enter Subnet Mask field, enter
Control Mode list, select Force Authorized
Accounting Server Address field, enter
Message Authenticator field, select Enable
Accounting Mode field, select Enable Click Apply
Server Address field, enter
Guest Vlan
Create a Guest Vlan
CLI Create a Guest Vlan
Enable dot1x and Radius on the switch
Web Interface Create a Guest Vlan
Enable the guest Vlan on ports 1/0/1 and 1/0/24
Click Apply to save settings Enable dot1x on the switch
ProSafe M4100 and M7100 Managed Switches
Radius Server IP Address field, enter
Assign VLANs Using Radius
Netgear Switch #network protocol none
CLI Assign Vlans Using Radius
Set the NAS-IP address for the Radius server
Enable dot1x authentication on the switch
Use the Radius as the authenticator
Set the Radius server IP address
Assign the IP address for the Web Management Interface
Web Interface Assign Vlans Using Radius
Show the dot1x detail for 1/0/5
IP Address field, enter Subnet Mask field, enter
Control Mode list, select Force Authorized
Dynamic ARP Inspection
Enable Dhcp snooping in a Vlan
CLI Configure Dynamic ARP Inspection
Enable Dhcp snooping globally
View the Dhcp Snooping Binding table
Web Interface Configure Dynamic ARP Inspection
Enable ARP inspection in Vlan
Select Security Control Dhcp Snooping Global Configuration
ProSafe M4100 and M7100 Managed Switches
ProSafe M4100 and M7100 Managed Switches
ProSafe M4100 and M7100 Managed Switches
Create an ARP ACL
CLI Configure Static Mapping
Configure the rule to allow the static client
Static Mapping
ACL Name list, select ArpFilter
Web Interface Configure Static Mapping
Configure ARP ACL used for Vlan
Click Apply Screen similar to the following displays
Dhcp Snooping
Dhcp Snooping
CLI Configure Dhcp Snooping
Web Interface Configure Dhcp Snooping
ProSafe M4100 and M7100 Managed Switches
Enter the Dhcp snooping static binding
Enter Static Binding into the Binding Database
CLI Enter Static Binding into the Binding Database
Maximum Rate of Dhcp Messages
Select Security Control Dhcp Snooping Binding Configuration
Control the maximum rate of Dhcp messages
CLI Configure the Maximum Rate of Dhcp Messages
Web Interface Configure the Maximum Rate of Dhcp Messages
View the rate configured
IP Source Guard
IP Source Guard
Enable IP Source Guard in interface 1/0/2
ProSafe M4100 and M7100 Managed Switches
ProSafe M4100 and M7100 Managed Switches
MAC Address field, enter
Select the Interface 1/0/2 check box
Show sntp
Show Sntp CLI Only
Simple Network Time Protocol
Show sntp server
Show sntp client
CLI Configure Sntp
Configure Sntp
Web Interface Configure Sntp
Set the Named Sntp Server
Set the Time Zone CLI Only
Address field, enter time-f.netgear.com
CLI Set the Named Sntp Server
Web Interface Set the Named Sntp Server
DNS Server field, enter
Traceroute
Tools
Web Interface Traceroute
Select Maintenance Troubleshooting Traceroute
CLI Traceroute
This section provides the following examples Script on
Configuration Scripting
Script list and script delete
Script
Upload a Configuration Script
Script apply running-config.scr
Create a Configuration Script
Transfer the file from the PC to the switch using Tftp
Pre-Login Banner
Create a Pre-Login Banner CLI Only
Select Monitoring Mirroring Port Mirroring
Port Mirroring
CLI Specify the Source Mirrored Ports and Destination Probe
Destination Port field, enter 1/0/3
Session Mode field, select Enable Click Apply
Dual Image
CLI Download a Backup Image and Make It Active
Remote File Name, enter gsm73xxse-r8v0m0b3.stk
Web Interface Download a Backup Image and Make It Active
Select Maintenance File Management Dual Image Configuration
Server Address Type list, select IPv4
This section, the following examples are provided
Outbound Telnet
CLI show telnet
CLI show network
CLI transport output telnet
Web Interface Configure Telnet
Select Security Access Telnet
Web Interface Configure the Session Timeout
CLI Configure the session-limit and session-timeout
Maximum number of sessions field, enter
Log Files Syslog
Syslog
Web Interface Show Logging
Configure the syslog
Show Logging
CLI Show Logging
Select Monitoring Logs Buffer Logs
Select Monitoring Logs Command Log
Select Monitoring Logs Console Log
CLI Show Logging Buffered
Show Logging Buffered
Web Interface Show Logging Trap Logs
Show Logging Traplogs
Web Interface Show Logging Buffered
CLI Show Logging Traplogs
CLI Show Logging Hosts
Show Logging Hosts
Web Interface Show Logging Hosts
Configure Logging for a Port
CLI Configure Logging for the Port
Severity Filter list, select Alert
Web Interface Configure Logging for the Port
For Position Only FPO
Email Alerting
Netgear Switch Config#logging traps
Switch Stack Management and Connectivity
Switch Stacks
Stack Master
Stack Master and Stack Members
Stack Member Numbers
Stack Members
Stack Member Priority Values
Install and Power-up a Stack
Compatible Switch Models
Install a Switch Stack
Switch Firmware
Code Mismatch
Upgrade the Firmware
Migrate Configuration with a Firmware Upgrade
Copy Master Firmware to Unit list, select
Configure a Stacking Port as an Ethernet Port
Continue with the boot of operational code
Copy Master Firmware to a Stack Member Web Interface
After Switch a reboots
CLI Configure a Stacking Port as an Ethernet Port
On Switch A, Configure the Stack Port and Reboot
Configured Stack Mode list, select Ethernet
Web Interface Configure a Stacking Port as an Ethernet Port
On Switch B, Configure the stack port and reboot
After Switch B reboots
ProSafe M4100 and M7100 Managed Switches
On Switch A, show the port information
Stack Switches Using 10G Fiber
CLI Stack Switches Using 10G Fiber
Select System Stacking Advanced Stack Port Configuration
Web Interface Stack Switches Using 10G Fiber
Reboot Switch B
On Switch A, you see the following
Add, Remove, or Replace a Stack Member
Add Switches to an Operating Stack
Configured Stack Mode list, select Stack
Reboot Unit No. list, select Click Apply
Remove a Switch from the Stack
Replace a Stack Member
Switch Stack Configuration Files
Switch Stack Master Scenarios
Preconfigure a Switch
Renumber Stack Members
Preconfigured Switches Compared to Stack Configuration
Web Interface Renumber Stack Members
CLI Renumber Stack Members
Now the unit ID of the stacking member is
Web Interface Move the Stack Master to a Different Unit
Move the Stack Master to a Different Unit
CLI Move the Stack Master to a Different Unit
Snmp V3 on SFlow on
Add a New Community
CLI Add a New Community
Web Interface Add a New Community
Enable Snmp Trap
CLI Enable Snmp Trap
This example shows how to send Snmp trap to the Snmp server
Snmp
Web Interface Enable Snmp Trap
Click Apply to save the settings Configure the Snmp V3 user
CLI Configure Snmp
Web Interface Configure Snmp
Confirm Password field, enter
Encryption Key field, enter
SFlow
SFlow
Select the 1 check box
View the sampling port configurations
Configure the sFlow receiver IP address
ProSafe M4100 and M7100 Managed Switches
Time-Based Sampling of Counters with sFlow
CLI Configure Time-Based Sampling of Counters with sFlow
View the polling port configurations
CLI Specify Two DNS Servers
Select System Management DNS DNS Configuration
Specify Two DNS Servers
Domain Name System
Web Interface Manually Add a Host Name and an IP Address
Select System Management DNS Host Configuration
Manually Add a Host Name and an IP Address
CLI Manually Add a Host Name and an IP Address
IP Address field, enter
Dhcp Server
Configure a Dhcp Server in Dynamic Mode
CLI Configure a Dhcp Server in Dynamic Mode
Web Interface Configure a Dhcp Server in Dynamic Mode
Select System Services Dhcp Server Dhcp Pool Configuration
Configure a Dhcp Reservation
Web Interface Configure a Dhcp Reservation
CLI Configure a Dhcp Reservation
ProSafe M4100 and M7100 Managed Switches
DHCPv6 Server
DHCPv6 stateful IPv6 address assignment DHCPv6 Server
Enable DHCPv6 service on port 1/0/9
CLI Configure DHCPv6
Enable IPv6 routing
Create a DHCPv6 pool and enable Dhcp service
Select Routing IPv6 Advanced Interface Configuration
Web Interface Configure an Inter-area Router
ProSafe M4100 and M7100 Managed Switches
ProSafe M4100 and M7100 Managed Switches
Prefix field, enter 000100011540144f0000004daad0
Enable IPv6 Dhcp server on interface 2/0/21
Configure Stateless DHCPv6 Server
CLI Configure Stateless DNS Server
Web Interface Configure Stateless DHCPv6 Server
Select System Services Dhcp Server DHCPv6 Pool Configuration
ProSafe M4100 and M7100 Managed Switches
This chapter includes the following examples
Double VLANs and Private Vlan Groups
Double VLANs
Create static Vlan
CLI Enable a Double Vlan
Web Interface Enable a Double Vlan
ProSafe M4100 and M7100 Managed Switches
ProSafe M4100 and M7100 Managed Switches
Private Vlan Groups
CLI Create a Private Vlan Group
Create a private group in community mode
Create a private group in isolated mode
Add 1/0/16 and 1/0/7 to the private group
Web Interface Create a Private Vlan Group
Acceptable Frame Type list, select Admit All
ProSafe M4100 and M7100 Managed Switches
ProSafe M4100 and M7100 Managed Switches
Spanning Tree Protocol
Configure Classic STP 802.1d
CLI Configure Classic STP 802.1d
Web Interface Configure Classic STP 802.1d
Select Switching STP CST Port Configuration
Configure Rapid STP 802.1w
CLI Configure Rapid STP 802.1w
Web Interface Configure Rapid STP 802.1w
CLI Configure Multiple STP 802.1s
Configure Multiple STP 802.1s
Web Interface Configure Multiple STP 802.1s
ProSafe M4100 and M7100 Managed Switches
Tunnel
In4 tuennel between two switches Tunnel
CLI Create a Tunnel
Configure Switch GSM7328S1
Configure Switch GSM7328S2
Web Interface Create a Tunnel
Click Apply Assign an IPv6 address to the tunnel
Source Address field, enter Destination Address field, enter
Configure Switch GSM7328S2
IP Address field, enter Subnet Mask field, enter
ProSafe M4100 and M7100 Managed Switches
CLI Create an IPv6 Routing Interface
IPv6 Interface Configuration
Create an IPv6 Routing Interface
Assign an IPv6 address to interface 1/0/1
Web Interface Create an IPv6 Routing Interface
Select Routing IPv6 Advanced Prefix Configuration
Create an IPv6 Network Interface
EUI64 field, select False Click Add
CLI Configure the IPv6 Network Interface
Web Interface Configure the IPv6 Network Interface
IPv6 Prefix/Prefix Length field, enter 200111/64
IPv6 Gateway field, enter
Create an IPv6 Routing Vlan
CLI Create an IPv6 Routing Vlan
Netgear Switch Config#ipv6 forwarding
Web Interface Create an IPv6 Vlan Routing Interface
Select Routing IPv6 Advanced Interface Configuration
ProSafe M4100 and M7100 Managed Switches
Enable DHCPv6 on the interface 1/0/23
Configure DHCPv6 Mode on the Routing Interface
CLI Configure DHCPv6 mode on routing interface
Show the ipv6 address assigned from 1/0/23
Web Interface Configure DHCPv6 mode on routing interface
ProSafe M4100 and M7100 Managed Switches
PIM-SMon
PIM-Dense Mode PIM-DM PIM-Sparse Mode PIM-SM
Protocol-Independent-Multicast
Configuring and Using PIM-DM
Enable IP multicast forwarding on the switch
CLI Configure PIM-DM
PIM-DM on Switch a
Enable pimdm on the switch
Enable PIM-DM on the interface
PIM-DM on Switch B
Enable Igmp on the switch
PIM-DM on Switch C
PIM-DM on Switch D
PIM-DM builds the multicast routes table on each switch
Enable Igmp on 1/0/24
Web Interface Configure PIM-DM
IP Address field, enter Subnet Mask field, enter
Select Routing RIP Advanced Interface Configuration
ProSafe M4100 and M7100 Managed Switches
ProSafe M4100 and M7100 Managed Switches
PIM-DM on Switch B
Select Routing RIP Advanced Interface Configuration
Select Routing Multicast PIM Global Configuration
PIM-DM on Switch C
IP Address field, enter Subnet Mask field, enter
Select Routing RIP Advanced Interface Configuration
Select Routing Multicast PIM Global Configuration
PIM-DM on Switch D
IP Address field, enter Subnet Mask field, enter
IP Address field, enter Subnet Mask field, enter
ProSafe M4100 and M7100 Managed Switches
Select Routing Multicast PIM Interface Configuration
Select Routing Multicast Igmp Interface Configuration
ProSafe M4100 and M7100 Managed Switches
PIM-SM
Enable RIP to build a unicast IP routing table
CLI Configure PIM-SM
PIM-SM on Switch a
Enable PIM-SM on the switch
Netgear Switch#configure
PIM-SM on Switch B
PIM-SM on Switch C
PIM-SM on Switch D
Pimsm
Web Interface Configure PIM-SM
IP Address field, enter Subnet Mask field, enter
IP Address field, enter Subnet Mask field, enter
Select Routing RIP Advanced Interface Configuration
ProSafe M4100 and M7100 Managed Switches
PIM-SM on Switch B
IP Address field, enter Subnet Mask field, enter
Select Routing Multicast Global Configuration
Select Routing Multicast PIM Interface Configuration
Group Mask field, enter
Click Add Set up the BSR candidate configuration
PIM-SM on Switch C
IP address, enter Subnet Mask field, enter
Select Routing Multicast Global Configuration
Select Routing Multicast PIM Interface Configuration
Select Routing Multicast PIM BSR Candidate Configuration
Click Add BSR Candidate Configuration
PIM-SM on Switch D
IP Address field, enter Subnet Mask field, enter
Select Routing RIP Advanced Interface Configuration
Select Routing Multicast Global Configuration
Select Routing Multicast PIM Interface Configuration
Click Add Set up BSR Candidate configuration
Select Routing Multicast Igmp Interface Configuration
ProSafe M4100 and M7100 Managed Switches
This chapter includes the following sections
Dhcp L2 Relay and L3 Relay
Dhcp L2 Relay
Enable the Option 82 Remote ID field
CLI Enable Dhcp L2 Relay
Enable the Dhcp L2 relay on the switch
Enable the Option 82 Circuit ID field
Trust packets with option 82 received on port 1/0/6
Web Interface Enable Dhcp L2 Relay
Enable Dhcp L2 relay on port 1/0/5
Enable Dhcp L2 relay on port 1/0/6
ProSafe M4100 and M7100 Managed Switches
Remote ID String field, enter rmtid
82 Option Trust Mode field, select Enable
Dhcp L3 Relay
Configure the Dhcp Server Switch
CLI Configure a Dhcp Server
Create a Dhcp pool
Web Interface Configure a Dhcp Server
Select System Services Dhcp Server Dhcp Server Configuration
IP Range From field, enter IP Range To field, enter
Select System Services Dhcp Server Dhcp Pool Configuration
Create a routing interface and enable RIP on it
Configure a Dhcp L3 Switch
CLI Configure a Dhcp L3 Relay
Create a routing interface connecting to the client
Web Interface Configure a Dhcp L3 Relay
Subnet Mask field, enter
Select Routing RIP Advanced Route Redistribution
IP Address Configuration Method field, enter Manual
Redistribute Mode field, select Enable
UDP Port field, enter dhcp Click Add to save the settings
Multicast Listener Discovery
Configure MLD on MLD Snooping on
MLD on Switch a
Configure MLD
CLI Configure MLD
Enable IPV6 PIM-DM on the switch
MLD on Switch B
Enable OSPFv3 to build a unicast route table
Enable IPV6 MLD on the switch
Enable MLD on interface 1/0/24
Web Interface Configure MLD
Select Routing IPv6 Advanced Interface Configuration
ProSafe M4100 and M7100 Managed Switches
Select Routing OSPFv3 Advanced Interface Configuration
Select Routing IPv6 Multicast IPv6 PIM Global Configuration
MLD on Switch B
Select Routing IPv6 Advanced Interface Configuration
ProSafe M4100 and M7100 Managed Switches
Select Routing OSPFv3 Advanced Interface Configuration
Select Routing IPv6 Multicast IPv6PIM Global Configuration
Select Routing IPv6 Multicast MLD Global Configuration
MLD Snooping
Enable MLD snooping on Vlan
CLI Configure MLD Snooping
Web Interface Configure MLD Snooping
ProSafe M4100 and M7100 Managed Switches
ProSafe M4100 and M7100 Managed Switches
Distance Vector Multicast Routing Protocol
Dvmrp
Create routing interfaces 1/0/1, 1/0/13, and 1/0/21
CLI Configure Dvmrp
Dvrmp on Switch a
255
Enable Dvmrp protocol on the switch
Create routing ports 1/0/13 and 1/0/20
Dvrmp on Switch B
Enable Dvmrp mode on interfaceS 1/0/13 and 1/0/20
192.168.2.1
Enable Igmp protocol on the switch
Dvrmp on Switch C
Enable IP Dvmrp protocol on the switch
Enable Dvmrp mode on interfaces 1/0/3, 1/0/11, and 1/0/24
Enable Igmp mode on the interface 1/0/24
Dvmrp on Switch a
Web Interface Configure Dvmrp
Routing Mode field, select Enable
Select Routing Multicast Dvmrp Interface Configuration
Dvmrp on Switch B
IP Address field, enter Subnet Mask field, enter
Select Routing Multicast Dvmrp Interface Configuration
Dvmrp on Switch C
IP Address field, enter Subnet Mask field, enter
Select Routing Multicast Dvmrp Global Configuration
Select Routing Multicast Igmp Global Configuration
Select Enable in the Interface Mode field
Click Apply to save the settings Enable Igmp on the switch
ProSafe M4100 and M7100 Managed Switches
Captive Portal
Enable captive portal on the switch
Captive Portal Configuration
Enable Captive Portal
CLI Enable Captive Portal
Select Security Control Captive Portal CP Configuration
Web Interface Enable Captive Portal
Enable captive portal instance
Enable captive portal instance 1 on port 1/0/1
Client Access, Authentication, and Control
Web Interface Block a Captive Portal Instance
Local Authorization, Create Users and Groups
Block a Captive Portal Instance
CLI Block a Captive Portal Instance
Web Interface Create Users and Groups
CLI Create Users and Groups
Group field, select Click Add
Remote Authorization Radius User Configuration
Web Interface Configure Radius as the Verification Mode
CLI Configure Radius as the Verification Mode
SSL Certificates
Default-RADIUS-Server
Shows an example of iSCSI implementation
ISCSI
Web Interface Enable iSCSI Awareness with Vlan Priority Tag
Enable iSCSI Awareness with Vlan Priority Tag
CLI Enable iSCSI Awareness with Vlan Priority Tag
Select Switching iSCSI Basic
Enable iSCSI Awareness with Dscp
CLI Enable iSCSI Awareness with Dscp
Web Interface Enable iSCSI Awareness with Dscp
IP Address, enter
Set the iSCSI Target Port
CLI Set iSCSI Target Port
Web Interface Set iSCSI Target Port
Web Interface Show iSCSI Sessions
Show iSCSI Sessions
CLI Show iSCSI Sessions
ProSafe M4100 and M7100 Managed Switches
Numerics
Index
Index
SFlow 373, 374