Xerox WorkCentre C226 User Guide
Trademark information
Warranty
Table of contents Introduction
Before Using the Product
Managing the Machine
Xerox WorkCentre C226 User Guide
Before Making Copies
Peripheral Devices
Convenient Copy Functions
Basic Procedure for Making Copies
Xerox WorkCentre C226 User Guide Vii
Machine Maintenance for Copying
Basic Printing Procedures
Setting the Printer Driver Properties
Key Operator Programs
Printer Configuration Settings
Web Pages in the Printer
Printing from the Operation Panel
Appendix
Troubleshooting
Condition Setting Screen of Scanner Mode
Scanning Settings
Sending an Image
Before Using the FAX Feature
Specifications
Xii Xerox WorkCentre C226 User Guide
Transmission Using F-Codes
Basic Operations
Advanced Transmission Methods
Convenient Methods of Use
Programming
Xerox WorkCentre C226 User Guide Xiii
Xiv Xerox WorkCentre C226 User Guide
Safety Notes
Electrical Supply
Operator Accessible Areas
Maintenance
Cleaning Your Product
Xerox WorkCentre C226 User Guide Xvii
Operational Safety Information
Do These
Disconnect Device
Do Not Do These
Maintenance Information
Ozone Safety Information
For Consumables
Product Safety Certification
Radio Frequency Emissions
Xerox WorkCentre C226 User Guide Xix
CE Mark
FAX Send Header Requirements
Xerox WorkCentre C226 User Guide Xxi
Data Coupler Information
Canada
Europe
Xxii Xerox WorkCentre C226 User Guide
USA Energy Star
Canada Environmental Choice
Xerox WorkCentre C226 User Guide Xxiii
Xxiv Xerox WorkCentre C226 User Guide
Europe Energy
Xerox WorkCentre C226 User Guide Xxv
Xxvi Xerox WorkCentre C226 User Guide
Other countries
Installation Requirements
Before Using the Product
General Information
Installation Requirements
Moving this machine
If the machine has been placed on a stand/1-Tray Unit
If the machine is to be left unused for a long time
Introduction
Introduction
Meaning of R in original and paper size indications
Original and paper sizes
Main Features
Main Features
Energy saving features
Preheat mode
Auto power shut-off mode
Operation panel
Part Names and Functions
Exterior
Part Names and Functions
Duplex Bypass/ See Inverter Unit and exit tray
Stand/1-Tray
Unit
Tray Unit
Interior
Part names and functions of peripheral devices
Other optional equipment
Operation panel
Ready indicator Data indicator
Settings key
Start key Clear ALL key
Start key
Selection of function
Using the touch panel
Touch panel
Beep tone
Copier feature
Paper Empty in the job status display
Auditing Mode
Using the machine when the auditing mode is enabled
Auditing Mode
Account counter is enabled only for the colour copy mode
Ready To Copy Please See Your Key Operator For Assistance
When the copy job is finished, press the key ACC.#-C key
Loading Paper
Managing the Machine
Loading Paper
Loading paper in Paper Tray
Changing the paper size in Paper Tray
Loading paper in the Bypass Tray
General Information
Tray, close the paper cover as shown
When loading paper in the Bypass Tray or closing
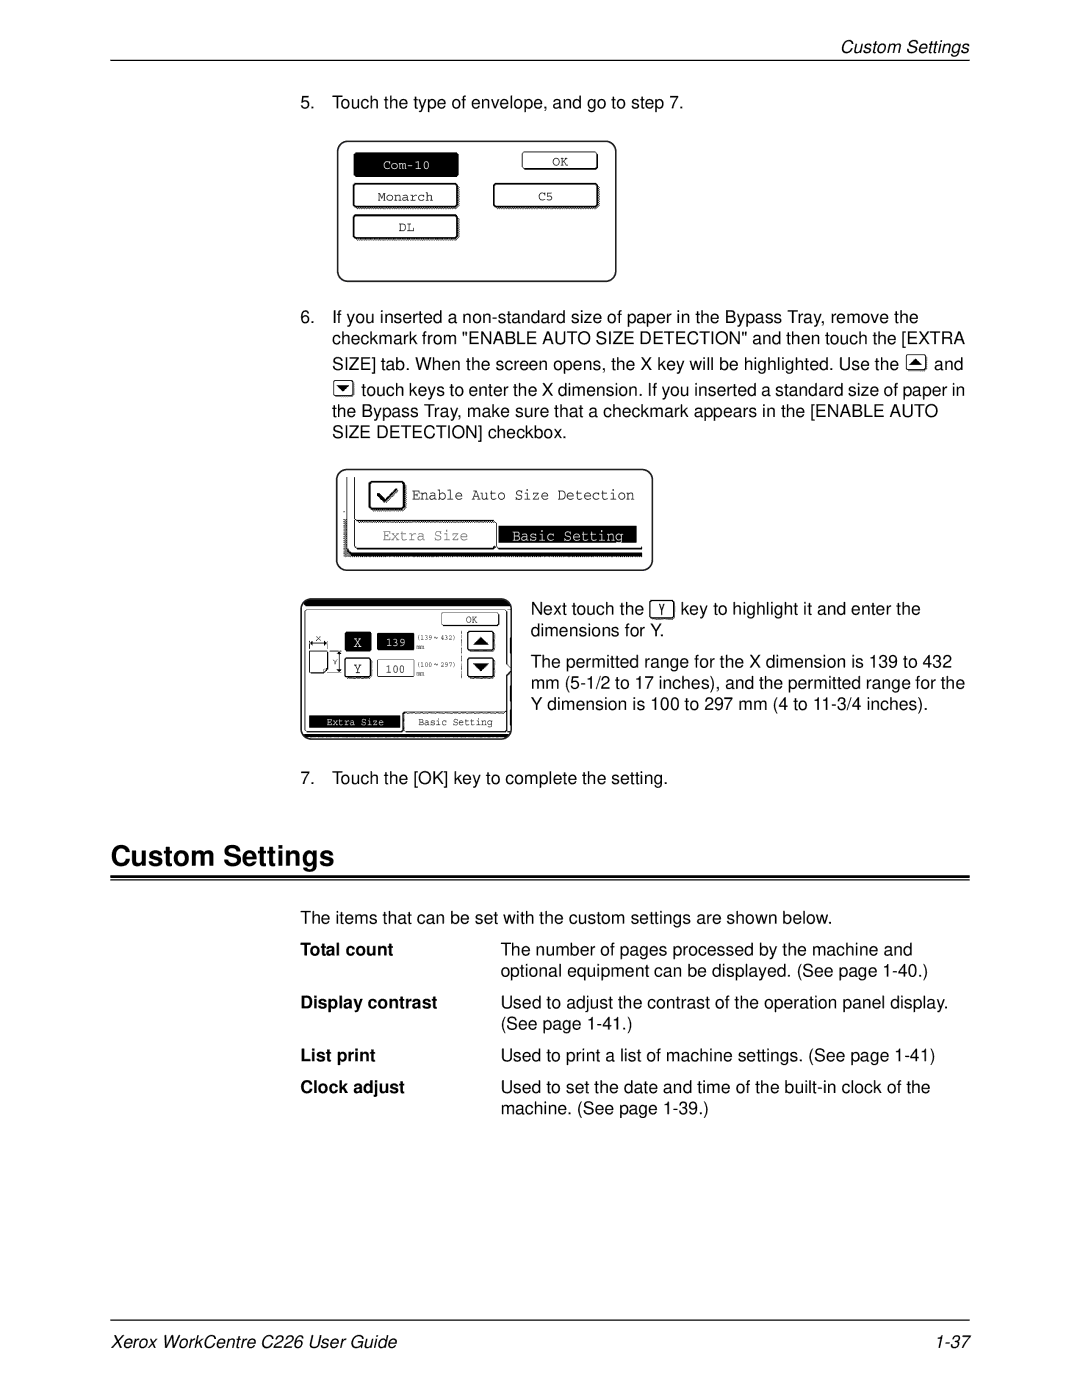
Loading envelopes
Setting envelopes or postcards
Printing onto envelopes or postcards
Loading postcards
Printing onto envelopes
Fusing unit pressure adjusting levers
Upper tray / middle tray / lower tray
Loading paper in the stand/1-Tray Unit/3-Tray Unit
Middle and lower paper trays
Specifications stand/1-Tray Unit/3-Tray Unit
Loading paper in the Duplex Module/2-Tray Unit
Upper tray
Specifications for paper trays
Specifications Duplex Module/2-Tray Unit
Tray No
More information on plain paper
More information on special media that can be used
Paper in AB system Paper in inch system
Setting the paper type except the Bypass Tray
Paper that can be used for automatic two-sided printing
Paper tray selection screen will appear
Touch the OK key to complete the setting
Setting the paper size when an extra size is loaded
Setting the paper type and paper size in the Bypass Tray
Heavy Paper1 106g/m2 200g/m2
Display contrast
Custom Settings
Clock adjust
Total count
Keyboard select
Tray settings
Receive mode
Fax data forward
Operation procedure common to all custom settings
More information on setting procedures
Detailed descriptions for program settings start on
Total count
About the settings
List print
Clock adjust
Tray settings
Display contrast
Toner
Replacing the Toner Cartridges
Remove the protective material from the new toner cartridge
Replacing the Toner Cartridges
General Information
Supply and Consumables
Storing Supplies
Proper storage
Storing Supplies
Misfeed Removal
Misfeed Removal
Misfeed Removal Guidance
Misfeed in the paper feed area
Misfeed in Tray
Misfeed in the Bypass Tray
Transport area
Misfeed in the transport area, fusing area, and exit area
Fusing area
Models without the Duplex Bypass/Inverter Unit
Upper exit tray
Misfeed Removal
Misfeed in the stand/1-Tray Unit
Misfeed in the 3-Tray Unit
General Information
Misfeed in the upper or lower tray
Problem Check Solution or cause
Problem Check Solution or cause
Troubleshooting
Problem Check Solution or cause
Saddle Stitch Finisher
Peripheral Devices
Saddle Stitch Finisher
Part names and functions
Using the Saddle Stitch Finisher
Staple cartridge replacement and staple jam removal
Staple cartridge replacement
Remove the empty staple box
General Information
Staple jam removal
Remove the staple box
Saddle Stitch Finisher
Push the Saddle Stitch Finisher back against the main unit
Open the top cover
Misfeed in the Saddle Stitch Finisher
General Information
Saddle Stitch Finisher
Check the list below before calling for service
Troubleshooting Saddle Stitch Finisher problems
Problem Check Solution or cause
Top binding
Stapling position quick reference guide for duplex output
Relation between print image and saddle stitch
Top cover
High Capacity Feeder
Part name
Loading paper in the High Capacity Feeder
High Capacity Feeder
Misfeed in the High Capacity Feeder
General Information
High Capacity Feeder
General Information Xerox WorkCentre C226 User Guide
Part Names and Functions The Dadf
Before Making Copies
Copier Operation
Touch Panel main screen of copy mode
Dadf
Acceptable originals
Adjust the original guides to the size of the originals
Setting Originals
Size and weight of acceptable originals
When using the Dadf
When using the document glass
Setting Originals
How to place the original
Operator programs
Original size detection function
Example
Standard original setting orientation
Automatic copy image rotation rotation copying
Selecting the Original Size
Selecting the Original Size
Using the Dadf Using the document glass
Touch the STORE/DELETE key
Storing, Deleting, and Using Original Sizes
Storing or deleting an original size
Touch the Original tab Touch the Custom Size key
To 297 mm can be entered in Y
Storing, Deleting, and Using Original Sizes
Enter X and then touch the key to enter Y. a width
64 to 432 mm can be entered in X, and a length
Touch the OK key Stored original size is called up
Using a Stored Original Size
Sided copies of 1-sided originals
Basic Procedure for Making Copies
Normal Copying
Copying from the Dadf
A4 Plain B4 Recycled A3 Plain
Normal Copying
Copy mode output restrictions
Normal Copying
About the offset function
Copy output sort and group
Turning on the offset function
Automatic two-sided copying from the Dadf
Touch Offset Touch OK
Selecting the output tray
Selected
Following two-sided modes can be
Set an original on the document glass pages 2-4 to
Copying from the document glass
How to place the original
Normal Copying
Automatic two-sided copying from the document glass
Exposure Adjustments
Exposure Adjustments
Example TEXT/PRTD.PHOTO key is selected
Obtain the best image quality. When a
Original type Contents of the original
Normally this setting is selected. When
Exposure is automatically adjusted to
Making a copy of a copy
Automatic selection auto image
Reduction/Enlargement/Zoom
Reduction/Enlargement/Zoom
100
Manual selection
Menu
To return the ratio to 100%
Touch the X key
XY Zoom
64%
Special Papers
Special Papers
Colour adjustment menu
Inserts key
Convenient Copy Functions
Special Modes
Special Modes
Common operation procedure for using the special functions
Screen
Touch the Special Modes tab
Margin shift
Touch the key for the desired special mode. Example
To set the margin shift function
Touch the Margin Shift key on the Special Modes screen
Set the shift amount as needed and touch the lower OK key
About the steps that follow
Screen to indicate that the function is turned on
Erase
Dual page copy
Touch the Dual page Copy key on the Special Modes screen
When copying book originals
As well as centre a smaller original onto a larger sized
Centring
This function can be used to reduce a larger sized origi
Nal image and centre it on a copy of smaller paper size
Ency film
Transparency film with insert sheets
Insert sheets must be the same size A4 or A4R
2 x 11 or 8-1/2 x 11R as the transpar
Auto
Copying onto a cover
Covers
Touch the Covers key on the Special Modes screen
Not copying onto a cover
See pages 2-13through
Select cover placement
Consumption
Touch the key to switch to the second Special Modes screen
Reverse
Originals with large black areas which use a large amount
Colour Adjustments Menu
Colour Adjustments Menu
RGB Adjust
Select a colour from R RED, G GREEN, and B Blue
Key to weaken the colour
Sharpness
Suppress background
Colour balance
About the steps that follow
Brightness setting screen will appear
Adjust the brightness
Brightness
Intensity setting screen will appear
Adjust the intensity
Intensity
Image Edit Menu
Image Edit Menu
Single Produces copies with a selected single colour
Select the desired colour
Single colour
Touch the Mirror Image key on the Image Edit menu screen
Mirror image
Photo Repeat
See pages 2-21through
Multi shot
On the copy
Touch the Multi Shot key on the Image Edit menu screen
Lines are added around the borders of the images
A3 11 x 17 Full-bleed
Touch the A3 FULL-BLEED key on the Image Edit menu screen
Overlap of sections of image
Multi-page enlargement
Inch system
About the steps that follow
Tion is turned on
Pamphlet copy
Pamphlet copy icon , etc. will also appear
Upper left corner of the screen to indicate that the func
When using the document glass
When using the Dadf
Job Program Memory
Storing a job program
Job Program Memory
Recalling a job program
Make all copier selections to be stored
Number of copies cannot be stored
Deleting a stored job program
To be deleted, touch the Exit key on the screen dis
Played in to exit the job program mode
CEL key is touched, the screen in will return but
Program will not be deleted. If no other programs are
Interrupting a Copy Run
Interrupting a Copy Run
Copier Operation
Removing an Original Misfeed
Machine Maintenance for Copying
Removing an Original Misfeed
Removing a misfed original from the Dadf
Check location C
Check location B
User Maintenance for copying
User Maintenance for copying
Cleaning the Original Scanning Area
Printed Photo
Problem Check Solution or cause
Windows 95 / 98 / Me
Basic Printing Procedures
Setting the Printer Drivers
Change the settings using the printer properties
Selecting a Color Mode setting
Windows NT4.0 / 2000 / XP / Server
Printer Operation
Click Help to display
Using the Help file to view explanations of the settings
Setting the Printer Drivers
Opening Help in Windows
Printing in black and white
Setting the Printer Drivers
Printer Operation
Automatic switching between colour and black and white
Printer Operation
Setting the Printer Drivers
Printing in colour
Setting the Printer Drivers
Printing using optional peripheral equipment
Setting the Printer Drivers
Printer Operation
Setting the Printer Driver Properties
Selecting Printing Functions
Selecting Printing Functions
Collate
Frequently used settings
Colour mode display
Copies
Document Style
Tiled Pamphlet
Up Pamphlet
Save
User Settings
Up Printing
Border
Binding Edge
Configure settings for staple or punch finishing
Auto Job Control review
Finishing
Staple sort mode
Saddle stitch function
Staple
Top left
Stapling positions
No Offset
Hole punching only if a Hole Punch Module is installed
Offset mode
Punch
Proof Print
Retention Normal Print
Hold After Print
Hold Before Print
Defaults
PIN 5-digit identification number
Notify Job End
Default Job ID
Account Number
User Name
Paper Size
Paper settings
Job Name
Always Use This ID
Fit To
Custom
Correct Wrong
Fit To Paper Size
Tray Status
Paper Selection
Paper Source
Paper Type
Image Quality
Advanced settings
PCL5c
Transparency Inserts
Margin Shift
Resolution Settings
Select 300 dpi or 600 dpi Default setting 600 dpi
Graphics Mode
PostScript
See the explanation for Overlays on
Compress Options
Job Compression
Bitmap Compression
Watermark settings
Edit Fonts
Text
Size
Angle
Original Type
Color settings
Preview of document type
This shows a preview of the document type selected
Table of document type previews
Color Mode
Image
Use this item to adjust the brightness and contrast
Print Priority
All Text to Black
Red Strength
Contrast
Color Balance
Saturation
Web Pages in the Printer
Printer Configuration Through the Network
Environment required for accessing Web pages
Accessing Web pages and displaying help
Printer Configuration Through the Network
Items and outline of menu frame of Web pages
System Information Image Send Management
Destination
Network Scanning
Device Setup
Password
Sender
Printer Configuration Settings
Making Configuration Settings
Network Setup
Making Configuration Settings
Paper Select Condition Settings
Copies
Default settings
Default paper size
Default output tray
PCL font settings
PCL settings
Default paper type
PCL symbol set setting
Hold Job List
Printing from the Operation Panel
Hold Job List
Key operator program list
Key Operator Programs
Auto colour calibration
Initialize and/or store settings
Key operator program list
Program name
Touch the Printer Settings key
Procedure for using key operator programs
Procedure for using key operator programs
Level
Key operator program menu
Description of Setting Programs
Printer settings
Default settings
Interface settings
Enable TCP/IP
Network settings
Timeout
IP address setting
Reset the NIC
Colour adjustments
Enable EtherTalk
Enable NetBEUI
Restore factory defaults
Initialize and/or store settings
Restore configuration
Store current configuration
Troubleshooting
Degrees with Respect to paper
Paper type Keys
Touch the Printer Test page key
Checking the IP address
Disabling of notice page printing
Screen and printing begins. To cancel printing, touch
Cancel key
Appendix
Print area of this product is shown below
Print Area
PCL symbol set
Symbol set
Print Area
Printer Operation Xerox WorkCentre C226 User Guide
Options required to use the network scanner function
Network Scanner Operation
About the Network Scanner Function
About the Network Scanner Function
Accessing Web Pages
About the Web
About the Web
Web
Network Scanning Setup screen
Basic Settings for Network Scanning
Enable scanner delivery methods Enable Scanner Delivery to
Enabling user authentication Advanced Setup
Basic Settings for Network Scanning
Mail Server and DNS Server Settings
Smtp Setup Description
Description
DNS Setup Description
Setting Up Destination Information
Check box for Frequently-Used
Setting Up Destination Information
Storing destinations for Scan to E-mail
Drop down list
Storing destinations for Scan to FTP
Description
Storing Groups Scan to E-mail
Editing and deleting programmed transmission destinations
Storing Sender Information Scan to E-mail
Storing a Custom Directory
Editing and deleting programmed senders information
Storing a Custom Directory
Protecting Information Programmed in the Web Page Passwords
Condition Setting Screen of Scanner Mode
Protecting Information Programmed in the Web Page Passwords
Condition setting screen
Mode and fax mode
Key
Display
Mail Destination Management
Address directory screen
Switching keys
Search key
Key Index keys
Sending an Image
Basic Transmission Method
Basic Transmission Method
Up to 20 senders can be stored using the Web page.
Touch the one-touch key for the desired destination
When transmitting by Scan to E-mail
Using the Dadf
About pressing the Start key in the following procedure
Destination Input Methods
Destination address manual entry
Perform steps 1 through 9 of Basic Transmission Method on
Enter the e-mail address
Touch the E-MAIL Address key
Scanning in colour
Select the file type and the compression mode
Select where you put the destination
Destination Input Methods
Destination address entry with global address search
Touch the Search key
Enter a keyword for search
You will return to the condition setting screen
Scanning and Transmitting a Two-sided Original
Select the destination type
Scanning and Transmitting a Two-sided Original
Scanning Settings
Manually Setting the Scanning Size
Touch the Manual key
Selected size appears in the top half of the Original key
Manually Setting the Scanning Size
Touching the inner OK key in the step above returns
You to step
When Auto is selected in step
Selecting the Exposure
Change the exposure
When Manual is selected in step
Selecting the Resolution
Change the resolution
Selecting the Resolution
Selecting the File Format
Touch the desired resolution key
Remove the checkmark from the Programmed checkbox
File format settings for colour scanning
File format settings for black and white scanning
Selecting the File Format
Touch the OK key You will return to the initial screen
Cancelling an E-Mail/FTP Transmission
Storing, Editing, and Deleting from the Touch Panel
Storing One-Touch Keys Only Addresses for Scan to E-mail
Touch the Direct Address key
Touch the Initial key
Storing One-Touch Keys Only Addresses for Scan to E-mail
Touch the Individual key
Touch the Name key
Touch the Index key
Touch an index key
Enter the e-mail address of the destination
Settings for black and white scanning
Check the file format and the compression mode
Settings for colour scanning
Compression mode LOW/MEDIUM*/HIGH
Editing and Deleting One-Touch Keys
Touching the Exit key returns you to the screen of on
Touch the one-touch key you wish to edit or delete
Touch the Delete key
Editing and Deleting One-Touch Keys
Steps 3 through
Following steps are for deleting a one-touch key
Programming a Group Key
Programming a Group Key
Touch the group key you wish to edit or delete
Editing and Deleting Group Keys
If you wish to delete another group key, repeat steps 3, 6,
Editing and Deleting Group Keys
Through
Following steps are for deleting a group key
Storing Sender Information
Touch the Store key
Touch the Sender Name key
Editing and Deleting Sender Information
Editing and Deleting Sender Information
When touched, the letter entry screen appears
Storing a Group Index
Edit or delete the sender
Printing Programmed Information
Printing Programmed Information
Touch the Sending Address List Scanner key
To cancel printing, touch the Cancel key
Scanned image is clipped
Image cannot be scanned
Moiré stripe pattern appears on the scanned image
Scanned image is fuzzy or has smudges
Received image data cannot be opened
Recipient does not receive transmitted data
Transmission takes a long time
Error Code Description of the Error
If a Transmission Error Occurs
Error Code Table
Resolution STANDARD, HIGHER, Highest
Checking the IP Address
Checking the IP Address
Approx KB Tiff High G4 format Jpeg Medium compression
Important Points When Using Scan to E-Mail
Key Operator Programs
Using the Key Operator Programs
Setting Programs
Network scanner settings
Setting Programs
Default display settings
Number of direct address keys displayed setting
Initial resolution setting
Initial file format setting
Scan complete sound setting
Default sender set
Compression mode at broadcasting
Scanner mode timeout after last scan
Default exposure settings
Maximum size of e-mail attachments
Disable of address direct entry
TCP/IP, UDP/IP
Specifications
Scanning margins
Scanning margins
Network Scanner Operation Xerox WorkCentre C226 User Guide
For Australia
To Use this Product Correctly as a Fax Device
Line connection
For United Kingdom
Lithium battery
Important Safety Information
Fax power switch
Settings and programming
Make sure the correct date and time have been set
Before Using the FAX Feature
Points to Check and Program After Installation
Make sure the fax power switch is turned on
Connecting an Extension Phone
Connecting an Extension Phone
Look at the Operation Panel
Look at the Operation Panel
Start
Fax Mode Condition Settings Screen
Condition settings screen
Fax Mode Condition Settings Screen
Mode
Modes
Address directory screen alphabetically ordered
Settings
Automatic reduction of faxed document
Originals that Can Be Faxed
Original sizes
Scanning area of original
Loading a Document
Using the Dadf
Using the Document Glass
Loading a Document
Detected
Checking the Size of a Loaded Original
Original key. Check the key to make
Sure that the original size has been correctly
Touch the desired original size key
Sizes that can be selected are displayed
Selecting Resolution and Exposure Settings
Selecting the Resolution
Change the resolution
Ultra fine
Resolution settings
Selecting Resolution and Exposure Settings
Standard
Selecting the Exposure
Change the exposure
Exposure, touch Key. To return to auto
Group dialing
Exposure settings
Convenient Dialing Methods
One-touch dialing
On-hook dialing
Sending a Fax
Basic Procedure for Sending Faxes
Basic Operations
Sending a Fax
If needed, adjust the resolution setting see
If needed, adjust the exposure setting see
Entering a Pause
Using the document glass
Using the Dadf
Refer to page 5-9 for information on using the address
Continue from of Basic Procedure for Sending Faxes
Directory screen
Faxing a Two-Sided Original
That are bound at the top are tablets
Quick On-line
Storing transmission jobs memory transmission
Side are booklets, and two-sided originals
If a transmission error occurs
If the receiving party is busy
Image rotation
Priority Transmission of a Stored Job
Press the JOB Status key Touch the FAX JOB key
Cancelling a Fax Transmission
Cancelling On-Hook Dialing
Cancelling a Fax Transmission
Machine will ring* and reception will automatically begin
Receiving Faxes
Receiving a Fax
Number of rings
If received data cannot be printed
Advanced Transmission Methods
Using Broadcast Transmission
Can be omitted
Using Broadcast Transmission
Dial Ann ot b e om itted
Dial
Check the destinations
Setting Up a Timer Transmission
Transmission and Reception Using the Polling Function
Transmission and Reception Using the Polling Function
Polling
Polling memory
Polling key is highlighted and the polling icon appears
Using the Polling Function
Touch the Special Modes key
Manual Polling
Using Polling Memory
Touch the Data Store key
Touch the Print Data key
Printing document data in the Public Box
Deleting document data from the Public Box
Touch the Delete Data key
Touch the Public BOX key Message screen appears
11/JUN/2004/FRI
Restricting polling access polling security
Own Number Sending
Example of fax page printed out by the receiving machine
Outside scanned data
Faxing a Divided Original Dual Page Scan
Position of senders information
Faxing a Divided Original Dual Page Scan
Programming Frequently Used Operations
Selecting Dual Page Scan
Press the Clear ALL key
Programming Frequently Used Operations
Using a Program
Transfer instruction
Program the fax number of the transfer destination
Using the Transfer Function
Transferring received data
Press the Custom Settings key Touch the FAX Data Forward key
Transmission Using F-Codes
Transmission Between Machines Supporting F-codes
Transmission Between Machines Supporting F-codes
This machine
Condition Settings Sub Address
Your machine Other machine
Code Polling Memory
Creating a Memory Box for F-Code Transmission
How F-code polling memory works
As the scanning destination
Using F-Code Polling Memory
Scanning a document into an F-code polling memory box
Code Polling Memory
Checking and clearing document data in a memory box
Procedure for F-Code Polling
Corpo.Tps Xerox Group
Code Confidential Transmission
Code Confidential Transmission
Code Confidential Transmission
If the print PIN is not correct, the message PIN is not
Press Start to Print DATA. appears
Code Relay Broadcast Transmission
Code Relay Broadcast Transmission
Relay machine your machine
Your machine is the relay machine
Using the F-Code Relay Broadcast Function
Convenient Methods of Use
Using an Extension Phone
Using the F-Code Relay Request Function
Using an Extension Phone
Sending a Fax after Talking Manual Transmission
Send key
FAX key
Using an Extension Phone to Receive a Fax
Changing the reception mode to Manual Reception
Press the Custom Settings key Touch the Receive Mode key
Receiving a Fax After Talking Manual Reception
When the extension phone is in Fax mode
Reception mode is set to Manual Reception
Reception begins when the other party begins transmis- sion
Using an Extension Phone
Storing, Editing, and Deleting Auto Dial Keys and Programs
Programming
Storing, Editing, and Deleting Auto Dial Keys and Programs
Storing One-Touch Keys
Corporation Fax No Mode
Passcode max digits
Use the numeric keys to enter the fax number
Transmission speed
Touch the one-touch key that you wish to edit or delete
International correspondence mode
Selections are NONE, Mode 1, Mode 2, and Mode
Editing and Deleting One-Touch Keys
If you cannot edit or delete a one-touch key
Storing a Group Key
Address Review Opqrst Uvwxyz ABC Group
Touch the group key that you wish to edit or delete
Editing and Deleting Group Keys
If you wish to delete another group key, repeat steps 2, 5,
Deleting a group key
Touch the Program Name key
Storing a Program
Special Modes
Touch the Settings key
Touch the program you wish to edit or delete
Editing and Deleting Programs
Programming, Editing, and Deleting F-Code Memory Boxes
Programming, Editing, and Deleting F-Code Memory Boxes
Programming an F-Code Memory Box
Use the numeric keys to enter a passcode max digits
Sub-address/passcode entry screen appears
Setting for F-Code Polling Memory Boxes Polling Times
Next Exit
Setting for F-Code Relay Broadcast Memory Boxes Recipient
Use the numeric keys to enter a 4-digit number
Touching the Exit key returns you to the screen
123456/987654
Editing and Deleting a Memory Box
Touch the key of the list you wish to print
Touch the Sending Address List FAX key
Touch the e key, r key, o key, and x key
Entering Characters
Entering alphabetical characters
Example Xerox äÄ Touch the X key
Entering Characters
Touch the Space key
Touch the ä key
SharpXerox ä
Screen 1/2 Screen 2/2
Entering numbers and symbols
Fax Unit
When a Transaction Report Is Printed
When a Transaction Report Is Printed
Explanation
Information appearing in the TYPE/NOTE column
Rect sub-address or other reason
Port F-code communication
Received fax cannot Add the indicated Loading Paper on
When an Alarm Sounds and a Warning Message Is Displayed
Message screen Alarm Meaning of message Action Page/Guide
Viewing the Communication Activity Report
Open Cated cover
When an Alarm Sounds and a Warning Message Is Displayed
Self-diagnosis func Turn off the power
Manual reception was Try manual recep
Problems and Solutions
Problem Check Solution
100 Xerox WorkCentre C226 User Guide
Problem Check Solution
Problems and Solutions
Fax Unit 102 Xerox WorkCentre C226 User Guide
Index
Symbols / Numerics
Index
Index
Index
Index
Index
Index
Fax 5-14,5-15
Index
PCL 3-47,3-67