Section 3 |
5.Once transducer is in place, secure with the transducer clamping screw. Do not overtighten. Ob- serve the upstream/downstream orientation and connect the transducer cable to the computer’s input jack. If a
Installing a 1012T Mounting Track in Direct Mode
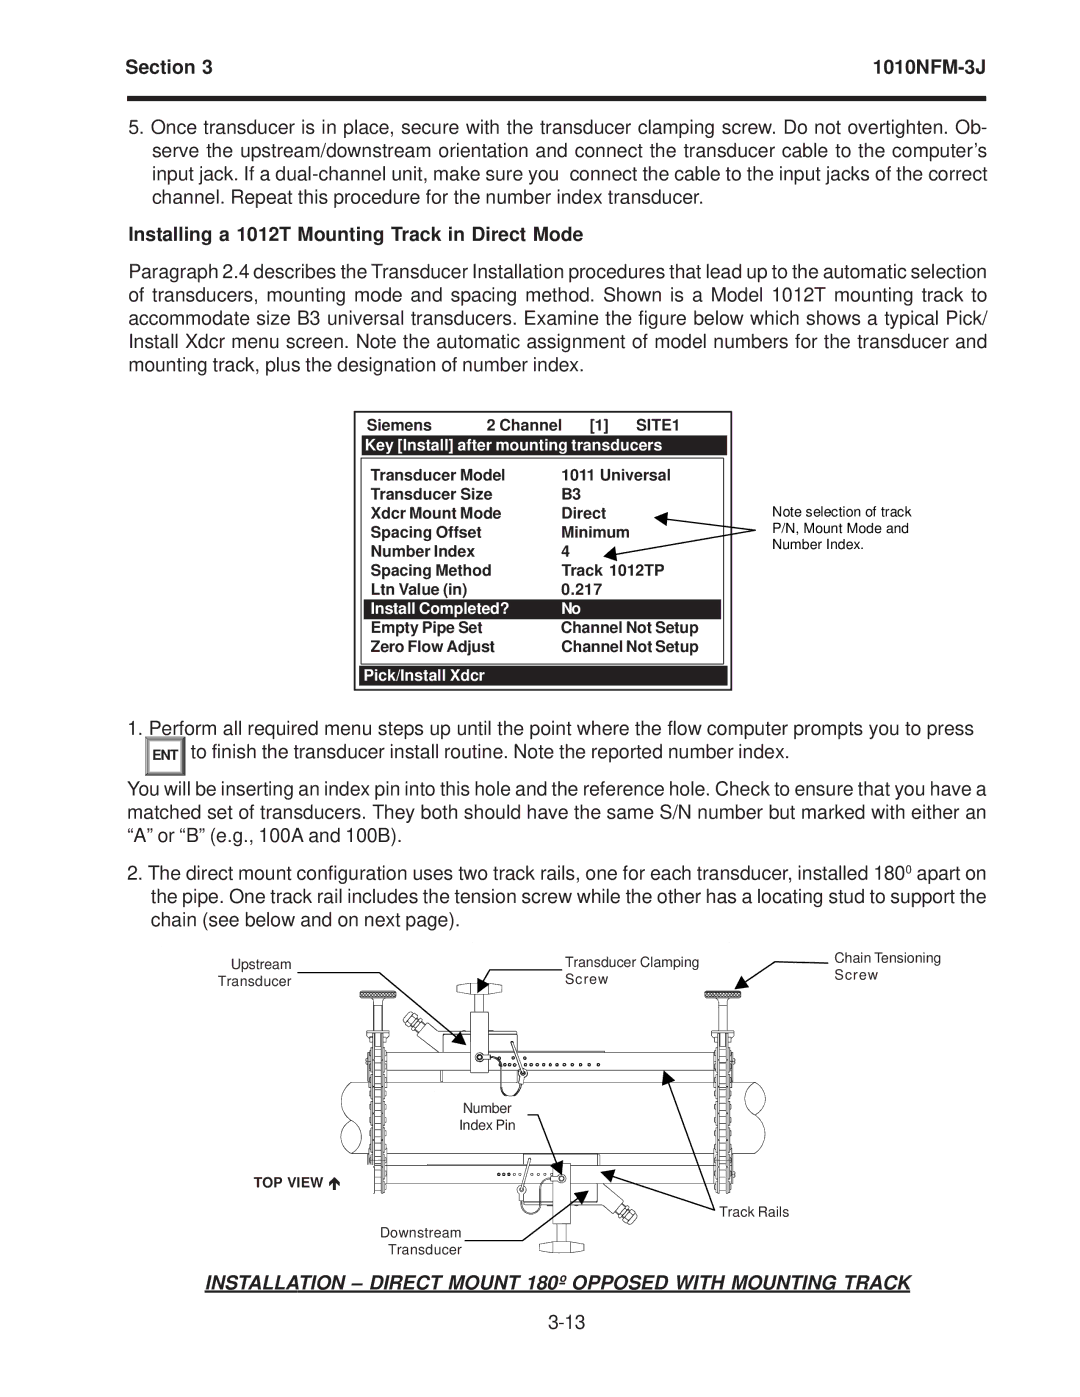
Paragraph 2.4 describes the Transducer Installation procedures that lead up to the automatic selection of transducers, mounting mode and spacing method. Shown is a Model 1012T mounting track to accommodate size B3 universal transducers. Examine the figure below which shows a typical Pick/ Install Xdcr menu screen. Note the automatic assignment of model numbers for the transducer and mounting track, plus the designation of number index.
| Siemens | 2 Channel [1] SITE1 |
|
| |
| Key [Install] after mounting transducers |
|
| ||
|
|
|
|
| |
| Transducer Model | 1011 Universal |
|
| |
| Transducer Size | B3 |
|
| |
| Xdcr Mount Mode | Direct |
|
| |
| Spacing Offset |
| Minimum |
|
|
| Number Index |
| 4 |
|
|
| Spacing Method | Track 1012TP |
|
| |
| Ltn Value (in) |
| 0.217 |
|
|
| Install Completed? | No |
|
| |
| Empty Pipe Set |
| Channel Not Setup |
|
|
| Zero Flow Adjust | Channel Not Setup |
|
| |
|
|
|
|
|
|
Pick/Install Xdcr
Note selection of track P/N, Mount Mode and Number Index.
1.Perform all required menu steps up until the point where the flow computer prompts you to press ENT to finish the transducer install routine. Note the reported number index.
You will be inserting an index pin into this hole and the reference hole. Check to ensure that you have a matched set of transducers. They both should have the same S/N number but marked with either an “A” or “B” (e.g., 100A and 100B).
2.The direct mount configuration uses two track rails, one for each transducer, installed 1800 apart on the pipe. One track rail includes the tension screw while the other has a locating stud to support the chain (see below and on next page).
UpstreamUpstream
Transducer
Transducer
Transducer Clamping | Chain Tensioning |
Transducer Clamping | |
Screw | Tensioning |
Screw | Screw |
| Screw |
NumberNumber
Index Pin
Index Pin
TOPTOPVIEWVIEW ÏÇ
TrackTrackRailsRails
DownstreamDownstre
TransducerTransdu
