Version November 2012 DOC2702A
Trademark Information
Table of Contents
Polycom, Inc
Additional Conferencing Information
Polycom, Inc
Cascading Conferences
Meeting Rooms
Reservations
Exporting and Importing Conference Templates
Polycom Solution Support
Deleting a Conference Template
Exporting Conference Templates
Viewing the Properties of an Ongoing SVC-based Conference
Monitoring SIP Bfcp Content
Using Dtmf Codes to Manage the Recording Process
Request to Speak
Ethernet Settings
User and Connection Management in Ultra Secure Mode 15-8
Implementing Password Re-Use / History Rules 15-11
Configuration Requirements
IVR Services
Error Handling
Defining a New Entry Queue IVR Service
Inviting Participants using Dtmf
Enabling the Invite Participants using Dtmf Option
Conference Templates
Status Bar
Address Book
Adding MCUs to the MCUs List
Installing RMX Manager for Secure Communication Mode
Disconnecting an MCU
Import/Export RMX Manager Configuration
Using an Internal Certificate Authority
Table of Contents
Installing ActiveX
Using the Information Collector
Alerts and Faults
Resetting the RMX
Alarms
IP Disconnection Causes Isdn Disconnection Causes
Appendix H Setting the MCU for Integration Into Microsoft
Xix
Appendix I Polycom Open Collaboration Network Pocn
USB Restore Defaults
Microsoft Lync Server
Xxii
About the RMX Administrator’s Guide
Overview
How This Guide is Organized
System Information from the Administration menu
Who Should Read This Guide?
Prerequisites
1Multipoint Video Conferencing using a RMX 1500/2000/4000
About the Polycom RMX System
IP and Isdn Network Guidelines
Card Configuration Modes
Viewing the Card Configuration Mode
IP Networks
Feature Name Description
Feature Support with MPMx Cards Only
2Features Supported with MPMx Card Configuration Mode Only
720p60
CTS
Support of Microsoft Protocols, algorithms and workflows
Microsoft Lync users can connect an RMX Meeting Room to a
Support of Microsoft RTV FEC Forward Error Correction that
Streams using the Microsoft Lync Server
Workstation Requirements
Transcoding AVC Conferencing
Conference Profiles
Conferencing Modes
Media Relay SVC Conferencing
AVC Conferencing Video Session Types
Continuous Presence CP Conferencing
Setting the Conferencing Mode to AVC only
1AVC Continuous Presence CP video streams and built layouts
Video Switching VSW Conferencing
Video Protocol Support in CP Conferences
MPMx
Guidelines
Resource Type Maximum Possible Resources Per Card
Line Rate/Participants RMX
Line Rates for CP and VSW
Line Rate kbps
2560 3072
AVC Conferencing Parameters
Basic Conferencing Parameters
3584 4096 6144 Not Supported
Supplemental Conferencing Features
Siren 7 mono
TIP Support
Operator Conferences CP only Conferences
Auto Brightness is supported with MPM+ and MPMx cards only
Setting Value
Default Profile Settings in CP Conferencing Mode
4Default Conference Profile Settings CP Licensing Mode
MapleRoom 1001 OakRoom 1002 JuniperRoom 1003 FigRoom 1004
Default EQ 1000
Name Meeting Rooms
Entry Queue
SVC-based Conferencing
3SVC video streams and Layouts
Guidelines
Advantages of SVC Conferencing
Only the H.264 Cascade and SVC Optimized option is supported
MCU Supported Resolutions for SVC Conferencing
RMX Management pane, expand the Rarely Used list
Viewing Profiles
To list Conference Profiles
Click the Conference Profiles button
To modify the Profile Properties
Modifying an Existing Profile
Profile Toolbar
7Profile Tool bar buttons
To delete a Conference Profile
Deleting a Conference Profile
Defining New Profiles
Conference Profile is deleted
Defining AVC Conferencing Profiles
To define a new Profile
Field/Option Description
As Operator conference or Video Switching conference
8New AVC Profile General Parameters
New profile
Click the Advanced tab
CP Only
9New AVC Profile Advanced Parameters
New Profile Advanced dialog box opens
Define the following parameters
At the End After Last Quits All the participants have
At the End When Last Participant Remains Only one
LPR
By the RMX User Auto Redialing
Field/Option Description
Display Name
For CP Conferences only Click the Gathering Settings tab
10New AVC Profile Gathering Settings Parameters
See the Defining New Profiles on
Field Description
Access Number
For more information see Video Preview on
Web Client
AVC-based CP Conferencing on
Click the Video Quality tab
New Profile Video Quality dialog box opens
Field/Option Description
Default On
CIF
Cascade and SVC Optimized
Content Video Definition
263 & H.264 Auto Selection Default
12New AVC Profile Video Settings Parameters
Click the Video Settings tab
New Profile Video Settings dialog box opens
MPM+ Only
More information see, Auto Layout Configuration on
For more information, see -13 Auto Layout Default Layouts
Default Auto Layout settings can be customized by modifying
Auto Default If any ITP Immersive Telepresence endpoints
Number of Video Participants Auto Layout Default Settings
Overlay For more information see Overlay Layouts on
14Video Layout Options
Number of Video Windows Available Video Layouts
Click the Audio Settings tab
New Profile Audio Settings dialog box opens
Field/Option Description
Mute Participants Except Lecturer option can be disabled
Their audio is muted by using the Closed Caption or Message
RMX Web Client/Manager, the mute by MCU indicator is
When you replace a lecturer, the MCU automatically mutes
Select one of the Skin options
Click IVR tab
Connected to the conference
To the Auto Terminate rules when enabled
16New AVC Profile IVR Parameters
Terminateconfafterchairdropped is set to YES
Parameter Description
New Profile Recording tab opens
17New AVC Profile Recording Parameters
Can be associated with a Virtual Recording Room VRR saved
Polycom, Inc
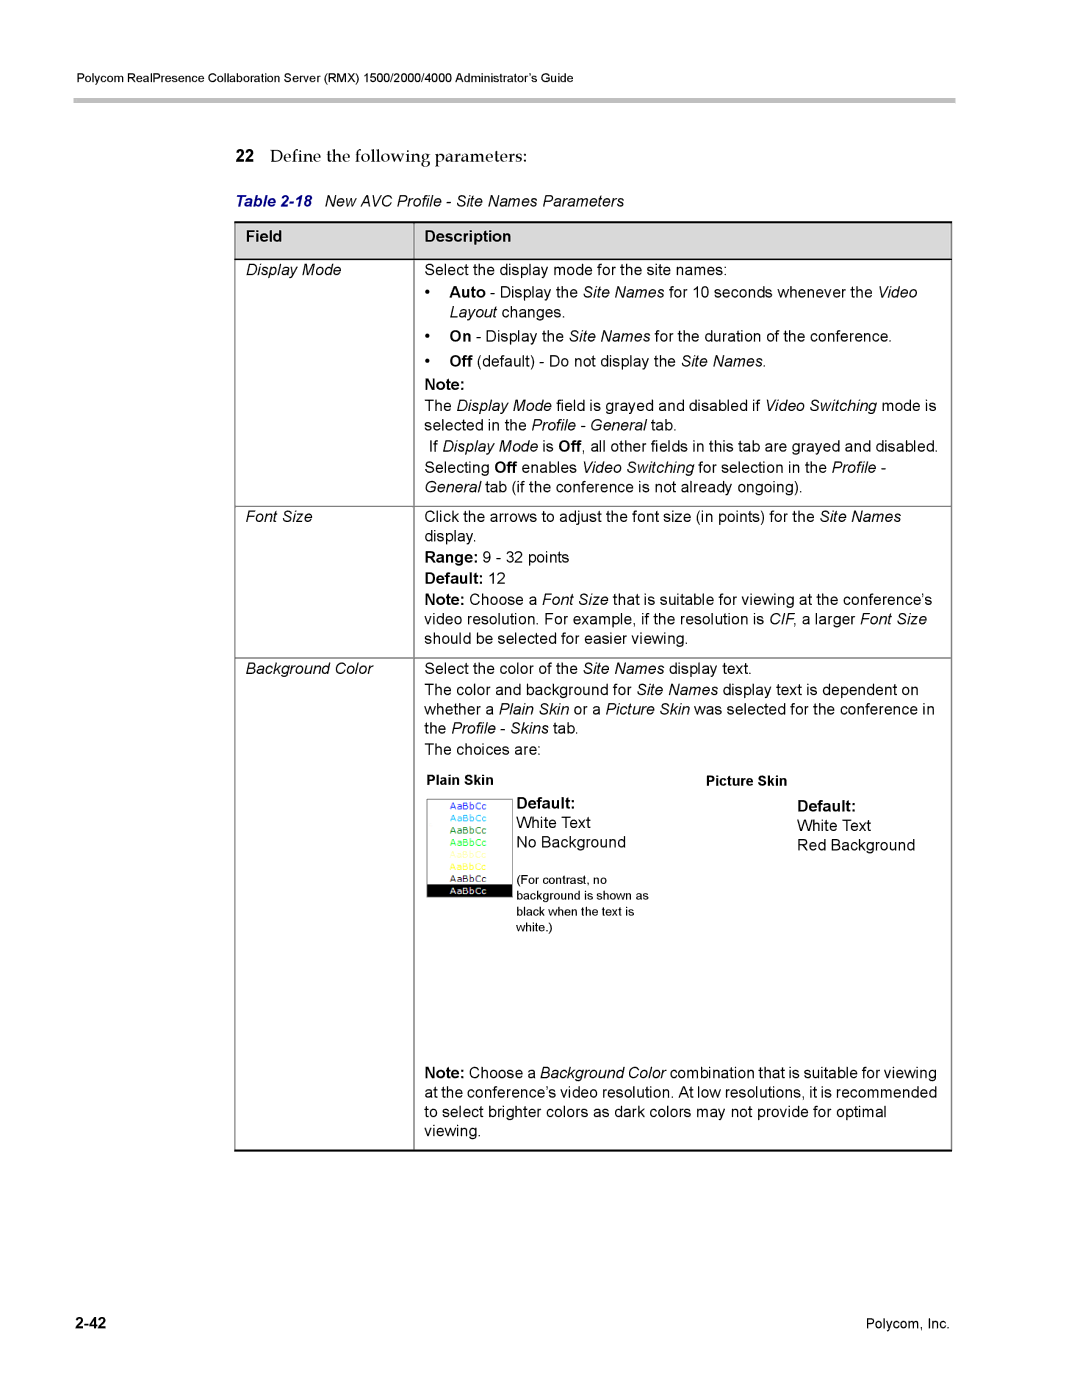
White Text No Background Red Background
Default
18New AVC Profile Site Names Parameters
LeftTop Default
Selection Site Names Position
Position sliders
Display Position LeftBottom Cont
Horizontal and Vertical
Horizontal Position
MPM+ Card
MPMx Card
For more details, see Message Overlay for Text Messaging on
Define the following fields
Default Bottom
MPMx Mode MPM+ Mode Color Options
Default
Default Slow
For example
Click the Network Services tab
New Profile Network Services tab opens
Non-unique URL, dummytester, used in previous versions
20New AVC Profile Network Services Parameters
Parameter Description IP Network Services
Defining a Video Switching Conference Profile
To Create a Video Switching-enabled Profile
Minimum threshold defined in the flag Hdthresholdbitrate
For HD video Switching conferences
21New AVC Profile VSW General Parameters
High Profile check box is only displayed if MPMx cards are
Switching conferences
Video Switching Conferences on
Selected
High Profile is supported in VSW conferences
High Profile Support in Video Switching Conferences
For H.264 High Profile-enabled VSW conferences
An Operator conference can only be a Continuous Presence
Flag Name Minimum Threshold Line Rate Kbps
Minimum Threshold Line Rate System Flags
For H.264 Base Profile VSW conferences
Vswcifhpthresholdbitrate Vswsdhpthresholdbitrate
Defining SVC Conferencing Profiles
To define SVC Only Profile
23New SVC Profile General Parameters
New Profile Advanced dialog box opens
Define the following supported parameters
Share content
Cascade and SVC Optimized is the only available Content
Protocol for content sharing during SVC-based conferences
25New SVC Profile Video Quality Parameters
26New SVC Profile Network Services Parameters
CP Conferencing Additional Information
Overlay Layouts
Telepresence ITP Room Layout Overlay
Standalone Endpoint Layout Overlay
Selecting the Overlay Layouts
Standalone
Site Names Definition
Site Names Display Position
For more information see Modifying System Flags on
Moving the Horizontal and Vertical Position sliders
Moving the Horizontal and Vertical Position sliders
Same Layout mode
Message Overlay for Text Messaging
Polycom, Inc
Chinese Font Types
Exporting All Conference Profiles from an MCU
Exporting and Importing Conference Profiles
Exporting Conference Profiles
Export selected Conference Profiles
Exporting Selected Conference Profiles
To export selected Conference Profiles
Importing Conference Profiles
To import Conference Profiles
Conference Profile already exists
Polycom, Inc
720 x 576 pixels at 30 or 60 fps
Video Resolutions in AVC-based CP Conferencing
352 x 288 pixels at 30 or 60 fps
A 1X1 Video Layout
High Profile Support in CP Conferences
Video Display with CIF, SD and HD Video Connections
CP Conferencing with H.263 4CIF
Continuous Presence CP mode
Video Switching VSW mode
HD1080p60 is supported
263 4CIF Guidelines
CP Resolution Decision Matrix
Resource-Quality Balanced default
Resource Optimized
Video Resource Usage
Base Profile Decision Matrix
Video Quality Optimized
Polycom, Inc
Polycom, Inc
Polycom, Inc
High Profile Decision Matrices MPMx
Base Profile and High Profile Comparison
Polycom, Inc
Polycom, Inc
Configuration in the RMX Setup menu
Resolution Configuration for CP Conferences
Accessing the Resolution Configuration Dialog Box
Guidelines
HD 720p30 HD 1080p30 HD 1080p60 CIF
Maximum CP Resolution Pane
MPM Cards MPM+ Cards
Resolution Configuration Pane
Resolution Configurations are
Example
Sharpness / Motion Resolution Slider Panes
Manual
Resolution Configuration Basic
Max CP Resolution Pane Resolution Configuration Pane
Resolution Configuration Detailed
Limiting Maximum Resolution
Setting the Maximum CP Resolution for Conferencing
Flag Settings
Base Profile / High Profile Resolution Slider Panes
MPM Cards MPM+ / MPMx Cards
High Profile System Flags Version 7.0.1 only
Minimum Frame Rate Threshold for SD Resolution
System Flag Default Value
512 x 288 pixels at 50 fps
W448p Resolution
352 x 288 pixels at 50 fps
848 x 480 pixels at 50 fps
All Video Layouts 1x1 Layout
323
RMX System Flag Settings
Content
Enabling Support of the w448p Resolution
Packet Loss Compensation
Microsoft RTV Video Protocol Support in CP Conferences
Additional Intermediate Video Resolutions
RMX Profile Setting
RTV protocol is supported
Bitrate 180kbps
Resolution Bitrate
Resolution Video Resources Used
Participant Settings
Protocol Forcing
Monitoring RTV
Qcif VGA
Auto
Kbps 179 kbps
Kbps VGA 30fps VGA 15fps Kbps 600 kbps Kbps 249 kbps
HD720p
Threshold HD Flag Settings using the RTV Video Protocol
7Allocated video resolutions per video resolution
VGA CIF Qcif
Polycom, Inc
Additional Conferencing Information
SIP People+Content is supported with MPM+ and MPMx cards
239 / People+Content
People+Content
239
For SIP Clients that support both BFCP/TCP and BFCP/UDP
SIP Bfcp Content Capabilities
323/ H.239 323 /Polycom People+Content Isdn Content
Dial-out Connections
Flag Value SIP Client Bfcp Support
SIP Clients connected as Audio Only cannot share Content
Dial-in Connections
UDP and TCP
Defining Content Sharing Parameters for a Conference
Conferencing Mode
Optimized for use in SVC only and Cascaded Conferences
2H.239 Content Options
263 & H.264 Auto Selection AVC Only Default
Protocols on
Content Settings
AVC Only Content Setting
263 & H.264 Auto Selection AVC Default Setting
Content Protocols
SVC Only Content Setting
263 & H.264 Auto Selection AVC only
AVC Only Conferences
HD AVC Only Conferences
Participant
Graphics Hi Resolution Graphics Live Video
Content Settings Flag Name Range Default
Cascade and SVC Optimized
High Profile is not supported
Summarizes the interaction of these parameters
Examples
Live Video HD720/30 512 768
Selecting a Customized Content Rate in AVC Conferences
If the Content Settings selection is Hi Resolution Graphics
To Select the Customized Content Rate
To modify the HD Resolution Content threshold line rate
Modifying the Threshold Line Rate for HD Resolution Content
Default resolution for all Content Rates is HD720p5
8H.264 Cascade Optimized Cascade Resolutions
Sending Content to Legacy Endpoints AVC Only
Guidelines for Sending Content to Legacy Endpoints
Content Display on Legacy Endpoints
HD720p30 with MPMx HD720p5/6 with MPM+
Enabling the Send Content to Legacy Endpoints Option
Interoperability with Polycom CMA and DMA
Layout Flag Value
9LEGACYEPCONTENTDEFAULTLAYOUT Flag Values
To modify system flags
Exclusive Content Mode
Click OK Flag is updated in the Mcmsparameters list
AVC Conference Profile Advanced SVC Conference Profile
To end the current Content session
Stopping a Content Session
Content Broadcast Control
To give token ownership
Giving and Cancelling Token Ownership
Select Change To Content Token Owner in the drop-down menu
Managing Noisy Content Connections
Content Display Flags
Video Preview Guidelines
Forcing Other Content Capabilities
Video Preview
Testing your Workstation
Workstation Requirements
Click Yes to run the diagnostics
DirectX Diagnostic Tool dialog box opens
Previewing the Participant Video
To preview the participant video
Gathering Phase
Gathering Phase Guidelines
Content Gathering Slide
Displayed Language Access Number 1
Gathering Phase Duration
Enabling the Gathering Phase Display
Display Name
Enabling Auto Scan and Customized Polling
To enable Auto Scan
Auto Scan and Customized Polling in Video Layout
Auto Scan
Customized Polling
Open the Customized Polling tab
Button Description
Audio Algorithm Support
Dialog box buttons are summarized in Table
With MPMx Cards only
SIP Encryption
Mono
IP H.323, SIP calls only CP and VSW conferences
Stereo
Audio Algorithm Minimum Bitrate kbps
Audio algorithms supported for Isdn
13Supported Audio Algorithm vs Bitrate
Click the Channel Status Advanced tab
Monitoring Participant Audio Properties
To view the participant’s properties during a conference
Media Encryption AVC Only
Media Encryption Guidelines
Allownonencryptpartyinencryptconf
Direct Connection to the Conference
Yes
When
Connection to the Entry Queue
Encrypt Auto
Possible
Encrypt When
Recording Link Encryption
Profile Setting
Encrypt when possible
Recording Link Connection Status according to flag
Version 7.6.1 and later
Encryption Flag Settings
To modify the Encryption flags
Set the Allownonencryptpartyinencryptconf flag to YES or no
Enabling Encryption at the Participant Level
To enable encryption at the conference level
Enabling Encryption in the Profile
To enable encryption at the participant level
Monitoring the Encryption Status
Packet Loss
Lost Packet Recovery
Packet Loss Compensation LPR and DBA
Monitoring Lost Packet Recovery
Enabling Lost Packet Recovery
Network Quality Indication AVC Only
Network Quality
Network Quality Indicators
SVC Conferencing Mode AVC Video switched conferences
Indication Threshold Values
Customizing Network Quality Indicator Display
Bottomleft
Telepresence Mode AVC Only
Cellindlocation
Topleft
Conference Level
RMX Telepresence Mode Guidelines
System Level
Room Participant/Endpoint Level
Cropping
Video Fade is enabled for all Telepresence conferences
Horizontal Striping
Video Fade in Telepresence conferences
Aspect ratio for standard endpoints
Gathering Phase with ITP Room Systems
RPX and TPX Video Layouts
Skins and Frames
Number Layouts Endpoints 10+
Enabling Telepresence Mode
RPX View
Click the Video Settings tab
Multiple Cascade Links
Select the required video layout
Enabling and Using Multiple Cascade Links
3RMX Telepresence Layout Mode Room Switch
4RMX Telepresence Layout Mode Continuous Presence
Current speaker is the HDX endpoint connected to RMX a
Creating a Link Participant
Link Participant in the Dial Out RMX
CascadeLink-1 CascadeLink-2 CascadeLink-3 CascadeLink-4
Polycom RMX Polycom RMX 1500-3, etc
Participant Link in the Dial In RMX
Disconnection Causes
Client / RMX Manager main screen
Polycom, Inc
Monitoring Telepresence Mode
Monitoring Ongoing Conferences
None
Monitoring Multiple Cascade Links
Monitoring Participant Properties
Polycom, Inc
Selecting the Conference Lecturer
Lecture Mode AVC Only
Enabling Lecture Mode
Selecting a defined participant
Automatic selection of the lecturer
Lecture Mode Monitoring
Enabling the Automatic Switching
To control the Lecture Mode during an Ongoing Conference
Restricting Content Broadcast to Lecturer
When enabled, the following rules apply
Muting Participants Except the Lecturer
Enabling the Mute Participants Except Lecturer Option
Enabling a Permanent Conference
Auto Terminate is disabled in Permanent Conferences
Permanent Conference
Closed Captions Guidelines
MPM, MPM+ and MPMx Card Configuration Modes
Closed Captions AVC Only
Enabling Closed Captions
New Flag field enter Enableclosedcaption
Cascading Conferences
Video Layout in Cascading conferences
Conference a Conference B
Setting the FORCE1X1LAYOUTONCASCADEDLINK
Flags controlling Cascade Layouts
Without Cascade During Cascading
Dtmf Forwarding
Play Tone Upon Cascading Link Connection
Basic Cascading using IP Cascaded Link
Basic Cascading
Dialing to an Entry Queue
Basic Cascading using Isdn Cascaded Link
Dialing Directly to a Conference
Automatic Identification of the Cascading Link
Gateway to MCU
MCU to MCU
Gateway to Gateway Calls via Isdn Cascading Link
Dialing string format
Gateway to MCU Calls via Isdn Cascading Link
MCU to MCU Calls via Isdn Cascading Link
RMX Configuration Enabling Isdn Cascading Links
Line Rate Motion Sharpness Encryption
1Recommended Conference Profile Options Setting
Conference Profile Definition
Scenario Versions
MCU Interoperability Table
2MCU Interoperability Table
Codian
System Flag Settings
Suppression of Dtmf Forwarding
Star Cascading Topology
Master-Slave Cascading
Topology MCU Type
Line Rate Endpoint Mode Level
To define the dial-out cascade participant link
New Participant Dial-out Cascade Link
For example
If the conference has a password and you want to include
Password in the dial string, set
After the Conference ID
Polycom, Inc
If a gatekeeper is used This field is left empty
To define a Dial-in Participant as the cascade link
1New Participant Dial-out Cascade Link
Host of the MCU running the other conference
Cascading via Entry Queue
7Cascaded Conferences Star Topology
To Define a Cascade-Enabled Entry Queue
Creating the Cascade-enabled Entry Queue
Creating a cascade-enabled Dial-out link
Enabling Cascading
Creating the Dial-out Cascaded Link
To define the Dial-out Cascaded Link
For Example 78485#24006#1234
Enabling Cascaded Conferences without Password
To enable cascaded links to connect without a password
Conference B Destination Conference
Monitoring Star Cascaded Conferences
Conference a Linked Conference
Cascading Conferences H.239-enabled MIH Topology
MIH Cascading allows
MIH Cascading Levels
Cascading Topologies
MIH Cascading Guidelines in CP Licensing
9MIH Cascade Levels
Video Session Mode, Line Rate and Video Settings
Topology MCU Type Video Session Type Line Rate
2MIH Cascading Video Session Mode and Line Rate
Video Layout in Cascading CP Conferences
Flags controlling Cascade Layouts
MGC to RMX Cascading
MGC to RMX
3Set up Procedures according to the Dialing Direction
Dialing RMX Level MGC Level Direction
RMX to MGC
Dialing MGC Level RMX 1500/2000/4000 Direction
4Set up Procedures according to the Dialing Direction
To modify the flags
Click OK Reset the MCU to apply the changes
H263ANNEXT=YES default
FORCE1X1LAYOUTONCASCADEDLINKCONNECTION=YES default
Click OK If you changed the flags, reset the MCU
Method II Defining the Cascading Entry Queue in the MGC
For Example 1002##12001##1234
For Example
5Recommended Conference Line Rates for Cascaded Conferences
Topology Video Session Mode Conference Line Rate
For more details, see RMX to RMX Cascading
EQ ID
Optional
Meeting Rooms
1Default Meeting Rooms List
Meeting Room Name Default Line Rate
MapleRoom 1001 Kbps OakRoom 1002 JuniperRoom 1003
To list Meeting Rooms
Meeting Rooms List
Meeting Rooms are listed in the Meeting Room list pane
Meeting Rooms List is displayed
Was selected
SIP server may be down, or any other reason the affects
Connection between the RMX or the SIP Server to the network
To create a new meeting room
Creating a New Meeting Room
Meeting Room Toolbar & Right-click Menu
Meeting Room Toolbar and Right-click Menus
Entry Queues, Ad Hoc Conferences and SIP Factories
Entry Queues
Parameter Value
Default Entry Queue properties
1Default Entry Queue Properties
RMX Management Rarely Used pane, click Entry Queues
Defining a New Entry Queue
To define a new Entry Queue
Option Description
Click OK New Entry Queue is added to the Entry Queues list
Modifying the EQ Properties
Setting a Transit Entry Queue
Listing Entry Queues
Transit Entry Queue
Call Flow
To cancel the Transit Entry Queue setting
IVR Provider Entry Queue Shared Number Dialing
To designate an Entry Queue as Transit Entry Queue
RMX Configuration
Entry Queue IVR Service
To create a new SIP Factory
SIP Factories
Creating SIP Factories
RMX Management Rarely Used pane, click SIP Factories
Mixture of character sets Unicode
Click OK New SIP Factory is added to the list
New Factory Properties
Ascii
Monitoring Registration Status
Failed Registration with the SIP Server failed
Ad Hoc Conferencing
Gateway to Polycom Distributed Media Application DMA
Address Book
Viewing the Address Book
To collapse a group
Participants List Pane Information
To expand the group to view the group members
Double-click the group name or click the Collapse button
Displaying and Hiding the Address Book
To add a group to a new conference or an ongoing conference
Adding Participants from the Address Book to Conferences
Adding a Group from the Address Book to Conferences
To manage the groups in the Address Book
Participant Groups
Managing Groups in the Address Book
Action Description
Managing the Address Book
Adding a Participant to the Address Book
New Participant General dialog box opens
Adding a new participant to the Address Book Directly
To add a new participant to the Address Book
3New Participant General Properties
To the conference H.323, SIP or ISDN/PSTN
Only
SIP Only
ISDN/PSTN Only
IP only
While the endpoint is connected
Define the following Advanced parameters
To add a participant from the conference to the Address Book
AGC
Participant Properties window opens
When required, you can modify the participant’s properties
Modifying Participants in the Address Book
Click the Add to Address Book button
Deleting Participants from the Address Book
To delete participants from the Address Book
5Copy/Cut Functions
Copying or Moving a Participant
To copy or move a participant to another group
Function Description
New Adds Copy to the end of the participant name
Searching the Address Book
6Paste functions
To filter the data in an address book group
Filtering Address Book Data Using a Predefined Pattern
Filtering the Address Book
Filtering Address Book Data Using a Custom Pattern
Custom Filtering dialog box opens
Clearing the Filter
To clear the filter and display all entries
Obtaining the Display Name from the Address Book
Importing an Address Book
Importing and Exporting Address Books
Exporting an Address Book
To Export an Address Book
CMA Address Book Integration Guidelines
Upgrading and Downgrading Considerations
Integrating the Polycom CMA Address Book with
Externalconte
RMX Side On the RMX menu, click Setup System Configuration
System Flags Mcmsparametersuser dialog box opens
Ntdirectory
Http//IP address of the CMA server
Ntpassword
Ntip
Ntuser
Polycom, Inc
Resources
Reservations
System
Reservations
To open the Reservation Calendar
Using the Reservation Calendar
Toolbar Buttons
RMX Management pane, click the Reservation Calendar button
Day View
Reservations Views
Week View
Single day is displayed
Today View
List View
Changing the Calendar View
To change between Week and Day views
To return to Calendar View
To view Today the current date
To change to List View
Method III To interactively define the duration
Scheduling Conferences Using the Reservation Calendar
Creating a New Reservation
2New Reservation Reserved Resources
To create a new reservation
Open the Reservation Calendar
Click the Schedule tab
3New Reservation Schedule Tab
Monthly
Day 1-31 of every 1-12 months Repeats a conference
First, second,...,last Sun-Sat of x months Repeats
Click the Participants tab
Viewing and Modifying Reservations
Using the Week and Day views of the Reservations Calendar
Managing Reservations
If 3 recurrences of the reservation are created
To change the Reservation’s End time
To move the Reservation to another time slot
To change the Reservation’s Start time
Reservation Properties General dialog box opens
Adjust Reservations Time dialog box opens
Adjusting the Start Times of all Reservations
Click the Adjust Reservations Time button
To delete all recurrences of a reservation
Deleting Reservations
To delete a single reservation
Click the Delete Reservation button. or
To clear the search and display all reservations
Searching for Reservations using Quick Search
To search for reservations
Click Search
10-1
Operator Assistance & Participant Move
Operator Conferences
Operator Conference Guidelines
Click the Conference Password tab
Enter the Conference IVR Service Name
New Conference IVR Service Welcome dialog box opens
Defining the Components Enabling Operator Assistance
Click the Video Services tab
Click the Roll Call/Notifications tab
New Entry Queue IVR Service Conference ID dialog box opens
Define the Entry Queue Service Name
New Entry Queue IVR Service Welcome dialog box opens
Click the Operator Assistance tab
RMX Management pane, click Conference Profiles
New Entry Queue IVR Service Video Services dialog box opens
Defining a Conference Profile for an Operator Conference
1New Profile General Parameters
10-7
2New Profile Advanced Parameters
LPR and DBA on
10-9
Configuration Mode
By the RMX User
Resolutions in AVC-based CP Conferencing on
3New Profile Video Quality Parameters
10-11
Defining an Ongoing Operator Conference
To start a conference from the Conference pane
4New Conference General Options
10-13
Comma, colon and semicolon characters cannot be used
Routing Name
To save an ongoing Operator conference as a template
Saving an Operator Conference to a Template
New Conference Participants dialog box opens
To their destination conference
Right-click and select Save Conference to Template
Starting an Operator Conference from a Template
Click the Save Conference to Template button. or
10-15
Right-click and select Start Conference from Template
Requesting Help
Click the Start Conference from Template button. or
Icon Status Indication Description
Participant Alerts List
5Participants List Status Column Icons and Indications
10-17
Moving Participants Between Conferences
Audible Alarms
Using Audible Alarms
Move Guidelines
YES
Moving Participants
Yes
10-19
Moving a Participant Interactively
11-1
Conference Templates
Conference Template
Using Conference Templates
Clicking the tab opens the Conference Templates list
To create a new Conference Template
Creating a New Conference Template
Creating a new Conference Template from Scratch
Click the New Conference Template button
New Conference Template General dialog box opens
11-5
New Template Participants dialog box opens
New Participant General tab opens
Modify the fields of the General tab Click the Advanced tab
New Participant Advanced tab opens
Optional. Click the Information tab
11-7
11-8 Polycom, Inc
11-9
Starting an Ongoing Conference From a Template
To start an ongoing conference from a Template
Conference is started
Reservation Properties dialog box is displayed
To schedule a Reservation from a Conference Template
Right-click and select Schedule Reservation from Template
11-11
11-12 Polycom, Inc
To delete Conference Templates
Deleting a Conference Template
Exporting and Importing Conference Templates
Right-click and select Delete Conference Template
Exporting All Conference Templates from an MCU
Using the Export Conference Templates option, you can
Exporting Conference Templates
Export selected Conference Templates
To export selected Conference Templates
Exporting Selected Conference Templates
Conference Templates Export dialog box is displayed
11-15
11-16 Polycom, Inc
Conference Templates Import dialog box is displayed
Importing Conference Templates
To import Conference Templates
11-17
Conference Template already exists
Polycom Conferencing for Microsoft Outlook
12-1
Setting up the Calendaring Solution
12-3
Option 1 Using default Exchange Server settings
1Exchange Integration Configuration Option
Option 2 Using an alternate Primary Smtp Mailbox
Reply to the meeting invitation
12-5
Option 3 Using modified Exchange Server settings
2Exchange Integration Configuration Option
RMX must have its MCU prefix registered in the gatekeeper
RMX must be configured as a Static Route
Calendaring Guidelines
12-7
Creating and Connecting to a Conference
Creating a Conference
4Microsoft Outlook Field Usage
Connecting to a Conference
Access Number section
Gathering Slide
RMX and Polycom DMA System Deployment
Polycom Solution Support
RMX Standalone Deployment
Conference and Participant Monitoring
13-1
Monitoring is done in the same way as for CP conferences
Monitoring AVC-based Video Switching Conferences
General Monitoring
To view the parameters of an ongoing AVC conference
Conference Level Monitoring
Viewing the Properties of an Ongoing AVC-based Conference
13-3
Video and audio streams
Following information is displayed in the General tab
1Conference Properties General
MPM+
MPM
HD 720P
13-5
2Conference Properties Advanced Parameters
Conference Properties Advanced dialog box opens
Following information is displayed in the Advanced tab
How often a FW NAT Keep Alive message is sent. For more
Click the Gathering Settings tab
Conference Properties Gathering Settings dialog box opens
13-7
Conference Properties Video Quality dialog box opens
3Profile Gathering Settings
Following information is displayed
Field/Options Description
13-9
Based CP Conferencing on
4Conference Properties Video Quality Parameters
264 HD
263
Cascade Optimized and SVC Optimized
13-11
Click the Video Settings tab to list the video parameters
5Conference Properties Video Settings Parameters
6Customized Polling Buttons
13-13
Viewing the Properties of an Ongoing SVC-based Conference
To view the parameters of an ongoing SVC conference
13-15
7Conference Properties Advanced Parameters
Field/Option Description People Video Definition
Cascade Resolution Resolution is fixed in SVC conferences
8Conference Properties Video Quality Parameters
Optimized
13-18 Polycom, Inc
13-19
Request to Speak
Request to Speak is
Duration of the icon display cannot be modified
To display the participant Properties
Participant Level Monitoring
Displaying Participants Properties
Participant Properties Media Sources dialog box opens
General dialog box
IP Participant Properties
10Participant Properties Media Sources Parameters
13-23
MCU
Participant Status
AVC-based
13-24 Polycom, Inc
13-25
SIP Participant AVC-based and SVC-based
12Participant Properties H.245/SDP Parameters
Channels
Columns
13-27
14Participant Properties Channel Status Advanced Parameters
SIP Bfcp TCP
E-1
On page E-1
Participant Properties Advanced Channel Information on
13-29
15Participant Properties Gatekeeper Status Parameters
16Participant Properties Gatekeeper Status Parameters
13-31
For more information see Participant Level Monitoring on
Monitoring SIP Bfcp Content
Channel Status tab Channel Status -Advanced tab
Monitoring ISDN/PSTN Participants
To view the participant properties during a conference
User Channels have been muted/suspended by the RMX
18ISDN/PSTN Participant Properties Media Sources
MCU
User
19 Participant Properties H.221 Parameters
13-35
20ISDN/PSTN Participant Properties Connection Status
13-37
Monitoring Telepresence Participant Properties
Recording Conferences
14-1
Creating Multiple Virtual Recording Rooms on the RSS
Configuring the RMX to Enable Recording
Default
Defining the Recording Link
Is 5555, enter 173.26.120.2##5555
SIP
RSSIPAddress##VRR number
14-3
Click OK Recording Link is added to the RMX unit
Enabling the Recording Features in a Conference IVR Service
Conference IVR Service Properties dialog box is displayed
Profile Properties dialog box, click the Recording tab
To enable recording for a conference
Enabling the Recording in the Conference Profile
3Conference Profile Recording Parameters
Recording is enabled in the Conference Profile
Configuration
Recording Link Encryption Guidelines
Recording Link Encryption Flag Setting
Recording Link Encryption
14-7
Recording in the Conference Profile on
Recording Link Settings
Managing the Recording Process
Not applicable
Recording Link Default Layout Settings Auto Layout Mode
Recording Link Layout
14-9
To manage the recording process using the right-click menu
Name Description
2Conferences List Recording Tool bar buttons
Using Dtmf Codes to Manage the Recording Process
Conference Recording with Codian IP VCR
Button Description
Monitoring the recording participant
User Types
Users, Connections and Notes
Users
Machine Account
Chairperson
Auditor
An Auditor can only view Auditor Files and audit the system
Active Directory
Listing Users
Monitoring
To view the users currently defined in the system
Administrators can add new users to the system
Adding a New User
Optional. To associate a user with a machine
Changing a User’s Password
Deleting a User
15-5
To enable a user
Click OK User’s password is changed
To disable a user
Disabling a User
15-7
Renaming a User
To rename a user
Viewing the Connections List
User and Connection Management in Ultra Secure Mode
Connections
Disabling/Enabling Users
Managing the System Users
User Types
Renaming Users
Password Character Composition
Managing the User Login Process
Implementing Strong Passwords
Password Length
Passwordexpirationdays System Flag
Implementing Password Re-Use / History Rules
Defining Password Aging
Range 1 Default
Temporary User Lockout
Defining Password Change Frequency
Forcing Password Change
User Lockout
Management Sessions per System
User Login Record
Controlling User Sessions
15-13
Session Timeout
Using Notes
Connection Timeout
Sessions per User
15-15
To open or edit a note
To delete a note
15-16 Polycom, Inc
Two IP Services are defined for the RMX
Network Services
IP Network Services
Management Network Default IP Service Conferencing Service
Default IP Service Conferencing Service
Management Network Primary
16-3
To view or modify the Management Network Service
Modifying the Management Network
1Default Management Network Service IP
Modify the following fields
RealPresence Collaboration Server Web Client to
Hardware Monitoring purposes
IPv6 address of the RMX Shelf Management
16-5
2Default Management Network Service Routers
Click the Routers tab Modify the following fields
16-7
Click the DNS tab Modify the following fields
DNS
16-9
4Management Network Properties LAN Ports Parameters
Manually for LAN 2 Port only
Click the Security tab Modify the following fields
5Management Network Properties Security Parameters
To view or modify the Default IP Service
Modifying the Default IP Network Service
Fast Configuration Wizard
16-11
RMX1500 MPMx
Optional. Click the DNS tab
16-13
7Default IP Service Conferencing Gatekeeper Parameters
Click the Gatekeeper tab Modify the following fields
16-15
Number of simultaneous calls x 8 ports 2 audio, 2 video
Field
9Default IP Service Conferencing QoS Parameters
Enable
16-17
TOS
Following protocols are supported TLS 1.0, SSL 2.0 and SSL
10Default IP Network Service SIP Servers
Click the SIP Servers tab Modify the following fields
16-19
Field Description Create Certificate
Send Certificate
11Default IP Network Service Security SIP Digest
16-21
12Default IP Network Service SIP Advanced
Optional. Click the V35 Gateway tab
13Network Service V35 tab
16-23
On the RMX menu, click Setup Ethernet Settings
Ethernet Settings
To modify the automatic LAN port configuration
Port Type Label on MCU 1500 4000
Ethernet Settings dialog box opens
16-25
RealPresence Collaboration Server RMX 1500 Do not
Modify the following field
RealPresence Collaboration Server RMX 4000 Do not
IP Network Monitoring
To monitor signaling status
16IP Network Services Properties RMX CS IP
16-27
Click the H.323 tab H.323 tab displays the following fields
17IP Network Services Properties H.323
Not Registered The registration of the Signaling Host with
IPv6 Scope IP Address Global Global Unicast IP address
18IP Network Services Properties SIP Servers
16-29
19IP Network Services Properties ICE Servers
16-31
IPv6 Guidelines
Default Management Network Service
LAN Redundancy
RMX Internal Addresses
RealPresence Collaboration Server RMX
Configuration Requirements
Media Redundancy
16-33
System Flag / Value RMX
Flag / Value Port Usage LAN 2 / MNG B RMX
Signaling and Management Redundancy
Multipleservices = no Lanredundancy
16-35
Flag / Value Port Usage LAN 2 / MNG B RMX LAN 3 / MNG RMX
Network Traffic Control
Hardware Monitor Indications
Status Description
16-37
Three Network Traffic Control Flags are added
Should a SIP Proxy failure occur in one of the DMA servers
RealPresence Collaboration Server RMX Network Port Usage
Rtcp
SIP-TLS
RTP
SIP -TLS
Non Supported Capabilities and Conferencing Features
ISDN/PSTN Network Services
Supported Capabilities and Conferencing Features
16-41
Adding/Modifying ISDN/PSTN Network Services
Obtaining ISDN/PSTN required information
Click Next
Whether this number is national or international
Default Num Type Select the Default Num Type from the list
Default Unknown
Call, select Unknown
26Span Definition
25PRI Settings
Click Next Span Definition dialog box is displayed
27Phones Settings
16-45
Click Save & Continue
Click Save & Close
Modifying an ISDN/PSTN Network Service
To Modify an ISDN/PSTN Network Service
Span Definition
Spans
28Default Management Network Service LAN Ports
Network Security
Attached
16-49
Multiple Network Services
RealPresence Collaboration Server RMX
16-50 Polycom, Inc
29Maximum Number of Network Services per RMX System
16-51
Resource Allocation and Capacity
First Time Installation and Configuration
Fixed and Flexible Resource Allocation Mode
Preparations
First Entry Power-up and Configuration
Upgrading to Multiple Services
Hardware Installation and Setup
16-53
Server RMX RealPresence Collaboration Server RMX 4000 only
Parameter Local Network Settings
RealPresence Collaboration
31LAN Connections to the RTM IP
RealPresence Collaboration Server RMX Hardware Installation
Connecting the cables to the RTM IP
RTM IP Port Description
Signaling and Media existing first Network Service
Connecting the cables to the RTM LAN
Signaling and Media additional second Network Service
32LAN Connections to the RTM LAN
33LAN Connections to the RTM IP
Signaling and Media second Network Service optional
Signaling and Media first Network Service optional
34LAN Connections to the RTM LAN
RMX Configuration
MNG MNG B
To add new/additional Network Services
System Flags and License Settings
IP Network Service Definition
16-59
New IP Service Networking IP dialog box opens
36IP Network Service IP Parameters
Server RMX
RealPresence
Collaboration
RealPresence Collaboration Server RMX 2000 If one card was
Following flags can be defined per service
16-63
One Network Service can include the DNS definition
37Default Management Network Service DNS
IP address field is enabled only if Specify is selected
Optional. Click the Ports tab
16-65
Setting a Network Service as Default
38Default IP Network Service SIP Advanced
Video/Voice Port Configuration and Resolution Configuration
Ethernet Settings
Signaling Host IP Address and MCU Prefix in GK Indications
Ethernet Settings on
Conference Profile
16-67
Hardware Monitor
Gateway Profiles
Defining Dial Out Participants
Signaling Monitor
Conferencing
16-69
General dialog box
Reserving Video Resources for a Conference
Monitoring Conferences
16-71
Resource Report
Port Gauge Indications
Deployment Architectures
Remote Connection Using the Internet
NAT Network Address Translation Traversal
Session Border Controller SBC
Business to Business Connections
FW Firewall NAT Keep Alive
System Configuration in SBC environments
To enable and modify FW NAT Keep Alive
To view the IVR Services list
IVR Services
IVR Services List
17-1
Button Button Name Descriptions
IVR Services Toolbar
1IVR Toolbar buttons
17-3
Adding Languages
To add a language
Uploading a Message File to the RMX
To upload messages to the MCU
Message Message Type Category
2lists the Message Types for each category
2IVR Message Types by Message Category
17-5
Defining the IVR Service for Gateway Calls on
Defining a New Conference IVR Service
Defining a New Conference IVR Service
To define a new Conference IVR Service
17-7
17-8 Polycom, Inc
17-9
17-10 Polycom, Inc
17-11
6Conference IVR Service Properties General Voice Messages
Message Type Description
Disconnect on Wrong
Complete the procedure
Number of redials. This call is then disconnected
Click the Roll Call tab
17-13
Roll Call Message Description
If Enable Roll Call option is selected
7Conference IVR Service Properties Roll Call Messages
If Enable Tone Notifications option is selected
17-15
High HD1080p HD720p
Slide Resolution Format Input Slides Generated Slides
8IVR Slide Input / Output Formats
4SIF
Video Services Description
Low 4CIF
CIF
17-18 Polycom, Inc
17-19
10New Conference IVR Service Properties Dtmf Codes
Operation Dtmf String Permission
17-20 Polycom, Inc
To set up a new Entry Queue IVR Service
Entry Queue IVR Service
Defining a New Entry Queue IVR Service
17-21
Fill in the following parameters
New Entry Queue IVR Service Global dialog box opens
11Entry Queue IVR Service Properties Global Parameters
Assign an audio file to each message type, as follows
12Entry Queue IVR Service Properties Conference ID
Select the voice messages
17-23
New Entry Queue IVR Service General dialog box opens
Operator Assistance dialog box opens
17-25
To select the Default Entry Queue IVR Service
To select the default Conference IVR Service
Then click the Set Default Conference IVR Service button
Adding a Music File
To modify the properties of an IVR Service
Replacing the Music File
Music file guidelines
Recording an Audio Message
Install Music File window opens
Creating Audio Prompts and Video Slides
17-29
To define the format settings for audio messages
Attributes list, select 16.000 kHz, 16Bit, Mono
To record a new audio message
17-31
Creating a Welcome Video Slide
To create a welcome video slide
Invite Call Flow
Inviting Participants using Dtmf
Error Handling
Entering Additional Dtmf Codes
To enable the Invite Participant using Dtmf on the RMX
Enabling the Invite Participants using Dtmf Option
General Video Services Dtmf Codes
17-35
Conference IVR Services General tab is displayed
IVR Services Video Services tab is displayed
IVR Services Dtmf Codes tab is displayed
Disabling the Invite Participant Option
Default IVR Prompts and Messages
To disable the Invite Participant option
Message Type Message Text File Name
17-38 Polycom, Inc
NID
17-39
Ivrmusicvolume
Volume Control of IVR Messages, Music and Roll Call
To control the volume of IVR music, messages and Roll Call
Ivrmessagevolume
CDR File Formats
Call Detail Record CDR Utility
CDR File
18-1
Following is a sample of an unformatted CDR file
Following is an example of a formatted CDR file
CDR File Contents
Multi-Part CDR Files
Viewing, Retrieving and Archiving Conference Information
Viewing the Conference Records
Multi-part CDR File display
To refresh the CDR list
Refreshing the CDR List
Retrieving and Archiving Conference CDR Records
To retrieve and archive CDR records
19-1
Gateway Calls
Gateway Functionality
Direct Dialing
Call Flows
IP Participants
19-3
Dialing from H.323 Endpoints
Dialing string
Dialing from SIP Endpoints
Optional
Gateway IVR
19-5
Gkmandatoryforcallsout System Flag
Direct IP Dialing
Dial-out Calls
19-7
Dial-in Calls
Flag Value Gatekeeper Results Available
Isdn Participants
Enabling or Disabling Direct IP Dialing
19-9
Pstn Dial-in Using GK Prefix
Dialing from ISDN/PSTN Endpoints
Interoperability with CMA
Calling an IP Endpoint via Gateway
Wrong Destination Number
Gateway Redial or Redialing Gateway Calls
Redial on Wrong Number
323
Wrong Destination Number Time-out
Disconnect on Busy
Disconnect on No Answer
New IVR Messages
Configuring the Gateway Components on the RMX
Disconnect on Wrong Number
There are 4 new IVR Messages
Defining the IVR Service for Gateway Calls
To define a new Conference IVR Service for gateway calls
19-15
19-16 Polycom, Inc
19-17
Defining the Conference Profile for Gateway Calls
To define a Conference Profile for Gateway Sessions
RMX Management Rarely Used pane, click Gateway Profiles
Defining the Gateway Profile
To define a new Gateway Profile
19-19
Service for dialing out to the target number
Displaying the Connection Information
System Configuration
Enabling Pstn dial-in using GK prefix
Click OK New Gateway Profile is added to the list
Connection Indications
Administrator’s Guide, Conference Level Monitoring on
Monitoring Ongoing Gateway Sessions
Gateway Session Name
Gateway Session Parameters
Connected Participant Parameters
Conference ID
To set up the Meeting Room for direct dialing
Define the Meeting Room with the following
Dialing to Polycom DMA
19-25
Calling the DMA via Gateway IVR
19-27
Manual Dial String Entry
Automatic Dial String Generation
Pstn Dial-in Using GK Prefix
Enabling Pstn dial-in using GK prefix
RMX with DMA
Deploying a Polycom RMX Serial Gateway S4GW
Standalone RMX
19-30 Polycom, Inc
RMX Manager Application
Accessing the RMX Manager Directly
To access the RMX Manager directly
20-1
Upgrade Notes
Installing the RMX Manager
Click the Install RMX Manager link
New RealPresence Collaboration Server RMX Installation Note
20-3
To use the Windows Start menu Click Start Programs
Starting the RMX Manager Application
To use the browser
Click All Programs Polycom RMX Manager
20-5
Connecting to the MCU
To connect the RMX Manager to an MCU
20-6 Polycom, Inc
MCUs pane includes a list of MCUs and a toolbar
RMX Manager Main Screen
MCUs Pane
20-7
1MCU Icons and Statuses
MCUs Toolbar
Conferences Pane
RMX Management
Monitoring conferences
System Alerts
List Pane
Status Bar
Participant Alerts
Conference Templates
MCU State indicator displays the status of the selected MCU
Address Book
Port Usage Gauges
MCU IP
Adding MCUs to the MCUs List
To add a RMX unit
Starting a Conference
20-13
Starting a Conference from the Conferences Pane
Start a Reservation
MCUs pane, select the MCU to run the conference
Starting a Reservation
To start a conference from the Reservation Calendar
20-15
Monitoring Conferences
20-16 Polycom, Inc
20-17
Grouping the Participants by MCU
On the RMX Menu, click View Group by MCU
Start Monitoring/Stop Monitoring
Participants pane display changes accordingly
To view and/or modify the MCU Properties
Disconnecting an MCU
Modifying the MCU Properties
To disconnect an MCU
To Remove an MCU from the list
Removing an MCU from the MCUs Pane
Changing the RMX Manager Language
Export RMX Manager Configuration dialog box opens
Import/Export RMX Manager Configuration
To Export the RMX Manager Configuration
20-21
To Import the RMX Manager Configuration
Import RMX Manager Configuration dialog box opens
Set the RMX to Non Secure Communication Mode
Installing RMX Manager for Secure Communication Mode
To install the RMX Manager
RMX Management pane, click IP Network Services
Enter the Local Domain Name
Security tab is displayed
Clear the Secured Communication check box
20-25
Set the RMX to Secure Communication Mode
Create a Certificate Request
Select the Secured Communication check box
Management Network Properties dialog box is displayed
Click on the Security tab. The Security tab is displayed
Using an Internal Certificate Authority
20-27
Click the Next button
Certificate Export Wizard is displayed
Select Base-64 encoded X.509 .CER
20-29
20-30 Polycom, Inc
System and Participant Alerts
21-1
To view the System Alerts list
1Active Alarms Pane Columns
System Alerts
An identifying number assigned to the system alert
Click the red blinking Participants Alerts indication bar
Participant Alerts
To view the Participants Alerts list
21-3
Participant Alerts pane opens
RMX Time
Altering the clock
To Alter the MCU Time
21-5
Maximum Possible Resources Resource Type RMX MPMx
Resource Management
Resource Capacity
Resource Capacity Modes
21-7
SVC Conferencing
Resolution/fps Video Resources Used
Resource Usage
AVC Conferencing Continuous Presence
21-9
AVC Conferencing Video Switching
AVC Conferencing Voice
Fixed Resource Capacity
Video/Voice Port Configuration
Flexible Resource Capacity Mode
There are two Resource Capacity modes in MPM+ and MPMx Mode
Configuring the Video/Voice Resources in MPM Mode
Configuring the Video/Voice Resources in MPM+ and MPMx Mode
Flexible Resource Capacity Fixed Resource Capacity
RMX menu, click Setup Video/Voice Port Configuration
To allocate Audio Only ports in MPM+ and MPMx mode
To allocate resources in Fixed Resource Capacity mode
Flexible Resource Capacity
Video/Voice Port Configuration dialog box opens
21-13
21-14 Polycom, Inc
To force CIF resource
Forcing Video Resource Allocation to CIF Resolution
To cancel the forcing of CIF resource
21-15
6Resource Report Fields Parameters
Main toolbar, click Administration Resource Report
Displaying the Resource Report
Column Description
Resource Report Display in Flexible Resource Capacity Mode
21-17
Port Gauges
Resource Report is displayed as follows
21-19
RMX Resource Management by CMA and DMA
7ISDN E1/T1 Connection Capacity vs. Bit rate
To Set the Port Usage Threshold
Setting the Port Usage Threshold
Port Usage Threshold
21-21
SIP Dial-in Busy Notification
High Port Usage threshold
Port Usage Gauges
Port Gauges in Flexible/Fixed Capacity Modes
Audio Ports Gauge
System Information
Flexible Capacity Mode
Fixed Capacity Mode
Video Ports Gauge
ISDN/PSTN
21-25
Media cards
Cards in the system are disabled. It is the mode used
Cards in the system are disabled
MPM Only MPM cards are supported. MPM+ and MPMx
Traps
Snmp Simple Network Management Protocol
MIBs Management Information Base
Private MIBs
Standard MIBs
Alarm-MIB
MIB H.341 H.323
Interfaces Mib-2
Palntsc NTSC/PAL
Unified MIB
Name Type Description
21-29
21-30 Polycom, Inc
An Example of an Authentication Failure Trap
An Example of a ColdStart Trap
Defining the Snmp Parameters in the RMX
To enable Snmp option
RMX Web Client menu bar, click Setup Snmp
Status Trap
With the MCU
1RMX-SNMP Properties Agent Options
Contact person for this
21-33
Click the Traps tab
RMX-SNMP Properties Traps dialog box opens
AES
21-35
RMX-SNMP Properties Security dialog box opens
Default DES
Default Empty
Default MD5
21-37
RMX Snmp Properties Security dialog box, click OK
Hot Backup
Accepted Host IP Address dialog box opens
21-39
To enable Hot Backup
Enabling Hot Backup
Using Hot Backup Triggers
Configuring the Hot Backup Triggers
21-41
To modify the Master MCU configuration
Modifications to the Master MCU Requiring System Reset
Select the appropriate Hot Backup Triggers check boxes
Reset the Master MCU
When selected all audible alarms are immediately stopped
Using Audible Alarms
Audible Alarm Permissions
Stop Repeating Message
User Customization
Configuring the Audible Alarms
7Audible Alarm User Customization Options
Option Description
Replacing the Audible Alarm File
21-45
To customize the Multilingual Setting
Multilingual Setting
Customizing the Multilingual Setting
Banner Display and Customization
Non-Modifiable Banners
Non-Modifiable Banner Text
Sample 1 Banner
Sample
Sample 4 Banner
Sample 2 Banner
Sample 3 Banner
Customizing Banners
Banners Configuration dialog box opens
8Banner Configuration
Customize the banners by modifying the following fields
Login Screen Banner
Banner Display
Main Screen Banner
Backup and Restore Guidelines
Software Management
21-51
Browse to the Install Path and then click Install
Using Software Management
Backup Configuration dialog box opens
Click the Browse button
To Ping a network entity from the RMX
Using Ping
Ping RMX
OK, or
10Notification Settings Parameters
Notification Settings
To configure the notifications
Logger Diagnostic Files
21-55
File name structure
11Diagnostic File Button Options
Following tasks can be performed
File name format
Viewing the Logger Files
Standard Security Mode
Information Collector
Apache logs
Unpermitted access includes
Ultra Secure Mode
Using the Information Collector
Network Intrusion Detection System Nids
Click the Collect Information button
Creating the Information Collector Compressed File
To create the compressed file
21-59
Viewing the Compressed File
Auditor
Saving the Compressed File
To view the compressed file
Auditor Event History File Storage
To access Auditor Files
Auditor Files
Retrieving Auditor Files
To open the file in the Auditor File Viewer
Auditor File Viewer
To retrieve files for storage on a workstation
Double-click the file
Following fields are displayed for each event
21-63
To open an auditor event file stored on the workstation
Audit Events
Alerts and Faults
Lists Alerts and Faults that are recorded by the Auditor
Event
Transaction
Transactions
Lists Transactions that are recorded by the Auditor
14Transactions
21-67
Installing ActiveX
ActiveX Bypass
21-69
Resetting the RMX
To reset the RMX
Standard Restore
Restore Factory Defaults
Restoring Factory Defaults
Comprehensive Restore
21-71
Click the Backup & Configuration option
USB key
Backup Configuration Dialog box opens
To Restore Factory Default Settings using the USB key
21-73
21-74 Polycom, Inc
22-1
System Configuration Flags
Modifying System Flags
Mcmsparameters tab, the following flags can be modified
22-3
Enablecascadedlink
Enableagc
Enableautoextensio
Enablecyclicfilesy
22-5
Internalscheduler
CONTENTFORCEH263
Hidesitenames
Isdncountry Code
Isdnresourcepolicy
22-7
Itpcropping
22-9
Ivrrollcalluseton
Esinsteadofvoice
Faultlayout
Lastloginattempts
Legacyepcontentde
Maxconfpasswordr
22-11
Inerate
Multipleservices
Mintipcompatibilityl
Msenvironment
22-13
Numericconfpassde
Faultlen
Passwordexpiration
Numericconfpassma
22-15
Example
22-17
Manually Adding and Deleting System Flags
To add a flag
22-19
Cacenable
Bondinggroupdelay
Burnbios
Bondingdialingmeth
22-21
Possible values
Default no
22-23
Enableipredial
ENABLEH239
ENABLEH239ANNEXT
Enablelyncrtcpint
22-25
Fadeinfadeout
Externaldbpasswor
Externaldbport
FORCE1X1LAYOUTON
Possible values YES / no
22-27
RATEHD720P60MOTION
Contentrate
RATEHD720P30SHARP
RATESD30SHARPNESS
22-29
Default n
Default YES
22-31
Partygatheringdura
Passwordfailurelimi
Portgaugealarm
Tionseconds
22-33
Sendsrtpmki
Sendsipbusyuponr
Esourcethreshold
Sendwiderestoip
Setaudioplc
Sendwiderestoisd
Setaudioclarity
Setautobrightness
Setdtmfsourcediff
Sipenablefecc
Sipfastupdateinter
Insec
22-37
Tcburstsize
Supporthigh
Profilewithisdn
Tclatencysize
Manually Adding Flags to the Csmoduleparameters Tab
22-39
Deleting a Flag
To delete a flag
Default Auto Layout is controlled by 13 flags
Auto Layout Configuration
Customizing the Default Auto Layout
Default Value Possible Values
22-42 Polycom, Inc
Predefined AUTOLAYOUT5
Legacyepcontentdefaultlayout Flag Values
Set to Number Flag Possible Participant’s View
22-43
22-44 Polycom, Inc
22-45
Csenableepc Flag
Automatic Password Generation Flags
Default in Ultra Secure Mode Conference password
Enabling the Automatic Generation of Passwords
Default in non-secured mode means no minimum
Default in Ultra Secure Mode, Chairperson
22-47
Numericconfpassdefaultl
Numericchairpass Default
Ultra Secure Mode Flag
Snmp
22-49
Range Default Network Security
Login and Session Management
Strong Passwords
Range Default User Management
Disableinactive User
Chine Passwordexpirat Iondays Ionwarningdays Passwordhistor
Flag Description Network Security
Range Default Cyclic File Systems
Ultrasecuremode System Flag Descriptions
22-51
Strong Passwords
Flag Description
RMX Serial Gateway S4GW
22-53
22-54 Polycom, Inc
23-1
RMX Hardware Monitoring
Viewing the Status of the Hardware Components
HW Monitor Pane Tool bar
Button Name Description
Hardware Properties dialog box has the following structure
23-3
To view the MCU Properties
3MCU Properties General Info
4MCU Properties Event Log
23-5
Mezzanine a
To view the Card Properties
5Card Properties General Info
Mezzanine B
6Backplane Properties General Info
To View the Supporting Hardware Components Properties
Backplane Properties
23-7
7FANS Properties General Info
General Settings
FAN Properties
Fans
LAN 1, LAN 2, LAN 3 Properties
23-9
ID assigned to the MCU’s chassis file
8MCU Properties General Info
Chassis File ID
9MCU Properties Event Log
23-11
10Card Properties General Info
11Backplane Properties- General Info
23-13
Fan number Fan numbering Speed rpm Present speed of a fan
Field Description General Settings
12FANS Properties General Info
LAN 0, LAN 1, LAN 2 Properties
23-15
13MCU Properties General Info
23-17
0x20 Switch, 0x86 MFA, etc
14MCU Properties Event Log
15Card Properties General Info
23-19
Backplane+ Properties
16Backplane+ Properties- General Info
17FANS Properties General Info
Board Mac Address
If applicable second Backplane Mac address
23-21
Diagnostic Mode RMX 1500/2000/4000
Connecting to the Shelf Management Server
Performing Basic Mode Diagnostics
To run Basic Mode Diagnostics on a Hardware Component
List pane tool bar, click the Basic Mode button
23-23
After login the following screen appears
18Run Tests Parameters
23-25
1RMX 2000/4000 Diagnostics Tests & Monitoring Tests
19Tests Selection Additional Test Parameters
List pane tool bar, click the Advanced Mode button
Performing Advanced Mode Diagnostics
To run Advanced Mode Diagnostics on a Hardware Component
Reset Confirmation dialog box, click Yes
23-28 Polycom, Inc
3RMX 2000/4000 Diagnostics Tests & Monitoring Tests
23-29
5RMX 2000/4000 MPMx D DSP DSP Sub Test selection
20Tests Selection Additional Test Parameters
23-31
Diagnostics Monitoring
MCU Monitor
22Tests Monitoring Card Monitor Parameters
Cards Monitor
21Tests Monitoring MCU Monitor Parameters
23-33
Error Buffer
23Tests Monitoring Card Monitor Parameters
Temperature Thresholds
To view the RMX RTM-IP 1500/RTM-IP/RTM IP 4000 Properties
Click Active Alarms
RMX RTM-IP 1500/RTM-IP/RTM IP 4000 Card Properties
To view the RMX Ctnl Properties
23-36 Polycom, Inc
To view the MPM+ Properties
23-37
MPMx Card Properties
To view the MPMx Properties
Disconnection Cause Description
Disconnection Causes
Table A-1Call Disconnection Causes
ARQ
Disconnection Cause Description
Ambiguous
Requested resource Must be accessed through
Disconnection Cause Description
Disconnection Cause
Number Summary Description
Enquiry Status Enquiry
Disconnection Cause
Number Summary Description
Subscribed
Disconnection Cause
CUG
CUG or a CUG call was made to a non CUG member
Interworking An interworking call has ended Unspecified
Message with
Unrecognized That was not recognized Parameter Discarded
Polycom, Inc
Alarm Code Alarm Description
Alarms and Faults
Alarms
Table B-1Alarms
Appendix B-Alarms and Faults
Free space percentage% minimum free space Blocks
Appendix B-Alarms and Faults
Such a case the system is automatically restarted
Alarm Code Alarm Description
Alarm Code Alarm Description
Appendix C
CDR Fields Unformatted File
Table C-1Conference Summary Record Fields
GMT. The reservation time of a reservation that was started
Event Records
Event Code Event Name Description
Event Code Event Name Description
Extensions
Update
SIP Private
Gatekeeper
User Delete
User Update
User ADD
PARTICIPANT, User Disconnect PARTICIPANT, User
Party
Attend Party
Back to
Continue
User Update Participant Continue 1, on page C-22 2106
User Update Participant Continue 1, on page C-22 2102
Additional information about a User Update Participant
Contents of the participant information fields
Fields for Event 11001 Conference Start
Fields for Event 5001 Conference Start Continue
Fields for Event 6001 Conference Start Continue
Continue 10, on page C-15
Appendix C-CDR Fields Unformatted File
Value is in units of 0.01 seconds
For the type of conference
Before switching to the next participant
Any other number Unknown
ATT Accunet
NTI FX
NTI TIE Trunk
Participant Name Name of the participant
12 H.323 card failure
Channels, as follows
Video parameters
Field Description
Field Description
Identification as identified by the MCU
Dialed by the MCU for each participant channel
ISDN/PSTN
Tel URL
Address overrides the gatekeeper
SIP URI
Remote participant
Undefined
Field Description
Secondary Cause
Password Not supported This field remains empty
SIP
Bonding Phone Number Phone number for Bonding dial-out calls
SIP URI
Field Description
Field Description
Table C-29Event fields for Event 33 Party Chair Update
Up to 80 characters
Field Description
Party Name Name of the participant who was moved
Operator Attend Party to Conference
Operator Name
Bandwidth that is currently supported
Isdn
MCU
Party Alias SIP Party Address
Table C-40Disconnection Cause Values
Info1 Info2 Info3 Info4
VIP
Value Call Disconnection Cause
SIP bad name
Value Call Disconnection Cause
MGC Manager Events that are not Supported by the MCU
Following MGC Manager events are not supported by the MCU
Ad Hoc Conferencing with External Database Authentication
Ad Hoc Conferencing and External Database Authentication
Ad Hoc Conferencing without Authentication
Starting a conference uses the following method
Ad Hoc Conferencing with Authentication
MCU
Network
Conference Access with External Database Authentication
Conference Access Validation All Participants Always
Conference Access Validation Chairperson Only Upon Request
MCU
Profiles
Ad Hoc Settings
Entry Queue IVR Service with Conference ID Request Enabled
MCU Configuration
Authentication Settings
Ad Hoc enabled Entry Queue
External Database Application Settings
Flag Description and Value
To set the System Configuration flags
Click OK Reset the MCU for flag changes to take effect
Set the External Server Authentication field to Numeric ID
Set the External Server Authentication field to
Participant Properties Advanced Channel Information
Lution is 4CIF, the Faulty flag is displayed
Bilities exchange, the Faulty flag is displayed
Channel Index For Polycom Internal use only
Field Description
From the beginning of the channels life span
Polycom, Inc
CSR
Secure Communication Mode
Environments are
PFX / PEM
Purchasing a Certificate
Switching to Secure Mode
Client Authentication Server Authentication
For example RootCA ↔ IntermediateCA ↔ SubCA
Click Send Details
Installing the Certificate
To install the certificate
Creating/Modifying System Flags
Enabling Secure Communication Mode
When Secure Communications Mode is enabled
Rmxmanagement
Select the Secured Communication check box
Alternate Management Network
Management Security Properties dialog box is displayed
Ultrasecuremode System Flag
Ultra Secure Mode
Securing an External Database
Ultrasecuremode System Flag
PKI Public Key Infrastructure
Unique Certificates for all Networked Entities
Self Validation of Certificates
Offline Certificate Validation
Peer Certificates
To enable Request Peer Certificate
Installing and Using Certificates on the MCU
Default Management Network
Certificate Revocation List
Default IP Network Service
Managing Certificates in the Certification Repository
Adding Trusted Certificates
Issued To Issued By Expiration Date Status
Trusted Certificates
To add a certificate to the repository
Option. Paste Certificate and Send Certificate
Paste Certificate and Send Certificate
Send Certificate File
Polycom, Inc
CRL Certificate Revocation List
Personal Certificates Management and Signaling Certificates
Network Service Issued To Issued By Expiration Date Status
Select the Certificate File Format PEM or DER
Adding a CRL
To add a CRL to the repository
To remove a CRL
MS Active Directory Integration
Removing a CRL
Directory and Database Options
Ultra Secure Mode
Standard Security Mode
Internal MCU database and Active Directory
389
Directory Services Configuration dialog box is displayed
Enabling Active Directory Integration
636
Table F-5Directory Services Role Mapping
Directory Services Role Mapping dialog box is displayed
Authentication Type Only Ntlm can be used
Click the Role Mapping tab
Polycom, Inc
Management Network Primary
Alternate Management Network
Configuring the Workstation
To modify the workstation’s IP addresses
Polycom, Inc
Connecting to the Management Network
To connect directly to the MCU
Fast Configuration Wizard starts
Connecting to the Alternate Management Network
To connect to the Alternate Management Network
Procedure 2 Configure the Modem
Connecting to the MCU via Modem
Procedure 1 Install the RMX Manager
Configure the modem as follows
Create a new connection
Procedure 3 Create a Dial-up Connection
To create a dial-up connection
Polycom, Inc
Polycom, Inc
Polycom, Inc
To use the Windows Start menu
Procedure 4 Connect to the MCU
To Connect using the RMX Manager To use the browser
Click All Programs
Setting the MCU for Integration Into Microsoft Environment
Overview
Table H-1SIP TLS Encryption Key Support by System Component
Conferencing Entities Presence
Multiple Networks
Table H-2RMX Media Cards vs Network Services including ICE
1500 2000 4000
ICE Guidelines
Connecting to the MCU in ICE Environment
Interactive Connectivity Establishment ICE
Matched URI Routing Numerical Dialing Registered User Name
Dialing Methods
Table H-3Available dialing methods per Connection Type
Local Branch office Remote Federation
MCU side
Setting the Matched URI Dialing Method
Office Communications Server side
Expand the Enterprise Pools list
To set the MCU as trusted in OCS
Open the OCS Management application
Click the Host Authorization tab
Pool Front End Properties dialog box opens
Setting the Static Route for MCU in the OCS
To add MCU to the Routing Roles
Expand the Enterprise Pools list
Configuring the MCU System
Load Front End Properties dialog box opens
To dial in directly to a conference or Entry Queue
Setting the Numerical Dialing Method
Setting the Numerical Dialing for MCU Meeting Rooms
Conferencing entity routing name@domain name
Optional. Removing the MCU from the Host Authorization List
Configure Office Communicator Users for Enterprise Voice
Configuring the MCU as a Routable Gateway
To set up the MCU/DMA as a Voice Gateway
To establish the voice route
Run the following command
Establishing a Voice Route to the MCU Voice Gateway
Click the Routes tab
Polycom, Inc
Configuring Office Communicator Users for Enterprise Voice
On the Configure User Settings dialog box, click Next
Polycom, Inc
Select the Enable Enterprise Voice option
Click the Communications tab
Starting a Conferencing Call from the MOC
Available Certificate Tasks window appears
Select Create a New Certificate and click Next
Delayed or Immediate Request window appears
Name and Security Settings window appears
Your Server’s Subject Name window appears
Select the Mark cert as exportable check box
Organization Information window appears
Choose a Certification Authority window appears
Assign Certificate Task window appears
Click Finish MS R2
Select Assign certificate later and click Next MS R2
Certificate Wizard Completed window appears MS R2
Select Export a certificate to a *.pfx file and click Next
Export Certificate Password window appears
To create the certPassword.txt file
Certificate Wizard Completed window appears
Creating an Active Directory Account for the MCU
To add the MCU user to the Active Directory
Name defined for the Office Communication Server
New User wizard, define the following parameters
Table H-4Active Directory New User Parameters for the MCU
Polycom, Inc
Configure the MCU for ICE dialing
Configuring the Polycom-Microsoft Solution
Call Admission Control CAC
FEC Support
Network Error Recovery
SIP Dialog Recovery
Media Over TCP
Configuring the RMX 1500/2000/4000 for Microsoft Integration
Management Network Properties DNS Parameters
Default name is MCU
Security Certificate
DNS Servers Addresses
CSR Method
Configuring the MCU IP Network Service
To configure the MCU IP Network Service
PFX Method
Default IP Service Networking IP dialog box opens
Click the SIP Servers tab SIP Server, select Specify
SIP Server Type, select Microsoft
Table H-1Create Certificate Request
Polycom, Inc
CSR Method Sending the certificate
If no additional configuration is required, reset the MCU
PFX Method Sending the Certificate
Three filespkey.pem, cert.pem and certPassword.txt
Default IP Service Networking IP dialog box, click OK
Polycom MCU System Flag Configuration
Enabling the Microsoft Environment
Sipfreevideoresources
Sipfastupdateinterval
Flag Name Value and Description
ENV
Default G711A
Possible values AUTO, G711A, G711U, G722
Table H-4Allocated video resolutions per video resolution
HD Frame Rate Flag Settings using the RTV Video Protocol
Adding Presence to Conferencing Entities in the Buddy List
Busy
Enabling the Registration of the Conferencing Entities
To add the conferencing entity user to the Active Directory
Table H-5Active Directory New User Parameters for the MCU
Select from Active Directory dialog box opens
Select the Use the user principal name UPN option
Defining the Microsoft SIP Server in the IP Network Service
Enabling Registration in the Conference Profile
Table H-6Profile Properties Network Services
That Network Service
Polycom, Inc
Figure H-3Ongoing Conferences list SIP Registration
Conferencing Entity Properties
Enabling CAC Implementation
MCU Configuration for CAC Implementation
Siptcpportaddrstrategy = 1 default setting
Conferencing Behavior
Monitoring Participant Connections
To connect to an A/V MCU conference
Configuring the MCU for Federated ICE Dialing
To configure the MCU for ICE Dialing
Polycom, Inc
Monitoring the Participant Connection in ICE Environment
To view the channel properties of the participant
Following connection information is displayed
Table H-9New Active Alarms
Active Alarms and Troubleshooting
Active Alarms
Alarm Code Alarm Description
Alarm Code Alarm Description
Active Alarm Phase Alarm Displayed When Troubleshooting
ICE Active Alarms
ICE Environment MCU Active Alarms
Troubleshooting
Active Alarm Phase Alarm Displayed When Troubleshooting
Known Issues
Polycom, Inc
Cisco TelePresence System CTS Version
Polycom Open Collaboration Network Pocn
Polycom Immersive Telepresence Systems ITP Version
Single company with Polycom and Cisco Infrastructure
Company to company via Service Provider
Single Company Model Polycom and Cisco Infrastructure
IOS
Component Version Description Cisco Equipment
Cucm
Ctms
CMA
Component Version Description Polycom Equipment
MLA
Virtual Meeting Room in DMA
Call Flows
Multipoint call with DMA
DMA Meeting Number
To the MCU
Multipoint call without DMA
According to its Dial Plan forwards calls with prefix
Company to Company Models Using a Service Provider
Model
Model
CMA Gatekeeper
Multipoint call via Service Provider Model
Call Flow
Figure I-3Company to Company via Service Provider Model
Company B
Deployment architecture includes
Company a
Polycom Equipment
Call Flow
Standalone Polycom CMA System as a Gatekeeper
Administration
Gatekeepers
Standalone Cisco IOS Gatekeeper
Resolution is fixed at XGA at 5fps
Configuring the Cisco and Polycom Equipment
Content
239
Cisco Equipment
Polycom Equipment
Set the Mintipcompatibilitylinerate System Flag
Configuring a Virtual Meeting Room VMR
Configuring CMA to route H.323 calls to MCU
SIP only no TIP support Versions
Procedure 1 Set the Mintipcompatibilitylinerate System Flag
Endpoints
Polycom, Inc
Procedure 4 Configuring a TIP Enabled Profile on the MCU
Polycom, Inc
CTS
TIP Compatibility Video & Content
RPX OTX TPX HD ATX HD
TIP Compatibility None
Click the Video Quality tab
Click the Video Settings tab
Set the Telepresence Mode to Auto
Procedure 6 Configuring a Meeting Room on the MCU
Microsoft MS Lync using MS-ICE RTV 720p
Collaboration with Microsoft and Cisco
MS Lync as a Static Route
Deployment Architecture
Cisco TelePresence System CTS Versions 1.7
Component Polycom
Microsoft
TLS and Srtp
Component Version
Cisco
Multipoint Calls using DMA
Workstation
Configuring the Microsoft, Cisco and Polycom Components
Microsoft Lync Server
Polycom, Inc
Register the ITP endpoints to the Lync server
Register HDX endpoints to the DMA as Gatekeeper
Open MLA to configure ITP Layouts
Configure a TIP Enabled Profile on the MCU
Create a New Profile for the Meeting Room
Table I-1 TIP Compatibility None
Content Receiver
Content
Sender
Table I-3TIP Compatibility Video & Content
Table I-2TIP Compatibility Video Only
Encryption
Endpoints
Endpoint Registration Dialing Method Lync
Configure SIP endpoints to register to
DMA as SIP Proxy Lync Server as SIP Proxy Cucm as SIP Proxy
SIP P+C
CTS Participants
Operations During Ongoing Conferences
Monitoring
Participant Properties General dialog box opens
Lync Participants RTV
Click the Channel Status Advanced tab
Known Limitations
Polycom, Inc
USB port of an MCU in Ultra Secure Mode can be used to
Restoring Defaults
USB Restore Defaults
Restore to Factory Security Defaults
To restore the MCU to Factory Security Defaults
Comprehensive Restore to Factory Defaults
Comprehensive Restore to Factory Defaults Procedure
Procedure a Backup Configuration Files
Procedure B Restore to Factory Defaults
Appendix K
SIP RFC Support
SIP RFC
SIP Timer Types & their Values
323 & SIP Flag Settings
Flag name Siptimerssetindex
Homologation for Brazil
TimerK
Flag name H323TIMERSSETINDEX
Flag name Disabledummyregistration
5000