AltiWare ACM Administration Manual
Page
Contents
Getting Around AltiWare Administrator 5.1
System Configuration
Voice Mail Configuration
Auto Attendant Configuration
Multilingual Configuration
Call Recording Configuration
Application Extension Configuration
Board Configuration
Trunk Configuration 147
Call Routing Configuration
Out Call Routing Configuration
Extension Configuration
Setting Up IP Extensions
AltiGen IP Phone Configuration 233
Mobile Extension Configuration 239
Hunt Group Configuration
Paging Group Configuration
Line Park Configuration
Workgroup Configuration
Managing and Using MeetMe Conference
Network Configuration Guidelines for VoIP 315
Enterprise VoIP Network Management 323
System Report Management
Microsoft Exchange Integration
Tapi Integration
E1-R2 and E1 Isdn PRI Installations
Required Service Parameters
Technical Support & Product Repair Services
Tools and Applications 387
Troubleshooting
Index
Xii AltiWare 5.1 Administration Manual
About This Manual
Related Publications
AltiWare ACM 5.1 Administration Manual
Overview
Technology Enhancements in Release
SIP Implementation
Multi-Site Enterprise Management AltiEnterprise Manager
Replaces Dina Manager and IP Dialing Table in 5.0A
Voice Processing New Features and Enhancements
Multi-Chassis Gateway Support
Capacity Improvements
PBX Capacity
PBX New Features and Enhancements
Call Center New Features and Enhancements
Client Application New Features and Enhancements
Supervisor Coaching
IP Phone New Features and Enhancements IP600, IP710, IP705
IPTalk Enhancements
AltiAgent
AltiSupervisor
Key System Features
IP PBX Features
Overview
Overview
Automatic Call Distribution Features
Real Time Monitoring
Overview
Auto Attendant AA Features
Voice Mail Features
Internet Integration Features
System and Administration Features
Voice over IP Features
Multi-Site VoIP Management AltiEnterprise Manager
Optional Add-On Software
Overview AltiWare ACM 5.1 Administration Manual
Software Installation & License Registration
For AltiWare Administrator
Minimum System Requirements
Supported Operating Systems
CPU, Memory, and HDD Requirements
For AltiWare 5.1 Client Applications
For Online Help
Number Triton or Quantum Boards per
Preparation for Installation
YES
Upgrade and Migration Path
Upgrading from 5.0A to
Migrating from ACC 5.1 to ACM
About License Keys and the System Key
License Activation and Registration Procedures
Dealer Installation ID
When the System Has an Internet Connection
Click the Proceed to Online Registration button
Software Installation & License Registration
Software Installation & License Registration
Software Installation & License Registration
When the System Has No Internet Connection
Software Installation & License Registration
Software Installation & License Registration
Software Installation & License Registration
Software Installation & License Registration
Installing AltiWare Admin on a Network Client
Uninstalling AltiWare
Troubleshooting Error Messages
Registering Online Without AltiWare Admin
Through Control Panel System
Through Control Panel System Environment Path
Page
Getting Around AltiWare Administrator
Logging In and Out
Changing the Password
AltiWare Administrator Main Window
Services
Main Menu
Quick Access Toolbar
View Windows
Status Bar
Boards View Window
Extension View Window
Boards window
Trunk View Window
Trunk View window
Call Log View Window
Workgroup View Window
Current Resource Statistics Window
Top part of the window
Middle part of the window
Stopping the AltiGen Switching Service
Setting the Refresh Interval
Bottom part of the window
Max Packet Loss Rate-the
Programs Available from the Windows Start Menu
System Configuration
Select System System Configuration
Setting General Parameters
Parameter Description System ID
Country
Timeout, Ring Back
Parameter Description Manager Extension
Distinctive Ring
System Home Area Code
Setting a System Number Plan
Parameter Description Operator Extension
Group Members
Call Supervision
Default Password
Parameter Description
Extension
Number Length
Did Number
Length
Dialed Digit
Translator
Parameter Description First Digit Translator Configuration
Parameter Description Extension Dialed Digit Translator
Change 9 to the Route Access code and configure
First Digit
Assignment
Outcall Routing table
Setting Business Hours
System Configuration, Business Hours tab
Parameter Description Day
Routing Calls on Holidays
Parameter Description AM and PM Schedules
To create a Holiday Profile
Configuring System Speed Dialing
To update the date of annual holidays
To set call routing
System Configuration, System Speed tab
Adding Speed Dial Entries
Defining System Call Restrictions
Editing Speed Dial Entries
Setting Local/Toll Free Area Codes
Blocking Calls to Area Codes from All Extensions
Setting 10-Digit Dialing Area Codes
Locking Attacked Extensions
Blocking All Outgoing Calls
Enabling Hop Off for Tie Trunks
Setting up Call Reports
Creating Account Codes
Adding and Deleting Account Codes
Internal Database Configuration Internal Log Service
System Configuration, Call Reports tab
External Remote Logging of Call Data
Exporting Through a Local Port
Country-Relevant Settings
Setting Toll Call Prefixes
Audio Peripheral Configuration
Setting Emergency Numbers
Configuring Music On Hold and Recorded Announcements
Setting Greeting and Update Prompts
To configure music on hold
Playing Music from a File for Music On Hold
RTP Resource Usage
Configuring Overhead Paging
To play an update prompt every 60 seconds
To configure overhead paging
Check the Play Update Prompt Every 60 Seconds check box
System Configuration
Feature Profiles
System Configuration, Feature Profiles tab
To add a Feature Profile
Session Types
Gateway Management
Multiple AltiGateways connected through a LAN
Managing AltiGateways
System Gateway Management
Setting Parameters
Adding and Attaching a Gateway
To add a gateway to the list
Changing Gateway ID and Password
Detaching and Deleting a Gateway
To attach a gateway to the AltiServ system
To delete a gateway from the Gateway Management window
AltiGateway Configuration Tool
AltiGateway Configuration Tool log-in dialog box
Parameter Description
Gateway Management AltiWare ACM 5.1 Administration Manual
Voice Mail Configuration
Select System Voice Mail Configuration
Managing Messages
Setting Message Notification Retries
Maximum Retry
Count
Retry Interval
Setting Message Management Options
Setting Message Recording Options
Setting E-mail Messaging Options
Creating Distribution Lists
Synchronizing E-mail with Exchange
Postmaster Ext
Synchronize with
Voice Mail Configuration, Voice Mail Distribution List tab
Defining a Distribution List
Page
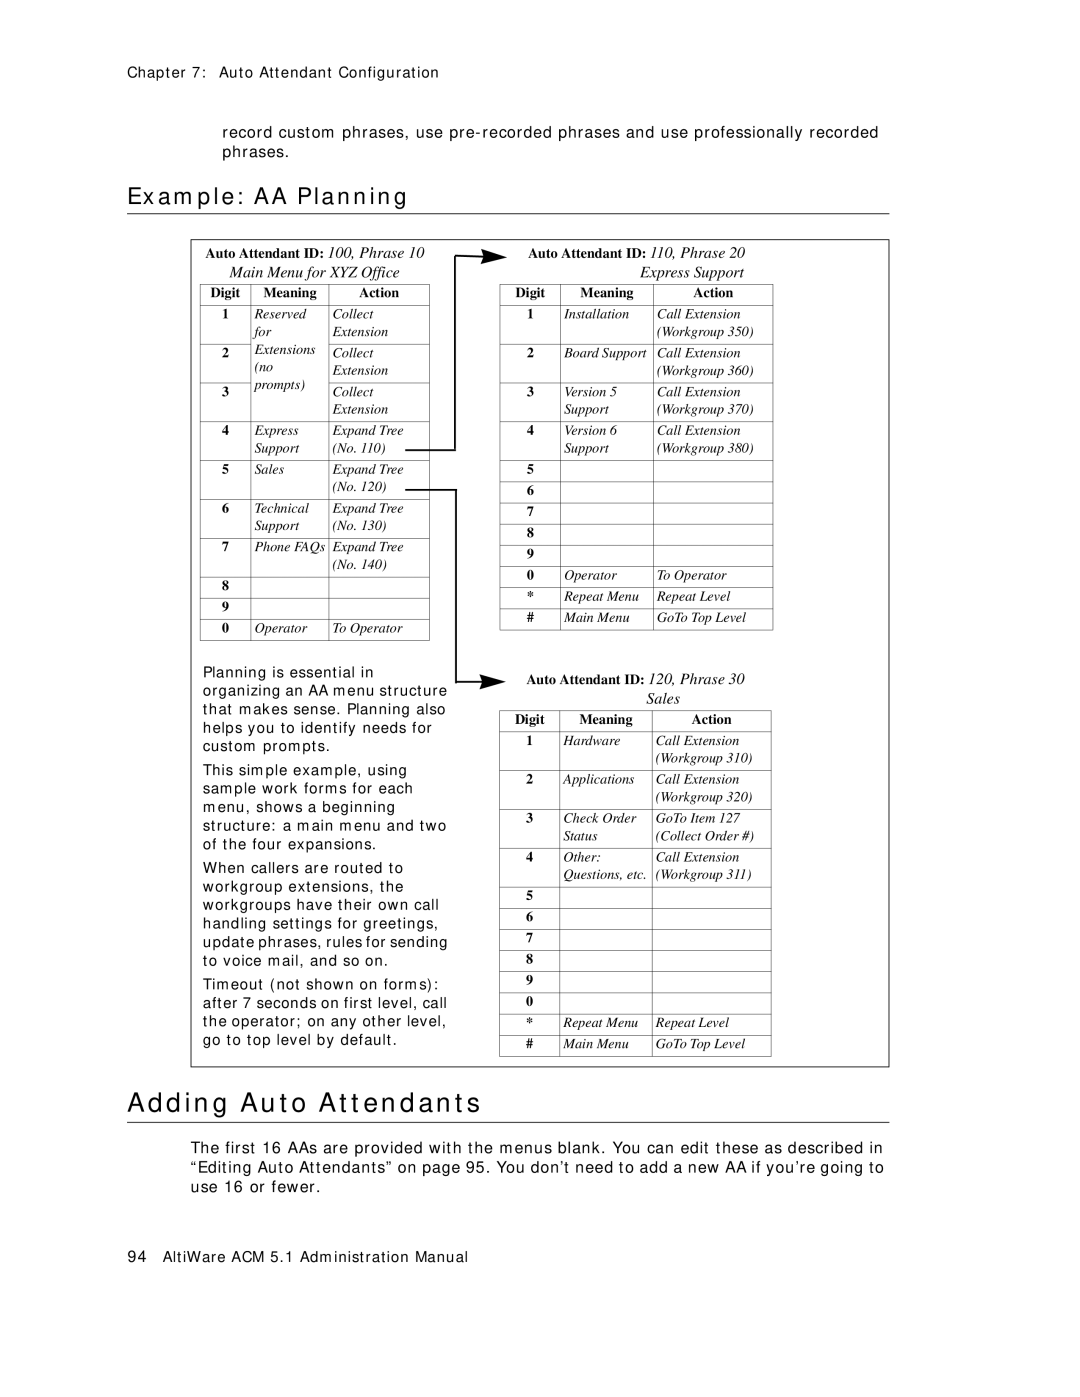
Auto Attendant Configuration
Planning Is Essential
Adding Auto Attendants
Example AA Planning
Editing Auto Attendants
To add an AA beyond the first
Configuring Menu Items
AA window
Action Description
Collecting Digits
To use the Collect Digits action
Collect digits
Using Pre-Recorded Prompts
Phrase Management
Making Auto Attendant Assignments
Phrase #
Using Professionally Recorded Phrases
Recording Custom Phrases from the AltiGen Phone
To record a custom phrase
To install professionally recorded phrases or prompts
Multilingual Configuration
Configuration Overview
Creating Language Phrase Packages
Storing Language Phrase Packages
Configuring for a Multilingual System
To add a language
Select System Multilingual Configuration AA tab
Enabling Multilingual Support in the Auto Attendant
Configuring the Extension
Extension User Can Change Language Setting
To configure feature code #12 for language selection
To enable feature code #12
To assign feature code #12 to an extension
Check the Language Selection Prompt check box
Using Dnis to Set the Language
Select PBX In Call Routing Configuration Dnis Routing tab
Which Language Will Be Used?
Call Recording Configuration
Description of the Recorded File Name
Configuring Call Recording
To Enable and Configure Centralized Recording
Check the Enable Centralized Recording check box
Using a Remote Shared Directory
This invokes the Add Network Place Wizard
Map Network Drive
Click Next. You’ll see the screen below
Add Network Place Wizard Internet/Network Address
Confirmation screen
Call Recording Configuration
Application Extension Configuration
Application Extension Setup
To set up an application extension
Application Failover Plan
Application Information
Readying the Application
Page
Board Configuration
Boards window AltiWare ACM 5.1 Administration Manual
Reset Channel Group button
Board Configuration
Reset Board button
Board Info
Using the Triton Resource Board
Using the Triton MeetMe Conference Board
Configuring the Quantum Board
Configuring the Triton Analog Station Board
Configuring the Triton Analog Trunk LS/GS and LS Boards
Configuring the Triton VoIP Board
Overview
Configuring the Triton T1/E1 Board
Configuring the Board
Configuration
Overview of the Triton T1/E1 Board
T1 and E1 Configuration
Triton T1/E1 Configuration dialog box
Error Message Meaning Action
Reading the Status Messages
Error Meaning
Reading the Statistics
Setting the Configurable Options
Option
Setting up Channels on the Triton T1/E1 Board
T1/E1 Clocking
System Clock Master
T1 PRI Protocol Configuration dialog box top half
Selecting Span Types
E1 PRI Protocol Configuration dialog box top half
Setting the Isdn PRI Switch Mode
AT&T 4ESS PRI AT&T 5ESS PRI
E1 PRI
Configuring an Isdn Numbering Plan
PRI Isdn Numbering Plan dialog box
Setting the NSF
Setting a TEI
Channel Maintenance Message
Setting PRI Calling Numbers
PRI Calling Number Setting
Installing a Channel Service Unit CSU
Troubleshooting T1/E1-Common Symptoms
Configuring Virtual Boards Sipsp and H323SP
Configuring the Sipsp Board
Configuring the H323SP Board
H323 Configuration
Configuring the MAX Board
Configuring the Virtual MobileExt Board
MAX Board Configuration window
Board Configuration AltiWare ACM 5.1 Administration Manual
Trunk Configuration
Trunks Out of Service
Channel Identification
Opening the Trunk Configuration Window
Select PBX Trunk Configuration
Trunk Configuration, General tab
Selecting Trunks to Set Attributes
Configuring One or Multiple Trunks
Setting General Trunk Attributes
Trunk Dialing Scheme-Overlap or En-bloc dialing
Trunk Configuration
Trunk Configuration
H323 Tie Trunk Properties
SIP Tie Trunk Properties
Configuring a SIP Trunk
SIP Trunk Properties
SIP Trunk Configuration dialog box opens
Parameter Description T1 robbed-bit signaling Protocol
Dialing Delay
Wink Start default
Triton T1/E1 Trunk Properties
Max. seconds
Before the first
Digit
Between digits
Caller ID and did Incoming Sequence Example
Sample Incoming Sequence window
Triton Analog Trunk GS/LS Properties
Parameter Description Interface Type
Loop Start Trunk
Ground Start Trunk
Enable Dial Tone
Parameter Description Incoming Ring
Caller ID Receiving
Centrex Flash
Parameter Description Tone Disconnect
Receiver
Transmission Gain
Using the Match Impedance Button
Performing Impedance Match on Your Own
Rx Level at 600 Ohms
Clicking the Test Rx Level button. See Test Rx Level
Measuring the Rx Level of a Trunk Channel
Match Result Button
If You Need to Improve the Rx Level
If You Don’t Have the Milli-Watt Test Number
Set the Timeout to Repeat Current Level
Setting trunk In Call Routing to an AA
Trunk Configuration
Quantum Trunk General Configuration
Quantum Trunk Properties
Loop Start
Ground Start
Receive from CO
DB Gain
Parameter Description Transmit to CO
Incoming Call Routing
Regular Trunk Calls
Web IP Calls
Trunk Configuration, Out Call Blocking tab
Outgoing Call Blocking
Trunk Configuration AltiWare ACM 5.1 Administration Manual
Call Routing Configuration
Step Routing Process
Caller ID Routing
Adding and Deleting Caller ID Route Entries
Dnis Routing
Defining Caller ID Routing
Adding and Deleting Dnis Route Entries
Defining Dnis Routing
Call Routing Configuration
Page
Out Call Routing Configuration
Using the trunk access code
Using the route access code
Configuring Out Call Routing
Working with Route Definitions
Setting Default Routes
To create a route
To delete a route
Out Call Routing Configuration, Default Routes tab
Working on Dialing Patterns
To create a dialing pattern
To delete a dialing pattern
Dialing pattern configuration tips
Configuration Example Solving 10-digit Dialing
Out Call Routing Configuration
Resolving Dialing Delay for Non-USA/Canada Countries
Out Call Routing Configuration
Page
Extension Configuration
Select PBX Extension Configuration
Setting up Extensions
About the Apply To Button
To add an extension
Type in an Extension Number
Setting Personal Information
Numbers Letters
Forced Account Code
Personal Call Recording Options
Physical Location and Type
Changing the Type
Setting the Line Properties
Assigning a Location to a Physical Extension
Changing the Location
Quantum Line Properties
Triton Analog Station Line Properties
Caller ID Signal
Signal Type None
Format
Message Waiting
IP Extension Configuration
Phone Display Options
Configuring Group Options for an Extension
To configure group options for an individual extension
Alti-IP 600 and IP 705 Phone Display Notes
Setting Wrap-up Time
Adding or Removing Group Assignments
To set the extension wrap-up time
Check the Allow Workgroup Wrap Up Time check box
Setting up Station Speed Dialing
Setting Inter Call Delay
Picking Up a Call from the Workgroup Queue
Logging Outbound Workgroup Calls
Setting the Mailbox Options
To add or edit an entry
Setting an Information-Only Mailbox
SMTP/POP3 Setting
Disabling a Mailbox
Synchronizing with Exchange Server
Setting Message Playback Options
Mail Forwarding Options
Press 0 Option
Setting Message Notification Options
Setting Mailbox Capacities
Setting the Message Types for Notification
Emergency Notification
Unusual VM Activity Notification
Urgent Voice Messages Only All Voice Messages
Setting Parameters for Unusual VM Activity
Where Security Alerts Are Logged
Adding security values to the registry
Setting the Type of Notification
Setting Notification Timing
Outcall to Cellular or PCS Phone Numbers
Setting Notification Business Hours
Enabling Message Notification
Configuring Calling Restrictions
Setting Call Restriction Options
No Restrictions on Outcalls
Setting Answering Options
Setting Other Call Restrictions
Forwarding All Calls
One Hop Limit to Call Forwarding for a Transferred Call
Hop Limit to Call Forwarding for Direct Calls
To Voice Mail
Do Not Disturb
To the Operator
Setting Call Waiting Options
Handling Busy Calls
Handling Unanswered Calls
Forward to Voice Mail
Configuring One Number Access
Enabling One Number Access
One Number Access Options
Disabling One Number Access
Setting Caller ID Verification
Using a Password Verification
Call Screening
Specifying Forwarding Numbers
Setting Up Monitor Lists
Configuring a Monitor List
Restrictions and Defaults
To add members to the list
To remove members
Click Remove
Page
Setting Up IP Extensions
Concept of signaling and media channels
Signaling and media channel between two IP phones
Setting Up IP Extensions
Setting Up IP Extensions
Setting an IP Extension
Setting VoIP Codec for IP Extension
For local IP phone deployment
For remote IP phone deployment
Page
AltiGen IP Phone Configuration
Parameter Description General
Debug
Check the Reset IP Phone and Boot Download check boxes
Setting
Registry Keep-Alive Duration-Indicates how often a SIP
AltiGen IP Phone Configuration
Parameter Description Program
Mable
Keys
Workgroup
Apply To Button
Copy From Button
Mobile Extension Configuration
Setting Up a Mobile Extension
To set up a Mobile Extension Board
Add/Remove Mobile Trunks dialog box appears
To set up a mobile extension
Boards window with virtual MobileExt board displayed
ExtensionAnywhere Configuration MobileExt dialog box opens
ExtensionAnywhere Configuration MobileExt dialog box
Mobile Trunk Allocation-select either Shared or Dedicated
Mobile Trunks dialog box
Mobile Extension Board Configuration dialog box
Voice Mail for Mobile Extensions
Mobile Extension Limitations
Page
Hunt Group Configuration
Overview of Huntgroup Configuration Window
Setting Up Huntgroups
Establishing Basic Hunt Group Attributes
To add a hunt group
To set Group Information, type in the following
Setting Call Restrictions
Establishing Hunt Group Membership
To add extensions to a hunt group
Setting Hunt Group Mail Management
Setting Login Status for System Restart
To remove extensions from a hunt group
Setting E-mail Options
Huntgroup Configuration, Mail Management tab
Setting Mailbox Playback Options
Huntgroup Configuration, Notification tab
Setting the Type of Notification
Setting Call Handling Options
Forwarding options are as follows
Setting a Hunt Group’s Call Distribution Rule
Handling Calls when Group Members Are RNA/Logged Out
Setting Queue Management Options
Huntgroup Configuration, Queue Management tab
Paging Group Configuration
To configure paging, select PBX Paging Group Configuration
To set up a Paging Group
Paging Group Configuration window
To add members to a Paging Group
To remove members assigned to a Paging Group
Page
Line Park Configuration
To set up a Line Park Group
Line Park Configuration window
To delete a Line Park Group
Page
Workgroup Configuration
System Features
Workgroup Functionalities
Agent’s Phone Operation
Agent Desktop Application AltiAgent
Supervisor’s Phone Operation
Supervisor’s Desktop Application AltiSupervisor
Activity Logging and Reporting
Creating and Configuring Workgroups
Overview of Workgroup Configuration Window
Setting Up Workgroups
Establishing Basic Workgroup Attributes
To create a workgroup
Service Level Threshold
Workgroup Recording Options
Method Options section, select one of the following
Establishing Workgroup Membership
Workgroup Configuration, Group Member tab
To add extensions to a workgroup
To remove extensions from a workgroup
Skill Level dialog box
Workgroup Configuration, Business Hours tab
Business Hour
Setting Up Skill Based Routing
Parameter Description After Hours
Non-Workday
Handling
Workgroup Configuration, Skill Based Routing tab
Setting Rules for Skill Based Routing
To define a skill for a workgroup
To set skill-based routing rules
Exact Match Sklr of Incoming Call
Examples
Equal or Higher than Sklr of Incoming Call
Setting Workgroup Mail Management
Workgroup Configuration, Mail Management tab
Setting Mailbox Playback Options
Voice Mail Access Option
Workgroup Configuration, Notification tab
Setting the Type of Notification
Setting Call Handling Options
Workgroup Configuration, Call Handling tab
Group Voice Mail
Set RNA Agent Auto Logout Check Box
Setting IntraGroup Call Distribution
Number of Rings Before Handling
Set RNA Agent Not Ready Check Box
Enable Single Call Handling for Agents
Announce Agent Info
Queue Management Basic
Inter Workgroup Call Distribution
Setting Queue Phrase Options
Queue Announcement
Expected Wait Time Sampling
Queue Overflow Forwarding
To set options for handling queue overflow
Quit Queue Option
Priority Promotion
Supervisor Queue Control
Voice Mail
Queue Management Advanced
Announcement
Use Default System Phrases Queue Position Expected Wait Time
Menu Selection
Queue Overflow
No Action Disconnect
Application Extension Queue Control
Agent Logout Reason Codes
Agent Logout Reason Configuration window
Managing and Using MeetMe Conference
MeetMe Conference Features
Hardware requirements
Setting the MeetMe Conference Extension
MeetMe Conference Window
Select PBX MeetMe Conference Management
Working in the MeetMe Conference Window
Using the Calendar Button
Creating a Meeting
One Time Only Meeting
Weekly Meeting
Monthly Meeting
Mailing a Meeting Invitation
Modifying the E-mail Template
Starting and Stopping a Meeting
Continuing a Meeting Beyond Its Duration Time
Joining a Meeting
Page
Network Configuration Guidelines for VoIP
ISP/Intranet Quality of Service QoS
WAN Bandwidth
WAN Router Configuration
Firewall Configuration
Network Using NAT
Network Configuration Guidelines for AltiGen IP Phones
Configuration Guidelines for NAT
Private Network Configuration Example
Setup
For the Remote IP Phone Using NAT
For the Corporate LAN
VPN Network Configuration Example
For an H.323 IP Call from Another AltiWare on the Internet
For the Branch office LAN
Router 1s Setting
Local Secure Group
Remote Secure Group
Remote Security Gateway
Router 2s Setting
Router 2s public IP address should be a fixed IP address
Page
Enterprise VoIP Network Management
Understanding VoIP Bandwidth Requirements
User name Password Login Domain Via Server
DomainAdmin gives you
Opening AltiEnterprise Manager
Configure Global Least Cost Routing
Setting VoIP Codec Profiles
Changing the AltiEnterprise Manager Password
Configuration Buttons
Tabs Displayed with the Servers Button
Codec profile setting window in AltiEnterprise Manager
Codec Profile Table
Codec
711/G.723/G.729
Silence Suppression
Assigning Codec Profiles to IP Addresses
RTP Packet
Length ms
To add IP addresses and address ranges and assign a codec
Defining IP Networks
Defining Your Network
Configuring a Public or Intranet Pipe
To define an address range
Configuring AltiServ Behind NAT
Configuration example
Defining the IP Dialing Table
Implementation details
IP Dialing Table tab in AltiEnterprise Manager
Server ID
Server Name
Server IP Address
Remote Ext. Length
Multi-site VoIP Domain
Creating a Multi-site VoIP Domain
Publish as a global
Entry
Check the Allow this server to be added to domain check box
Click Create domain and join as master. a dialog box opens
Declaring Additional Servers for the VoIP Domain
Working with Servers in the Domain
Domain Name
Server ID Length
Global Server
Adding a Server to a VoIP Domain
Changing the Server ID Length
To add a server to a VoIP domain
Parameter Definition
Rejoining a Server to the VoIP Domain
Managing Domain Users
Rejoin
Scope of an Extension in the VoIP Domain
System a Ext Domain Master System B System C
Global
Changing an Extension’s Scope from Local to Global
Ext System a System B System C Scope
Local
Conflict
Changing an Extension’s Scope from Global to Local
Situation 1 One Global and no conflict
Situation 2 One or more Global with conflict
Ext System a System B System C
Relocating a Global Extension
Click Relocate
Configuring Global Least Cost Routing
To configure Global Least Cost Routing
Click the Global LCR Button
When Information May Be Out of Sync
System Report Management
System Summary Report
IP Cumulative Traffic Statistics
Resetting Cumulative Statistics
Parameter Description Packets Lost
Average Jitter
Page
Microsoft Exchange Integration
Requirements
Windows Services window
To verify requirements, do the following, as necessary
Under Log on as, select This account, and set
Exchange Server Configuration
Active Directory Users and Computers Window
Exchange System Manager Configuration
Go to Start Programs Microsoft Exchange System Manager
Go to the Security tab and click Add
Microsoft Exchange Integration
Microsoft Exchange Integration
Installing Outlook 2000/2003 Client on the AltiWare System
To install Outlook 2000 to Corporate or Workgroup mode
Go to Start Control Panel Mail. Click the Mail Setup tab
Outlook setup, Exchange Server Name and Mailbox
Select the Microsoft Exchange Server option, then click Next
To check the Outlook 2000 mode
Mail Accounts Window
Outlook Options
To configure an Outlook 2000 profile
Outlook Services
To test the configuration
Enabling the Exchange Server
Mail account configuration in Exchange Administrator
Enable Exchange Integration in AltiWare Admin
Testing the Exchange Server Setup
Troubleshooting Tips
To troubleshoot or double-check the server configuration
To check profiles
To delete old profiles
Application Settings group
To gather trace files
Page
Installing the Tapi Proxy Server
To install AltiGen Tapi Proxy Server on the server
Tapi Integration
Setting Up the Client
Install the AltiGen Tapi Service Provider on the Client
Set Up Phone and Modem Options
Go to Start Settings Control Panel Phone and Modem Options
Configuring phone and modem options
Set Up Phone Dialer
Preferred line for calling section, select Phone
Testing Tapi Service Provider on the Client System
Making a Call in Microsoft Outlook
Tapi Integration
Changing Tapi Configuration Parameters
To change Tapi Configuration Parameters
Windows, go to Control Panel Phone and Modem Options
Tapi Integration AltiWare ACM 5.1 Administration Manual
Tools and Applications
AltiGen Board Test
Programs AltiWare ACC/ACM Under Gateway Tools
Under Utilities
Backup and Restore Utility
CT-Bus Test Tool
To run the CT-Bus Test Tool
Scheduling Backups
Backing Up Files
To back up files
To set backup schedules
To restore backed up files
Restoring Backed up Files
AltiWare Admin & Extension Security Checker
AltiWare Admin & Extension Security Checker
Checking Extension Security
To check extension security
Start & Stop All AltiGen Services
Trace Collector
Following describes the fields in the Trace Collector
Main AltiWare Trace \AltiServ\log
System Configuration Data
Service Provider Log Dump
IP Phone Dump
Stand-alone AltiGateway Trace
Limitations
Voice File Converter
To use the Voice File Converter
Read Config
To use Configuration Reader
Work/Hunt Group Converter
Work/Hunt Group Converter
Tools and Applications
AltiWare ACM 5.1 Administration Manual
E1-R2 and E1 Isdn PRI Installations
E1 R2 CAS Installation
Change the Configure Type to E1
Physical Layer
Signaling Layer
Country Signaling Values
Set calling part category
Incoming sequence DID/DNIS
China MFC-R2
Ecuador MFC-R2
Mexico / Teléfonos de
MFC-R2
Venezuela / Nacional
Colombia MFC-R2
Ecuador MFC-LME
MFC-R2
E1 Isdn PRI Installation
Physical Layer
Data Link layer
Channel Maintenance
Country Protocol Supported Message Setting
Required Service Parameters
Service Parameters/Request Information for T1
Equipment Information
Technical Information for T1 with Voice
Type of Registered Services Provided
Service Order Code
T1 Channel Assignment
CSU/DSU Requirements
Service Parameters/Request Information for PRI
Switch Type
Technical Information for PRI with Voice
PRI Channel Assignment
Service Parameters/Request Information for E1
Technical Information for E1 with Voice
E1 Channel Assignment
Network Ports
For external VoIP connection through a firewall
Gateway ID =
Remote IP Phones Behind NAT
Gateway ID=n
To connect the following applications through a Firewall
TCP
Page
Technical Support & Product Repair Services
How To Reach AltiGen Technical Support
Technical Support
Technical Training for Administrators
Product Repair
Who should attend?
What do the courses cover?
How can I register or where can I get more information?
Page
Troubleshooting
Troubleshooting VoIP-Common Symptoms and Solutions
Poor Voice Quality
Cannot Make a Connection
IP Resource Does Not Appear in Current Resource Statistics
Index
Dnis
Master
MAX
ONA
Page
T1/PRI