RealPresence Collaboration Server RMX
Version 8.5 January 2015 3725-74300-000B
Page
Contents
Defining AVC-Based Conference Profiles
108
Sharing Content During Conferences
Defining SVC and Mixed CP and SVC Conference Profiles
Customized Content Rate 135
131
132
135
Setting Conferences for Telepresence Mode AVC CP
Implementing Media Encryption for Secured Conferencing
Additional Conferencing Information
Defining Cascading Conferences
239
Meeting Rooms
Entry Queues, Ad Hoc Conferences and SIP Factories
Address Book
Scheduling Reservations
Operator Assistance & Participant Move
Using Audible Alarms 349
Conference Templates
Start a Conference
349
Conference and Participant Monitoring
Conference and Participant Level Operations
Polycom Conferencing for Microsoft Outlook
Recording and Streaming Conferences
Users, Connections, and Notes
IP Network Services
Network Security 532
Defining ISDN/PSTN Network Services 522
Modifying an ISDN/PSTN Network Service 530
IVR Services 566
Call Detail Record CDR Utility
Gateway Calls
Starting the RMX Web Client
RMX Manager Application 651
Use the RMX Web Client 677
Administration and Utilities
Customizing the Multilingual Setting 734
714
716
717
System Configuration Flags 762
Ultra Secure Mode 812
Polycom, Inc Xxiii
Collaboration Server Hardware Monitoring
Appendix a Disconnection Causes 891
Restoring Defaults
Appendix H Deployment Into Microsoft Environments
Appendix I Polycom Open Collaboration Network Pocn
Multipoint Calls using DMA 1039
1023
1035
1036
Appendix M Homologation for Brazil
Appendix J Restore Defaults
Appendix K SIP RFC Support Appendix L Media Traffic Shaping
Overview
Administration menu
Who Should Read This Guide?
How This Guide is Organized
Prerequisites
About the RealPresence Collaboration Server System
Network Services Guidelines
IP Networks
Isdn Networks
Card Configuration Modes
Viewing the Card Configuration Mode
Features Supported with MPMRx Cards
Differences Between MPMx and MPMRx Media Cards
General RealPresence Collaboration Server Supported Features
Support for Microsoft Protocols, algorithms and workflows
Software Prerequisites and Guidelines
1500/1800/2000/4000 Getting Started Guide
Continuous Presence CP Conferencing
Conferencing Modes Overview
AVC Conferencing
AVC Continuous Presence CP video streams and built layouts
Video Switching VSW Conferencing
Video Protocol Support in CP Conferences
Video Switching VSW Conferencing Guidelines
AVC Video Switching VSW video streams and Full Screen Layout
Up to 2Mbps 160 130 320 260 4Mbps 6Mbps 100 200
Video resolution
AVC Basic Conferencing Parameters
Supplemental Conferencing Features
SVC-based Conferencing
SVC video streams and Layouts
SVC Conferencing Guidelines
Advantages of SVC Conferencing
Fecc
MCU Supported Resolutions for SVC Conferencing
Mixed CP and SVC Conferencing
MCU Resource Capacities for Mixed CP and SVC Conferences
Conferencing Modes Overview
Using Conference Profiles
Conferencing Parameters Defined in a Profile
Conferencing Feature
Conferencing Capabilities in the Various Conferencing Modes
Conference Type
IVR
MCU
Default Profile Settings in CP Conferencing Mode
Default CP Only Conference Profile Settings Value
Echo Suppression
Default Profile Settings in SVC Only Conferencing Mode
Default SVC Only Conference Profile Settings Value
Name Meeting Rooms
Entry Queue
Default SVC Only Conference Profile Settings Value
Default settings are as follows
Default Mixed CP and SVC Conference Profile Settings Value
Viewing the List of Conference Profiles
Name
To list Conference Profiles
RMX Management pane, expand the Rarely Used list
RMX Management pane, click the Conference Profiles button
Conference Profiles Pane Columns Field Description
To modify the Profile properties
Modifying an Existing Profile
Profiles Toolbar
Deleting a Conference Profile
Defining New Profiles
To delete a Conference Profile
To define a new Profile
Exporting and Importing Conference Profiles
Guidelines for Exporting and Importing Conference Profiles
Exporting Conference Profiles
Exporting All Conference Profiles from an MCU
Exporting Selected Conference Profiles
To export selected Conference Profiles
Importing Conference Profiles
To import Conference Profiles
Using Conference Profiles
Defining AVC-Based Conference Profiles
Defining AVC CP Conferencing Profiles
To define a new CP Profile
RMX Management pane, click Conference Profiles
Defining AVC-Based Conference Profiles
New AVC CP Profile General Parameters
Field/Option Description
Profile Support in Video Switching Conferences
Define the following parameters
Click the Advanced tab
New Profile Advanced dialog box opens
New AVC CP Profile Advanced Parameters
Resource Optimized
Video Quality Optimized
For CP Conferences only Click the Gathering Settings tab
Defining New Profiles
New AVC CP Profile Gathering Settings Parameters
Click the Video Quality tab
New Profile Video Quality dialog box opens
Resolution Configuration dialog box
New AVC CP Profile Video Quality Parameters
HD720
HD1080
Information, see Multiple Content Resolutions
Cascade Optimized
263
263 & H.264 Auto Selection
SVC
Video layout
Manual
Defining AVC-Based Conference Profiles
12+
Page
Defining AVC-Based Conference Profiles
Connection to improve call clarity
New AVC CP Profile Audio Settings Parameters
Participants pane
For more details, see Automatic Muting of Noisy Endpoints
New AVC CP Profile IVR Parameters Field/Option Description
New Profile Recording dialog box opens
New AVC CP Profile IVR Parameters
Video/Voice Port Configuration MPMx
New AVC CP Profile Recording Parameters Description
New AVC CP Profile Site Names Parameters
Click the Site Names tab
New Profile Site Names dialog box opens
New AVC CP Profile Site Names Parameters Field Description
Selection Site Names Position
Top RightTop LeftMiddle RightMiddle
Position sliders
Position adjustments using
Horizontal and Vertical
New AVC CP Profile Site Names Parameters
Define the following fields
Defining AVC-Based Conference Profiles
Service Name
Click the Layout Indications tab
Disableselfnetworkind Selfindlocation
Additional Information for Setting CP Profiles
Gathering Phase
Gathering Phase Guidelines
Gathering Phase Duration
Partygatheringdurationseconds Range 0 3600 seconds
Enabling the Gathering Phase Display
Overlay Layouts
Guidelines for using the Overlay Layouts
Selecting the Overlay Layouts
Site Names Definition
Shorten the Site Name Display
Guidelines
Site Names Display Position
Defining AVC-Based Conference Profiles
Same Layout mode
Send Text Message to Participant dialog box is displayed
Select the Enable check box
Click the Message Overlay tab
To cancel the Message Overlay display
Selecting the Chinese Font for Text Display
Selecting the Chinese Font
To send text to selected participants
Defining AVC-Based Conference Profiles
Defining an AVC Video Switching Conference Profile
To Create a Video Switching Profile
Define the New Profile General parameters
New AVC VSW Profile General Parameters
CIF
High Profile Support in Video Switching Conferences
Minimum Threshold Line Rate System Flags
Guidelines
Vswcifhpthresholdbitrate Vswsdhpthresholdbitrate
Defining AVC-Based Conference Profiles
By default, the Conferencing Mode is set to CP
Defining SVC and Mixed CP and SVC Conference Profiles
Defining SVC Conference Profiles
To define SVC Only Profile
New SVC Profile General Parameters Field/Option Description
New Profile Advanced dialog box opens
Define the following supported parameters
New SVC Profile Advanced Parameters Field/Option Description
New Profile Video Quality dialog box opens
Use this option when most of the endpoints support H.263
Click the Video Settings tab
Click the Audio Settings tab
Click the IVR tab
PCM
New SVC Profile IVR Parameters Field/Option Description
Polycom, Inc 106
New SVC Profile Network Services Parameters
Parameter Description
To configure a mixed AVC and SVC conference
Defining Mixed CP and SVC Conferencing Profiles
Polycom, Inc 109
Video Resolutions in AVC CP Conferencing
Video Display with CIF, SD and HD Video Connections
High Profile Support in CP Conferences
High Profile Guidelines
HD1080p60 Resolution Guidelines
With Video Quality mode set to Motion
CP Resolution Decision Matrix
CP Conferencing with H.263 4CIF
263 4CIF Guidelines
Qcif CIF
Resource-Quality Balanced default
Video Resource Usage
Resource Optimized
Video Quality Optimized
HD1080p30
HD720p60
HD720p30
CIF
Resolution Configuration for CP Conferences
Modifying the Resolution Configuration
Maximum Negotiated Line Rate for Resolutions
Guidelines
Resolution Configuration
Resolution Configuration Basic
Maximum CP Resolution Pane
Resolution Configuration Pane
Limiting Maximum Resolution
Sharpness and Motion
Resolution Configuration Detailed
Sharpness Resolution sliders Motion Resolution sliders
Resolution Configuration Sliders
Sharpness mode Motion mode
Polycom, Inc 122
Flag Settings
Setting the Maximum CP Resolution for Conferencing
Additional Video Resolutions
Minimum Frame Rate Threshold for SD Resolution
W448p Resolution
SIP
Enabling Support of the w448p Resolution
Content
Packet Loss Compensation
Isdn
Additional Intermediate Video Resolutions
Collaboration Server System Flag Settings
Sharing Content During Conferences
Content Control Protocols
Guidelines for Controlling Content
Supported Content Control Protocols
Guidelines for Using SIP Bfcp Content
Content Sharing Using H.239 Protocol
Content Sharing Using Bfcp Protocol
Content Sharing Using People+Content Protocol
Dial-out System Flags
Bfcp support in dial-in Connections
UDP and TCP
MPMRx MPMx Base profile High profile
Content Media Protocols
AVC non-TIP conferences Content RMX 1500/2000/4000 Profile
Highest Common
Content Transmission Methods
Content Video Switching
Fixed Rate
Multiple Content Resolutions
Highest Common Calculation Depending on Content Settings
Page
Content Settings
MCU Usage Modes of Content Protocols
Customized Content Rate
263 263 & H.264 Auto Selection Cascade Optimized 264 HD
Content Sharing Properties
263
263 & H.264 Auto Selection
Cascade Optimized
Guidelines for Sharing Content Using H.264 HD
HD System Flags Content Settings Flag Name Range Default
H264HDGRAPHICSMINCONTENTRATE
H264HDHIGHRESMINCONTENTRATE
Sending Content to Legacy Endpoints
Content Sharing Related Issues
Sharing Content in Cascaded Environments
Sending Content to Legacy Endpoints in Telepresence Mode
Guidelines for Sending Content to Legacy Endpoints
Content Display on Legacy Endpoints
Exclusive Content Mode
Guidelines for Sharing Content in Exclusive Content Mode
Forcing Other Content Capabilities
Managing Noisy Content Connections
Useful Procedures in Content Sharing
Defining Content Sharing Parameters for a Conference
To set the content sharing parameters
Content sharing Options Field Description
Content sharing Options
Non-TIP Conferences
Cascade Optimized Content Sharing
Content Settings list, select Customized Content Rate
Selecting a Customized Content Rate
To Select the Customized Content Rate
Sharing Content in Multiple Content Resolutions Mode
To enable Multiple Content Resolutions
To give token ownership
Giving and Canceling Token Ownership AVC Participants
Select Change To Content Token Owner in the drop-down menu
To end the current Content session
Stopping a Content Session
To cancel token ownership
Content Sharing Reference Tables
Resolutions and Content Rate Reference Tables
Content Rate Table
Settings
Resolution per Content Rate Tables
For RMX1800-0, maximum content resolution is HD1080p30
Highest Common Content Rates Tables
Highest Common Content Bit Rate for H.264 Base Profile
Highest Common Content Bit Rate for H.264 High Profile
Cascade Optimized Fixed Content Rates Tables
Cascade Optimized Content Bit Rate for H.264 Base Profile
Cascade Optimized Content Bit Rate for H.264 High Profile
Implementing Media Encryption for Secured Conferencing
Media Encryption Guidelines
Implementing Media Encryption for Secured Conferencing
Direct Connection to the Conference
Connection to the Entry Queue
Media encryption is enabled at three levels
Profile Setting
Enabling Media Encryption for a Conference
Recording Link Encryption
Setting the Encryption Flags
To enable encryption at the conference level
Enabling Encryption in the Profile
To modify the Encryption flags
Enabling Encryption at the Participant Level
To enable encryption at the participant level
Monitoring the Encryption Status
Polycom, Inc 163
Setting Conferences for Telepresence Mode AVC CP
Collaboration Server Telepresence Mode Guidelines
Participants using two RealPresence RPX HD 400 Room Systems
System Level
Automatic Detection of Immersive Telepresence ITP Sites
Horizontal Striping
Gathering Phase with ITP Room Systems
Cropping
Aspect ratio for standard endpoints
Skins and Frames
10+
Polycom, Inc 168
Room Switch Telepresence Layouts
Telepresence Display Decision Matrix
Polycom, Inc 170
Speaker Priority in CP Video Layouts
Reserved Screens
Grid Screens
Video Layout Examples
Polycom, Inc 172
Polycom, Inc 173
AVC endpoints only
Telepresence Mode License
Selecting Speaker Priority
Polycom, Inc 175
Enabling Telepresence Mode
Manual
Monitoring Telepresence Mode
Monitoring Ongoing Conferences
Monitoring Participant Properties
None
Polycom, Inc 180
Enabling and Using Multiple Cascade Links
RMX Telepresence Layout Mode Continuous Presence figure
RMX Telepresence Layout Mode Room Switch
RMX Telepresence Layout Mode Continuous Presence
Creating a Link Participant
Link Participant in the Dial Out RMX
For more information see
To create a Link Participant in the dial-out RMX
Participant Link in the Dial In RMX
An Undefined Participant Link
Defined Participant Link
Monitoring Multiple Cascade Links
Disconnection Causes
Polycom, Inc 187
Video Preview Guidelines
Additional Conferencing Information
Video Preview
Testing your Workstation
Workstation Requirements to Display Video Preview
To preview the participant video
DirectX Diagnostic Tool dialog box opens
Previewing the Participant Video
Additional Conferencing Information
Guidelines for Using Auto Scan and Customized Polling
To enable Auto Scan
Auto Scan and Customized Polling in Video Layout
Enabling the Auto Scan and Customized Polling
Customized Polling dialog box is displayed
Customized Polling
To define the scanning order in the Customized Polling tab
Customized Polling Dialog Box Command Buttons Description
Packet Loss
Lost Packet Recovery
Packet Loss Compensation LPR and DBA
Enabling Lost Packet Recovery
Monitoring Lost Packet Recovery
Polycom, Inc 198
Network Quality Levels
Layout Indications
Network Quality Indication
Indication Threshold Values
Displaying the Network Quality icons
Customizing the Network Quality Icon Display
Network Quality Icon Indication Threshold Flags Description
Disable the display of the Network Quality icon
Default no
Disable the display of Network Quality icons displayed
Default YES
Recording Indications
Audio Participants Indication
Recording
Recording Paused
Layout Indications Icon Display Positions
Polycom, Inc 204
Selecting the Conference Lecturer
Lecture Mode
Enabling Lecture Mode
To automatically select a defined participant
To automatically select the lecturer
Enabling the Automatic Switching
Lecture Mode Monitoring
To control the Lecture Mode during an Ongoing Conference
Restricting Content Broadcast to Lecturer
When enabled, the following rules apply
Muting Participants Except the Lecturer
Enabling the Mute Participants Except Lecturer Option
SIP Encryption
Audio Algorithm Support
Audio Algorithm Support Guidelines
Mono
Supported Audio Algorithm vs Bitrate Minimum Bitrate kbps
Audio algorithms supported for Isdn
Stereo
722.1 16K 722 48K 722 56K 722 64K
Monitoring Participant Audio Properties
To view the participant’s properties during a conference
Automatic Muting of Noisy Endpoints
Guidelines for Automatically Muting Noisy Endpoints
YES
Automatic Muting of Noisy Endpoints
Automatic Muting of Noisy Endpoints at the Conference Level
To modify the system flag setting
Automatic Muting of Noisy Endpoints at the MCU Level
Permanent Conference
Enabling a Permanent Conference
Closed Captions
Closed Captions Guidelines
To change the flag value
New Flag field enter Enableclosedcaption
Enabling Closed Captions
Cascading Link Properties
Setting the Video Layout in Cascading conferences
Defining Cascading Conferences
Defining Cascading Conferences
Flags Controlling Cascading Layouts
Dtmf Forwarding
Play Tone Upon Cascading Link Connection
Possible Cascading Topologies
Basic Cascading
Basic Cascading Using IP Cascaded Link
Dialing Directly to a Conference
Dialing to an Entry Queue
Basic Cascading Topology IP Cascading Link
Basic Cascading Using Isdn Cascaded Link
Automatic Identification of the Cascading Link
Gateway to Gateway Topology
Gateway to MCU/ MCU to Gateway Topology
MCU to MCU
Cascading Between Two MCUs Using an Isdn Link
Gateway to Gateway Calls via Isdn Cascading Link
Gateway to MCU Calls via Isdn Cascading Link
For example
MCU to MCU Calls via Isdn Cascading Link
Polycom, Inc 234
Conference Profile Definition
LPR
MCU Interoperability Table
Defining Cascading Conferences
Suppression of Dtmf Forwarding
System Flag Settings
Command box, enter H239OlcPatch
Star Cascading Topology
Master-Slave Cascading
Master-Slave Star Cascading Topology
MGC VSW HD
To define the dial-out cascade participant link
Conferences pane, select the conference
New Participant Dial-out Cascade Link Field Description
Enablecascadedlinktojoinwithoutpassword flag to YES
New Participant Dial-out Cascade Link
To define a Dial-in Participant as the cascade link
New Participant Dial-in Cascade Link Field Description
If a gatekeeper is not used Select E.164 digits 0-9, *, #
If a gatekeeper is used This field is left empty
If a gatekeeper is used H.323 ID
Cascaded Conferences Star Topology
Cascading via Entry Queue
Enabling Cascading
Creating the Cascade-enabled Entry Queue
To Define a Cascade-Enabled Entry Queue
Creating the Dial-out Cascaded Link
To define the Dial-out Cascaded Link
Click OK New Entry Queue enabling cascading is created
Name field, enter a participant name
Method a
Method B
Enabling Cascaded Conferences without Password
To enable cascaded links to connect without a password
Set the Enablecascadedlinktojoinwithoutpassword flag to YES
Monitoring Star Cascaded Conferences
Polycom, Inc 251
Cascading Conferences H.239-enabled MIH Topology
Advanced tab, in the Node Type field, select MCU Click OK
Cascading Topologies
MIH Cascade a Sample 3-Level Cascading Configuration
MIH Cascading Levels
MIH Cascade Levels
MIH Cascading Guidelines in CP Licensing
Master Slave Conferences
Video Session Mode, Line Rate and Video Settings
MIH Cascading Master-Slave Relationship
RMX CP HD
RMX
RMX CP CIF
RMX VSW HD
MGC to RealPresence Collaboration Server Cascading
Method
Method
Setting Flags on the RealPresence Collaboration Server
H263ANNEXT=YES default
FORCE1X1LAYOUTONCASCADEDLINKCONNECTION=YES default
To modify the flags
To define the Cascading Entry Queue in the MGC
Setting Flags in the MGC
Method II Defining the Cascading Entry Queue in the MGC
Polycom, Inc 261
For Example 1002##12001##1234
Polycom, Inc 263
HD VSW
Defining the Cascading Conferences
MGC HD VSW
To define the Dial-out Participant
Polycom, Inc 266
Polycom, Inc 267
Meeting Rooms
Use Time Out as Dtmf Delimiter
Meeting Rooms List
Meeting Rooms are listed in the Meeting Room list pane
Value / Description Flag Name
To list Meeting Rooms
Meeting Rooms List Columns Field Description
Automatic Password Generation Flags
Use Time Out as Dtmf Delimiter
Meeting Room Toolbar & Right-click Menu
Creating a New Meeting Room
To create a new meeting room
Meeting Rooms pane, click the New Meeting Room
Button or right-click an empty area
Entry Queues, Ad Hoc Conferences and SIP Factories
Entry Queues
Defining a New Entry Queue
Default Entry Queue properties
Default Entry Queue Properties Parameter Value
To define a new Entry Queue
Entry Queue Definitions Parameters Option Description
Shared Number Dialing
Listing Entry Queues
Modifying the EQ Properties
Transit Entry Queue
To view the list of Entry Queues
Setting a Transit Entry Queue
To cancel the Transit Entry Queue setting
To designate an Entry Queue as Transit Entry Queue
RMX Management pane, Rarely Used list, click Entry Queues
Guidelines for setting the Entry Queue as IVR Provider
Configuring the Collaboration Server as IVR Provider
Entry Queue IVR Service
IVR Provider Entry Queue Shared Number Dialing
Using External IVR Services via the MCCF-IVR Package
Entry Queue
Call Flow for Standalone TIP Endpoints
Call Flows
Call Flow for Standalone SIP Endpoints
Call Flow for TIP Endpoints from a Polycom ITP System
RMX Management pane, click Entry Queues
Configuring the Entry Queue to Use External IVR Services
To configure the Entry Queue for External IVR Services
SIP Factories
Creating SIP Factories
To create a new SIP Factory
RMX Management pane, Rarely Used list, click SIP Factories
New Factory Properties Option Description
Click OK New SIP Factory is added to the list
Ad Hoc Conferencing
Monitoring Registration Status
Gateway to Polycom Distributed Media Application DMA
Address Book
Viewing the Address Book
Participants List Pane Information
To expand the group to view the group members
To collapse a group
» Double-click the group name or click the Collapse button
Adding Participants from the Address Book
Displaying and Hiding the Address Book
Participant Groups
Adding a Group from the Address Book to Conferences
Managing Groups in the Address Book
To add a group to a new conference or an ongoing conference
Select one of the following actions
Address Book Navigation Action Description
Managing the Address Book
Adding a Participant to the Address Book
Adding a New participant to the Address Book Directly
To add a new participant to the Address Book
New Participant General Field Description
New Participant General
Only
SIP Only
IP only
New Participant Advanced Field Description
AGC
Dial-out SIP Only
Substituting E.164 Number in Dial String
Guidelines for Substituting E.164 Number in Dial String
To modify participant properties in the Address Book
When required, you can modify the participant’s properties
Modifying Participants in the Address Book
Deleting Participants from the Address Book
To delete participants from the Address Book
Copy / Move Participant Function Description
Copying or Moving a Participant
To copy or move a participant to another group
Paste Participant Function Description
Searching the Address Book
Filtering the Address Book
Filtering Address Book Data Using a Predefined Pattern
To filter the data in an address book group
Filtering Address Book Data Using a Custom Pattern
Polycom, Inc 310
Clearing the Filter
To clear the filter and display all entries
Obtaining the Display Name from the Address Book
Importing and Exporting Address Books
Exporting an Address Book
Importing an Address Book
To Export an Address Book
Upgrading and Downgrading Considerations
Integration with Resource Manager
RealPresence Collaboration Server Side
Scheduling Reservations
Guidelines for Scheduling Reservations
System
Resources
Reservations
Using the Reservation Calendar
Toolbar Buttons
To open the Reservation Calendar
RMX Management pane, click the Reservation Calendar button
Reservations Views
Week View
Day View
Single day is displayed
Today View
List View
Changing the Calendar View
To change between Week and Day views
To view Today the current date
To change to List View
Scheduling Conferences Using the Reservation Calendar
Creating a New Reservation
To return to Calendar View
Method III To interactively define the duration
Select a starting time slot
To create a new reservation
Open the Reservation Calendar
New Reservation Reserved Resources Field Description
New Reservation Schedule Tab Field Description
All Reservations
Recur every weeks field
You can add participants from the Participants Address Book
Viewing and Modifying Reservations
Using the Week and Day views of the Reservations Calendar
Managing Reservations
To move the Reservation to another time slot
To change the Reservation’s Start time
To change the Reservation’s End time
Reservation Properties General dialog box opens
Adjusting the Start Times of all Reservations
Scheduling Reservations
Searching for Reservations using Quick Search
Deleting Reservations
To delete a single reservation
To delete all recurrences of a reservation
To clear the search and display all reservations
Clear the Quick Search field
Click Search
All Reservations are displayed
Operator Assistance & Participant Move
Operator Conferences
Operator Conference Guidelines
Defining the Components Enabling Operator Assistance
New Conference IVR Service Welcome dialog box opens
New Conference IVR Service General dialog box opens
Click the Video Services tab
New Conference IVR Service Dtmf Codes dialog box opens
Click the Operator Assistance tab
New Entry Queue IVR Service Welcome dialog box opens
New Entry Queue IVR Service Conference ID dialog box opens
To define a Conference Profile for an Operator Conference
Click the Operator Conference check box
Starting an Ongoing Operator Conference
To start a conference from the Conference pane
New Conference General Options Field Description
New Conference General Options
Routing Name
Saving an Operator Conference to a Template
To save an ongoing Operator conference as a template
Click the Participants tab
New Conference Participants dialog box opens
Starting an Operator Conference from a Template
Requesting Help
Participant Alerts List
Audible Alarms
Using Audible Alarms
Conference Templates
Conference Templates Toolbar Buttons Description
Using Conference Templates
Conference Template toolbar includes the following buttons
Creating a New Conference Template
Creating a new Conference Template from Scratch
To create a new Conference Template
Conferences List toolbar includes the following button
Conference Templates
Polycom, Inc 354
Click the New button
New Participant General dialog box opens
New Participant Advanced dialog box opens
Specify the Display Name and Duration
New Conference Template Information dialog box opens
Starting an Ongoing Conference From a Template
To start an ongoing conference from a Template
Conference is started
Scheduling a Reservation From a Conference Template
To schedule a Reservation from a Conference Template
Polycom, Inc 362
Deleting a Conference Template
Exporting and Importing Conference Templates
To delete Conference Templates
Click the Delete Conference Template button. or
To export all Conference Templates from an MCU
Exporting Conference Templates
Exporting All Conference Templates from an MCU
Exporting Selected Conference Templates
To export selected Conference Templates
Conference Templates Import dialog box is displayed
Importing Conference Templates
To import Conference Templates
Polycom, Inc 367
Polycom, Inc 368
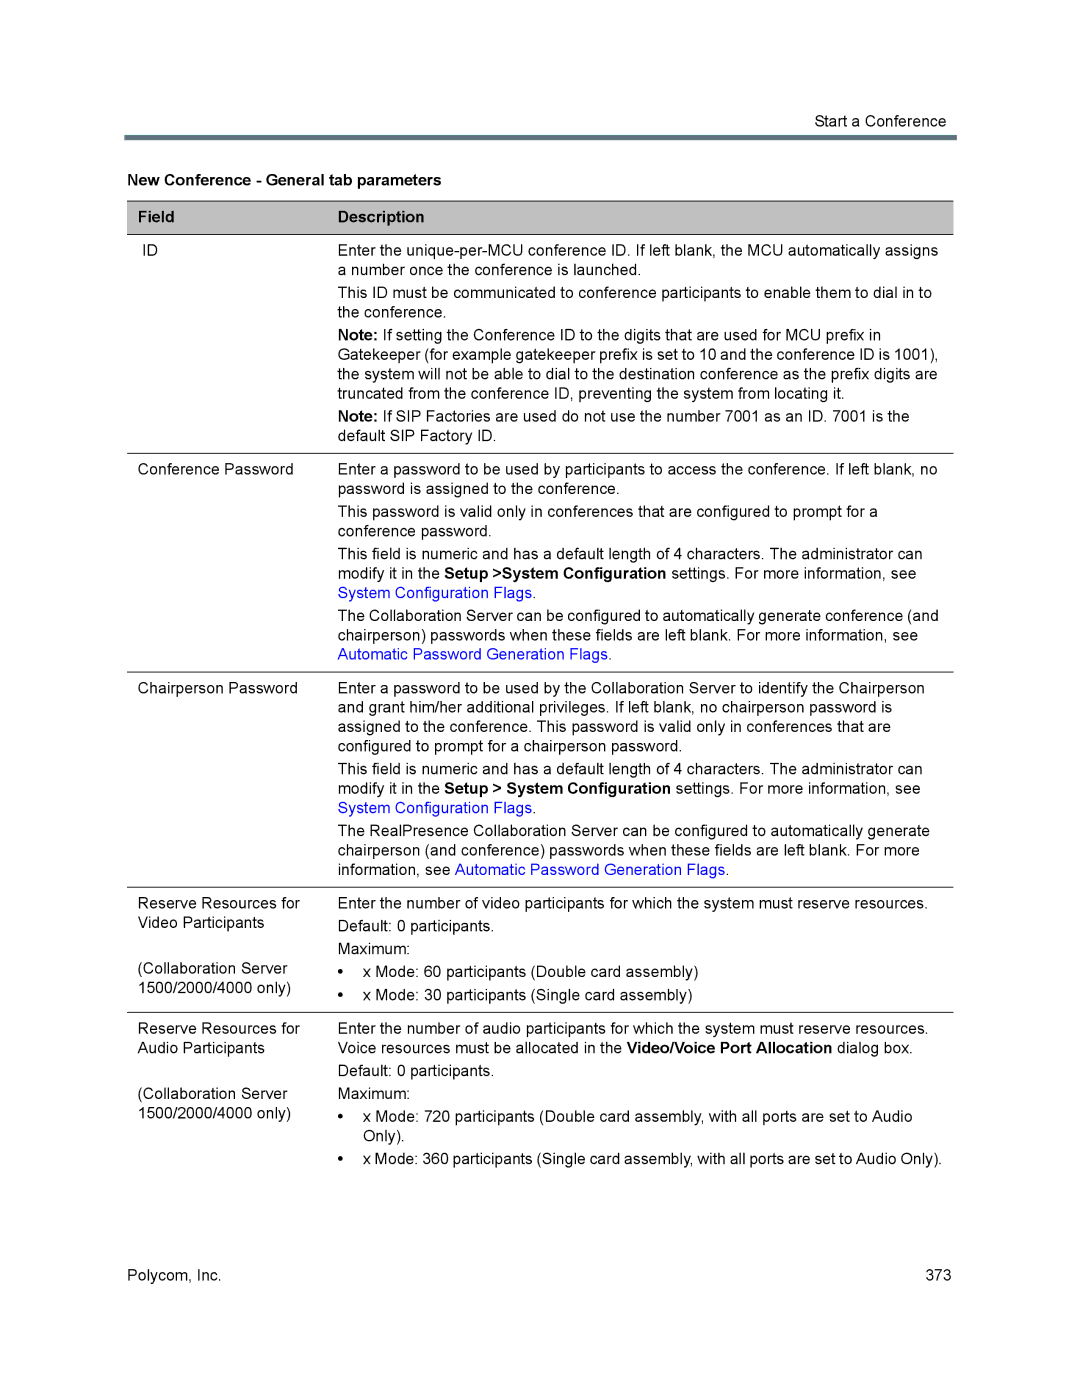
Start a Conference
Start an AVC CP Conference from the Conferences Pane
To start an AVC CP conference from the Conference pane
General Tab
New Conference General tab parameters Field Description
Support
System Configuration Flags
Polycom, Inc 374
Participants Tab
New Conference Participants Tab Column / Button Description
Option is disabled in SVC conferences
All Participants list opens
Information Tab
To add participants from the Address Book
Media Sources Tab
New Conference Information Tab Field Description
To start a SVC conference from the Conference pane
Scheduling an AVC-based Reservation
To start a conference from the Reservation Calendar
Starting an Ongoing Conference From a Template
This section is applicable for CP-AVC only conferences
Conference and Participant Level Operations
Conference Operations
Copy Conference
Paste Conference
Paste Conference As
To paste a conference as a new conference
Participant Operations
Operational Buttons
Participant Level Operations Menu Option Button Description
Resume Video button
Change to Regular
Copy, Cut and Paste Participant
Copy Participant
Cut Participant
Paste Participant
Paste Participant As
Moving Participants Between Conferences
Move Guidelines
Moving Participants Options
Moving a Participant Interactively
Polycom Conferencing for Microsoft Outlook
Setting up the Calendaring Solution
Option 1 Using default Exchange Server settings
Exchange Integration Configuration Option Field Description
Option 2 Using an alternate Primary Smtp Mailbox
Option 3 Using modified Exchange Server settings
Exchange Integration Configuration Option
Calendaring Guidelines
Polycom, Inc 398
Creating and Connecting to a Conference
Creating a Conference
Connecting to a Conference
RealPresence Capture Server or
Polycom Solution Support
Collaboration Server Standalone Deployment
Conference and Participant Monitoring
General Monitoring
Using the Chairperson Password for Filtering
Multi-Selection
Conference Level Monitoring
To search for an ongoing conference by Chairperson Password
Click in the Chairperson Password field
Monitoring the Conference in the Conference List Pane
Mixed
Displays conference name and type of conference
Conferences Monitoring Information FieldDescription
To view the parameters of an ongoing CP conference
Following information is displayed in the General tab
Conference Properties General Field Description
Conference Properties General
SVC
Conference Properties Advanced dialog box opens
Following information is displayed in the Advanced tab
End When Last Participant Remains parameters apply
Conference Properties Advanced Parameters
None
Prefer TIP
Profile Gathering Settings Field/Options Description
Following information is displayed
Information, see Video Resolutions in AVC CP Conferencing
Conference Properties Video Quality dialog box opens
Click the Video Settings tab to list the video parameters
Customized Content Rate
Conference Properties Video Quality Parameters
AS-SIP
For more information, see Supplemental Conferencing Features
See Defining New
Customized Polling Buttons Description
Polycom, Inc 418
Conference Properties General Parameters Field Description
Viewing the Properties of Ongoing SVC Conferences
To view the parameters of an ongoing SVC conference
Conference Properties General Parameters
Last Participant Remains parameters apply
Server RMX Network Port Usage
Content Rate
Polycom, Inc 424
Requesting Help
Request to Speak
Request to Speak is
Participant Level Monitoring
SDP
Gatekeeper Status Call Admission Control
Participant’s connection no indication is displayed
Participant Monitoring Indicators and Properties
Column Icon/Description
Polycom, Inc 431
Viewing the Properties of Participants
To view the participant Properties
Monitoring IP Participants
Following parameters are displayed for an IP participant
Mute/Suspend
Conference. See Conference and Participant Monitoring
Polycom, Inc 436
Conference and Participant Monitoring Polycom, Inc 437
Milliseconds derived from the Rtcp report
From the endpoint
SIP Bfcp TCP
Participant Properties Channel Status Advanced Parameters
Participant Connections
Conference and Participant Monitoring
Conference and Participant Monitoring
Monitoring SIP Bfcp Content
Channel Status tab Channel Status Advanced tab
Configuring the System Flag
Default
Detecting Endpoint Disconnection
Detecting SIP Endpoint Disconnection
Endpoint Disconnection Detection
System Configuration Flag
Monitoring ISDN/PSTN Participants
Algorithm
To view the participant properties during a conference
Participant Properties H.221 Parameters Field Description
Causes
Polycom, Inc 451
ISDN/PSTN Participant Properties Channel Status
Monitoring Telepresence Participant Properties
Recording and Streaming Conferences
Configuring the Collaboration Server to Enable Recording
Default Recording Link
Defining the Dial Out Recording Link
To define a Dial Out Recording Link
Recording Link Parameters Description
Enabling the Recording Features in a Conference IVR Service
Conference IVR Service Properties dialog box is displayed
RealPresenceCaptureServerorRSS4000system IPAddress
Recording Link Parameters ParameterDescription
Enabling the Recording in the Conference Profile
To enable recording for a conference
Conference Profile Recording Parameters Description
Dial Out Recording Link Encryption Flag Setting
Click OK Recording is enabled in the Conference Profile
Dial Out Recording Link Encryption
Dial Out Recording Link Encryption Guidelines
Dial Out Recording Link Settings
Managing the Recording Process
Recording Layout
To manage the recording process using the right-click menu
Server or RSS 4000 system User Guide
Recording Participant Right-click Options Name Description
Monitoring the recording participant
Using Dtmf Codes to Manage the Recording Process
Conference Recording with Codian IP VCR
Administrator
Users, Connections, and Notes
Collaboration Server Users
User Types
Listing Users
Administrators can add new users to the system
Adding a New User
To add a new user to the system
RMX Management pane, click Users Users pane is displayed
Deleting a User
To associate a user with a machine
Changing a User’s Password
To change a user’s password
To disable a user
Disabling a User
To enable a user
Renaming a User
Machine Account
To rename a user
Active Directory
Guidelines for defining a machine account
Monitoring
Using Notes
Connections
Viewing the Connections List
To list the users who are currently connected to the MCU
To delete a note
To create a note
To open or edit a note
IP Network Services
Collaboration Server IP Network Services Overview
Default IP Service Conferencing Service
Management Network Primary
IPv6 Addressing Guidelines
Modifying the Management Network
To view or modify the Management Network Service
RMX Management pane, click the IP Network Services button
Management Network Properties Collaboration Server RMX
Default Management Network Service IP Field Description
Modify the following fields
Auto If selected, Site-Local and Global
Click the Routers tab
Default Management Network Service Routers Field Description
Default Management Network Service DNS Field Description
Click the DNS tab Modify the following fields
DNS
DNS Servers Addresses
Click the Security tab Modify the following fields
Revocation Method
URL
Modifying the Default IP Network Service
To view or modify the Default IP Service
RMX Management pane, click IP Network Services
Default IP Service Collaboration Servers RMX 1500/2000/4000
Default IP Service Collaboration Server RMX
Default IP Network Service IP Field Description
2000/4000
4000
Polycom, Inc 489
Optional. Click the DNS tab
IP Network Services
To view or modify the ports values, click the Ports tab
Aliases
Fixed Ports
If required, click the QoS tab
View or modify the following fields
System.cfg file
Click the SIP Servers tab
TOS
Default IP Network Service SIP Servers Field Description
SIP Servers Primary / Alternate Server Parameter
Username@domain name
Outbound Proxy Servers Primary / Alternate Server Parameter
Modify the following fields
To configure the ICE environment, click the SIP Advanced tab
Default IP Network Service SIP Advanced Field Description
Network Service V35 tab Field Description
Ethernet Settings
LAN
MNG B LAN
MNG LAN
To modify the automatic LAN port configuration
RealPresence Collaboration Server RMX 1500/4000
RealPresence Collaboration Server RMX 1500 Do not select
Ethernet Settings Parameters Field Description
RealPresence Collaboration Server RMX 4000 Do not select
RMX CS IP tab displays the following fields
To monitor signaling status
IP Network Monitoring
IP Network Services
Click the H.323 tab H.323 tab displays the following fields
IP Network Services
IP Network Services
IP Network Services
Media Redundancy on RealPresence Collaboration Server RMX
LAN Redundancy
Media Redundancy
Multipleservices = no Lanredundancy
Multipleservices = YES Lanredundancy
Multipleservices = no
Multipleservices = YES
Signaling and Management Redundancy
Multipleservices = no Lanredundancy = YES
LAN Connections to the IP ports IP Port Description
RMX 1800 Media Redundancy System Flags System Flag / Value
= no Management Signaling
LAN
Configuration Requirements
Hardware Monitor Indications
RealPresence Collaboration Server RMX
RealPresence Collaboration Server
Network Traffic Control
RTM LAN Indications Status Description
RealPresence Collaboration Server RMX Network Port Usage
Http TCP
Https
DNS UDP
UDP, TCP
SSH TCP
NTP
SIP-TLS
RTP
Rtcp
SIP -TLS
Defining ISDN/PSTN Network Services
ISDN/PSTN Network Services Overview
Supported Capabilities and Conferencing Features
Non Supported Capabilities and Conferencing Features
Adding/Modifying ISDN/PSTN Network Services
To Add an ISDN/PSTN Network Service
RMX Management pane, click ISDN/PSTN Network Services
Obtaining ISDN/PSTN required information
Isdn Service Settings Field Description
Unknown
Span Definition Field Description
Configured symmetrically
Phones Settings Field Description
Click Save & Continue
Click Save & Close
Modifying an ISDN/PSTN Network Service
To Modify an ISDN/PSTN Network Service
Dial-in Phone Numbers
MCU CLI
Multiple Network Services
Network Security
RealPresence Collaboration Server RMX 1500/4000
RealPresence Collaboration Server
Network Security
Polycom, Inc 534
Cards Up to 2 per Media Card Services
That Include ICE
First Time Installation and Configuration
Resource Allocation and Capacity
Upgrading to Multiple Services
RealPresence Collaboration Server RMX Hardware Installation
Polycom, Inc 539
Connecting the cables to the RTM IP
Connecting the cables to the RTM LAN
LAN Connections to the RTM IP RTM IP Port Description
LAN Connections to the RTM LAN RTM LAN Port Description
Polycom, Inc 541
LAN Connections to the RTM LAN RTM IP Port Description
Management, media and signaling for Network Service
MNG MNG B
Collaboration Server Configuration
System Flags and License Settings
IP Network Service Definition
To add new/additional Network Services
Device Management pane, click IP Network Services
Polycom, Inc 547
IP Network Service IP Parameters Field Description
IP Network Service IP Parameters
Service Configuration dialog box opens
Following flags can be defined per service
H263ANNEXT
Defined and the IP Network Service
Default IP Network Service SIP Advanced FieldDescription
Default IP Network Service Icons IconDescription
Setting a Network Service as Default
Ethernet Settings
Conference Profile
Signaling Host IP Address and MCU Prefix in GK Indications
Video/Voice Port and Resolution Configuration
Gateway Profiles
Signaling Monitor
Hardware Monitor
Conferencing
Defining Dial Out Participants
Reserving Video Resources for a Conference
Monitoring Conferences
Resource Report
Port Usage Gauges
Remote Connection Using the Internet
NAT Network Address Translation Traversal
Deployment Architectures
Following Remote Connection call flow options are supported
Business to Business Connections
Remote Connections Enterprise Client Environment Registered
Registered Environment
VBP
To enable and modify FW NAT Keep Alive
FW Firewall NAT Keep Alive
System Configuration in SBC environments
SIP TCP Keep-Alive
To view the IVR Services list
IVR Services
IVR Services List
IVR Services Toolbar
IVR Toolbar buttons Button Button Name Descriptions
Adding Languages
To add a language
Uploading a Message File to the Collaboration Server
To upload messages to the MCU
IVR Message Types by Message Category
Properties General Voice Messages
To define a new Conference IVR Service
Defining a New Conference IVR Service
Defining a New Conference IVR Service
Default is
Conference IVR Service Properties Global Parameters
Polycom, Inc 574
Chairperson Identifier
Polycom, Inc 576
Conference IVR Service Properties General Voice Messages
Message Type Description
Indicating the recording status of the conference
Followed by the Reorder Tone and disconnection
Polycom, Inc 580
Ivrrollcallusetonesinsteadofvoice is set to YES,
Ivrrollcallusetonesinsteadofvoice is set to YES ,
IVR Services
Polycom, Inc 583
Low
4SIF
SIF
Video Services Description
Dtmf
New Conference IVR Service Dtmf Codes dialog box opens
IVR Services
IVR Services
Change to Chairperson
Entry Queue IVR Service
Defining a New Entry Queue IVR Service
To set up a new Entry Queue IVR Service
RMX Management pane, click IVR Services
Ad Hoc Conferencing and External Database Authentication
Fill in the following parameters
Polycom, Inc 592
Select the voice messages
New Entry Queue IVR Service General dialog box opens
IVR Services
Polycom, Inc 596
To select the default Conference IVR Service
Default Conference IVR Service
To select the Default Entry Queue IVR Service
To modify the properties of an IVR Service
To replace the Music file
Replacing the Music File
Adding a Music File
Defining the format settings for audio messages
To define the format settings for audio messages
Creating Audio Prompts and Video Slides
Recording an Audio Message
Attributes list, select 16.000 kHz, 16Bit, Mono
Click Convert Now
Sound Selection dialog box opens Format field, select PCM
Recording a new audio message
To record a new audio message
IVR Services
Creating a Welcome Video Slide
To create a welcome video slide
Inviting Participants using Dtmf
Error Handling
Invite Call Flow
Entering Additional Dtmf Codes
General Video Services Dtmf Codes
Enabling the Invite Participants using Dtmf Option
Conference IVR Services dialog boxes
Conference IVR Services General tab is displayed
Disabled set to Off
To disable the Invite Participant option
Disabling the Invite Participant Option
Guidelines for TIP Support with IVR Services
External IVR Service Control
IVR Services Support with TIP Protocol
Default IVR Prompts and Messages
Password IVR
Change
Requests Chairperson help Menu
IVR Services
Default IVR Messages Flag Description
Volume Control of IVR Messages, Roll Call and Music
To control the volume of IVR music, Roll Call and messages
IVR Services in TIP-Enabled Conferences
IVR Services in TIP-Enabled Conferences Guidelines
Entry Queue and Virtual Entry Queue Access
Configuring the Conference and Entry Queue IVR Services
Call Detail Record CDR Utility
CDR File Properties
CDR File Formats
Unformatted CDR File
Multi-Part CDR Files
Formatted CDR File
CDR File Contents
Viewing, Retrieving and Archiving Conference Information
Viewing the Conference Records
To open the CDR utility
Conference Record Fields Description
Multi-part CDR File display
Refreshing the CDR List
Retrieving and Archiving Conference CDR Records
To refresh the CDR list
To retrieve and archive CDR records
Gateway Calls
Gateway Functionality
Direct Dialing
Call Flows
IP Participants
Dialing from H.323 Endpoints
Dialing from SIP Endpoints
Gateway IVR Dialing For IP Participants
Optional
Direct Dialing Using IP Addresses
Dial-out Calls
Dial-in Calls
Calling a SIP Endpoint in a Remote Domain
Enabling or Disabling Direct IP Dialing
Isdn Participants
Dialing via Gateway IVR for Isdn Participants
Dialing from ISDN/PSTN Endpoints
Two dialing methods are available to ISDN/PSTN participants
Pstn Dial-in Using GK Prefix
Calling an IP Endpoint via Gateway
Interoperability with DMA
Defining the IVR Service for Gateway Calls
To define a new Conference IVR Service for gateway calls
Roll Call disabled
Operator Assistance disabled
Gateway Calls
DefaultGWWelcomeSlide
Details, see Disconnect on Busy
To define a Conference Profile for Gateway Sessions
Define the required settings for Encryption and LPR
Defining the Conference Profile for Gateway Calls
Defining the Gateway Profile
To define a new Gateway Profile
System Configuration
Gateway Calls Redialing
Call Failure Reasons H.323, SIP, Isdn
Wrong Destination Number
Wrong Destination Number Time-out
Monitoring Ongoing Gateway Sessions
Connection Indications
Disconnect on Busy
Disconnect on No Answer
Conference ID
Gateway Session Parameters
Gateway Session Name
Connected Participant Parameters
To set up the Meeting Room for direct dialing
Polycom, Inc 645
Dialing to Polycom RealPresence DMA System
Example
Calling the RealPresence DMA via Gateway IVR
Manual Dial String Entry
Automatic Dial String Generation
Pstn Dial-in Using GK Prefix
Enabling Pstn dial-in using GK prefix
Configuration
Pstn Participant input via Dtmf
Deploying a Polycom RMX Serial Gateway S4GW
Installing the RMX Manager Application
RMX Manager Application
Accessing or Downloading the RMX Manager Installer
Downloading the Installation files from Polycom Support Site
Click Install
Click the Install RMX Manager link
Installing the RMX Manager on Your Workstation
Accessing the RMX Manager Installer from the Login screen
Polycom, Inc 655
Installing the RMX Manager for Multi-User Capability
To install the RMX Manager for Multiple Users
Polycom, Inc 657
Starting the RMX Manager Application
To use the browser
To use the Windows Start menu
Click Start Programs
Click All Programs Polycom RMX Manager
Connecting to the MCU
To connect the RMX Manager to an MCU
MCUs pane includes a list of MCUs and a toolbar
RMX Manager Main Screen
MCUs Pane
MCU Icons and Statuses Icon Description
To add a Collaboration Server unit
Adding MCUs to the MCUs List
Use Other RMX Manager UI Components
MCU Properties Field Description
MCU IP
Grouping the Participants by MCU
Start Monitoring/Stop Monitoring
Removing an MCU from the MCUs Pane
Disconnecting an MCU
Modifying the MCU Properties
To select a language
Import/Export RMX Manager Configuration
Changing the RMX Manager Language
To Export the RMX Manager Configuration
To Import the RMX Manager Configuration
Export RMX Manager Configuration dialog box opens
Import RMX Manager Configuration dialog box opens
Installing RMX Manager in Secure Communication Mode
To install the RMX Manager
Click on the Security tab Security dialog box is displayed
Clear the Secured Communication check box Click the DNS tab
DNS dialog box is displayed
Enter the Local Domain Name
Create a Certificate Request
Select the Secured Communication check box
Management Network Properties dialog box is displayed
Click the Security tab Security dialog box is displayed
RMX Management pane, click Hardware Monitor
Using an Internal Certificate Authority
Click OK Reset the Collaboration Server
Click the Copy to File button
Certificate Export Wizard is displayed
Click Next Export File Format dialog box is displayed
Select Base-64 encoded X.509 .CER
Polycom, Inc 676
Use the RMX Web Client
Starting the RMX Web Client
To start the Collaboration Server Web Client
RMX Web Client Screen Components
Viewing and System Functionality Permissions
Auditor
Conferences List
If you are logged in as a User with Chairperson permissions
Status Bar
List Pane
RMX Management Pane
System Alerts
Participant Alerts
Port Usage Gauges
MCU State
Address Book
Displaying and Hiding the Address Book
Dialing Direction Dial-in or Dial-out
Conference Templates
Displaying and Hiding Conference Templates
To adjust column width
Customizing the Main Screen
To resize a pane
To sort the data by any field column heading
To switch between Toolbar and List Views
Increasing and Decreasing the Text Size
Customizing the RMX Management Pane
To increase or decrease the text size
Polycom, Inc 690
Collaboration Server 1500/1800/2000/4000 Status Bar
Administration and Utilities
System and Participant Alerts
System Alerts
To view the System Alerts list
Error occurred
Active Alarms Pane Columns
An identifying number assigned to the system alert
System Alerts Buttons
Participant Alerts
To view the Participants Alerts list
RMX Time
Altering the clock
To Alter the MCU Time
RMX Time Fields Properties Description
RMX Time Fields Properties
Resource Management
Resource Capacity
Resource Usage in AVC CP Conferencing
MPMx MPMRx-D
MCU Capacities in Mixed CP and SVC Conferencing
Resource Usage in SVC Conferencing
Audio
Mode
AVC Conferencing Video Switching Resource Capacity
Resource Usage in Mixed CP and SVC Conferencing
MPMRx 3333 Mixed CP
MPMx Mixed CP
Resource Usage in AVC CP Conferencing
AVC Conferencing Voice
Resource Capacity Modes
MPMx MPMRx
Flexible Resource Capacity Mode
Video/Voice Port Configuration MPMRx
Video/Voice Port Configuration MPMx
To allocate Voice resources
Configuring the Video/Voice Resources
Forcing Video Resource Allocation to CIF Resolution
To cancel the forcing of CIF resource
Resource Reports
To force CIF resource
Mcmsparameters tab, click New Flag
Resource Report Fields Parameters Column Description
Main toolbar, select Administration Resource Report
Displaying the Resource Report
Port Gauges
Port Gauge
AVC HD AVC SD AVC CIF SVC
Collaboration Server 1800 Resource Capacity
AVC HD AVC SD AVC CIF
Port consumption ratios of different calls HD720p HD1080p
Resource Capacity in Non-Mixed Conferences
Resource Capacity in Mixed Conferences
ISDN/PSTN
Collaboration Server 2000/4000 Resource Capacity
Polycom, Inc 711
To Set the Port Usage Threshold
Setting the Port Usage Threshold
Port Usage Threshold
SIP Dial-in Busy Notification
Port Usage Gauges
Polycom, Inc 715
System Information FieldDescription
System Information
To view the System Information properties box
Snmp Simple Network Management Protocol
MIBs Management Information Base
Traps
MIB Files
Alarm-MIB
Support for MIB-II Sections
MIB H.341 H.323
Standard MIBs
Unified MIB
Unified MIB Snmp Fields Name Type Description
Code
An Example of a ColdStart Trap
An Example of an Authentication Failure Trap
An Example of an Alarm Fault Trap
Status Trap
RMX MIB entities that do not generate traps
Administration and Utilities
To enable Snmp option
Defining the Snmp Parameters in the Collaboration Server
Select the Traps tab
Snmp Properties Traps dialog box opens
SHA
SNMPv3 Traps Field Description
Snmp
SNMPv3 Traps Field Description Version
Authentication Password
Select the Security tab
Snmp Properties Security dialog box opens
Default Empty
Default MD5 Authentication
Enter an Authentication Password
Default DES
Snmp Properties Security dialog box, click OK
Using Audible Alarms
Accepted Host IP Address dialog box opens
Configuring the Audible Alarms
Audible Alarm Permissions
Audible Alarm Permissions Option Operator Administrator
Stop Repeating Message
Replacing the Audible Alarm File
Audible Alarm User Customization Options Description
Download Audible Alarm File window opens
Multilingual Setting
Customizing the Multilingual Setting
To customize the Multilingual Setting
Banner Display and Customization
Non-Modifiable Banner Text
Sample 1 Banner
Sample 4 Banner
Sample 2 Banner
Sample 3 Banner
Banners Configuration dialog box opens
Customizing Banners
To customize the banners
Customize the banners by modifying the following fields
Login Screen Banner
Banner Display
Main Screen Banner
Backup and Restore Guidelines
Software Management
Using Software Management
To backup configuration files
To restore configuration files
Select the Backup Directory Path and then click Backup
Using Ping
Ping the Collaboration Server
To Ping a network entity from the Collaboration Server
OK or
Notification Settings Parameters Field Description
Notification Settings
To configure the notifications
Following tasks can be performed
Logger Diagnostic Files
To access the Logger Diagnostic Files
To Retrieve the Logger Files
Logger Diagnostic Files dialog box, click Browse
Diagnostic File Button Options Description
Standard Security Mode
Information Collector
To View the Logger Files
Click Retrieve Files
Ultra Secure Mode
Network Intrusion Detection System Nids
To create the compressed file
Using the Information Collector
Creating the Information Collector Compressed File
Saving the Compressed File
Click Collect Information
Auditor
Auditor Files
Viewing the Compressed File
To view the compressed file
Name
To access Auditor Files
Retrieving Auditor Files
Auditor File Viewer
To retrieve files for storage on a workstation
To open the file in the Auditor File Viewer
StartUp
To open the Auditor File Viewer from the Administration Menu
Auditor Event Columns Field Description
Alerts and Faults
Alerts and Faults that are recorded by the Auditor
Alerts and Faults recorded by the Auditor Event
Audit Events
Alerts and Faults recorded by the Auditor Event
Transactions recorded by the Auditor
Transactions
Transactions that are recorded by the Auditor
Installing ActiveX
ActiveX Bypass
Click Reset
Resetting the Collaboration Server
To reset the RMX
Administration and Utilities
To modify system flags
System Configuration Flags
Modifying System Flags
Mcmsparametersuser Flags Description
Manually Added and Deleted System Flags
RealPresence Capture Server or RSS 4000 system recorder
Contentspeakerintrasup
Disableinactiveuser
Enableacceptingicmpredi
Enableagc
Enableautoextension
Enablecascadedlinktoj
Oinwithoutpassword
Enablecyclicfilesystem
Forcesystembroadcastv
Olume
Forcesystemlisteningvo
Lume
Isdnresourcepolicy
Fillfromfirstconfiguredspan
Fillfromlastconfiguredspan
Itpcropping
Lastloginattempts
Legacyepcontentdefault
Maxconfpasswordrepeat
Layout
Maxcpresolution
Maxpasswordrepeapedc
Maxpasswordrepeatedch
Maxintrarequestsperin
Minpasswordlength
Multipleservices
Mcudisplayname
Minpwdchangefrequenc
Numofnumeric
Numofspecialchar
Numofuppercasealphab
Numericchairpassdefaul
Numericconfpassdefault
Numericconfidmaxlen
Numericconfidminlen
LEN
Passwordexpirationdays
Passwordexpirationwarni
Passwordhistorysize
Restrictcontentbroadca
Example
Systemlisteningvolume
Ultrasecuremode
Usegkprefixforpstnca
LLS
Acceptvoipdtmftype
To add a flag
Manually Added, Modified, Deleted System Flags Description
42Kbps, fail, thus disconnecting the call
Is the preferred codec for SIP/Lync calls
Manually Added, Modified, Deleted System Flags
Flag Description
Blockcontentlegacyfor
Bytimers
Bondinggroupdelay
Burnbios
Cfgkeyenableflowcont
Cascadelinkplaytoneon
Connection
Cellindlocation
Timer
DELAYBETWEENH320DIALO
Disablecellsnetworkind
Disabledummyregistratio
Disablegwoverlayindicat
Disableselfnetworkind
Disablewiderestosipdi
Enableciscogk
ENABLECONTENTOF768FOR
Enableepc
Enableflowcontrolrein
Enableexternaldbacces
Enablemsfec
Enablenovideoresource
Enablerecording
Enablertptrafficshapin
Enablesipppcforallus
Enablesirenlpr
Enablesirenlprsipencry
Enabletcpackage
Externaldblogin
Externaldbpassword
Externaldbdirectory
Externaldbip
Forceresolution
Forceaudiocodecforms
Singlecore
Forceencryptionforund
Numericconfpassdefault LEN Numericchairpass Defaultlen
G728ISDN
H239FORCECAPABILITIES
H264HDGRAPHICSMINCONT
IPV6AUTOADDRESSCONFIGU
Ignoreaim
Iplinkenvironment
Ipresponseecho
Transcoding
For single MCU conferences
For cascaded conferences
Default n
Possible values
Maximumrecordinglinks
Medianicmtusize
Minimumframeratethres
Holdforsd
Possible Values YES / no
Passwordfailurelimit
Portgaugealarm
Pcmfecc
Pcmlanguage
Nnovideotimer REMOVEH323EPCCAPTON
Pstnringingdurationsec
Qosipaudio
Qosipvideo
Rtcpfirenable
Enable
REMOVEH323HIGHPROFILE
Captononpolycomvend
Rtcpplienable
Interval
Rtcpqosisequaltortp
Rtvmaxbitrateforforc
Sendwiderestoisdn
Sendsrtpmki
Sendwiderestoip
Setaudioclarity
Setaudioplc
Setautobrightness
Setdtmfsourcediffins
Sipenablefecc
Sipfastupdateintervale
Sipbfcpdialoutmode
Sipdualdirectiontcpco
Socketactivitytimeout
Sipfreevideoresources
Sipomitdomainfrompart
Yname
V35MULTIPLESERVICES
Tclatencysize
Tcpretransmissiontimeou
Trafficshapingmtufacto
Manually Adding Flags to the Csmoduleparameters Tab
Manually Added Csmoduleparameters System Flags Description
Msupdatecontac
Qosipsignaling
Siptcptlstimer
Tremove
Auto Layout Configuration
Deleting a Flag
To delete a flag
Available Layouts No. of Cells Layout Layout Flag Value
Customizing the Default Auto Layout
Default Auto Layout is controlled by 13 flags
Polycom, Inc 807
Example
Legacyepcontentdefaultlayout Flag
Csenableepc Flag
Automatic Password Generation Flags
Enabling the Automatic Generation of Passwords
Automatic Password Generation Flags Description
Hideconferencepassword
Default in non-secured mode means no minimum length
Default in Ultra Secure Mode Conference password must be
Default in Ultra Secure Mode, Chairperson password must
16, 6 default non-secured mode
Ultra Secure Mode Flag
Numericchairpass Default LEN
Ultra Secure Mode
Polycom, Inc 813
Enabling Ultra Secure Mode
PCM
Modifying the Ultra Secure Mode System Flag Value
Ultrasecuremode System Flag
System Flags affected by Ultra Secure Mode
To modify the Ultrasecuremode System flag value
Range Default Network Security
Login and Session Management
Strong Passwords
User Management
Range Default
Enablecyclicfilesystemalarms YES/NO
Certificate Management
PKI Public Key Infrastructure
PKCS#7/P7B
To access the Certification Repository
Adding Certificates to the Certificate Repository
Trusted Certificates
To add a certificate to the repository
Paste Certificate and Send Certificate
Send Certificate File
Paste Certificate and Send Certificate
Send Certificate File
Polycom, Inc 822
Personal Certificates
To add a Personal Certificate to the Certificate Repository
Click Send Certificate
General Error message from the SSL library
Certificate Validation
CRL Certificate Revocation List
Adding a CRL
To add a CRL to the repository
Select the Certificate File Format PEM or DER
Removing a CRL
To remove a CRL
Certificate Revocation
Revocation Method
One of three Certificate Revocation Methods can be selected
Global Responder URL
No Certificate Validation is performed
Self-signed Certificate
Self-signed Certificate Creation
Self-signed Certificate Field Values Creation
SHA1
Emergency CRL Certificate Revocation List Update
To perform an Emergency CRL Update procedure
Download and save the updated CRL files from the CA Server
Disable Secure Communications mode
Open the Certification Repository and Update the CRL files
Re-connect to the RMX
Update the repository
Re-enable Secured Communications Mode
Polycom, Inc 835
SIP TCP Keep-Alive
Siptcpkeepalivetype None
RFC5626
If its value is Reregistrationwhennopongresponse
Donotreregistrationwhennopongresponse Default
System Flags Siptcpkeepalivetype / Behavior
Flag Possible Flag Values
Siptcpkeepalivebehavior
Managing the user login process includes
User and Connection Management
Keep Alive Frequency
Managing system users includes
Managing the System Users
User Types
Disabling/Enabling Users
Renaming Users
Password Character Composition
Managing the User Login Process
Implementing Strong Passwords
Defining Password Aging
Password Length
Implementing Password Re-Use / History Rules
Maximum Repeating Characters
Defining Password Change Frequency
Forcing Password Change
User Lockout
User Login Record
Temporary User Lockout
Connection Timeout
Session Timeout
Controlling User Sessions
Management Sessions per System
Erase Session History After Logout
Guidelines for Customizing the Login Page Banner
Polycom, Inc 847
Polycom, Inc 848
Polycom, Inc 849
Securing an External Database
Ultra Secure Mode
Standard Security Mode
MS Active Directory Integration
Directory and Database Options
Guidelines
Enabling Active Directory Integration
To configure Directory Services
Directory Services Configuration Field Description
Restoring the Collaboration Server Using the USB Port
Directory Services Role Mapping dialog box is displayed
Directory Services Role Mapping Field Description
Click the Role Mapping tab
Precedence Levels
Mlpp Multi Level Precedence and Preemption
FLASH-OVERRIDE-OVERRIDE Classified Networks only
Enabling Precedence
SIP Message
Dial-in calls
FLASH-OVERRIDE-OVERRIDE
Domain Name = UC Sub Domain = r-priority =
Flash Immediate Priority Routine None
No Default
Incoming SIP
Message
UCC
Dial-out calls
Precedence Level Change
To configure Precedence Settings
Default Cleared Precedence disabled
Optional Modify the values if required
Possible Values 1
System Flags
Precedence Settings Domains, Levels and Dscp Values
Monitoring Precedence Level
Ieee 802.1X Authentication
Following 802.1X Authentication methods are supported
Certificate Repository
PEAPv0 MSCHAPv2
Enabling and Configuring 802.1X Authentication
802.1X Authentication Configuration Field Description
Disable the 802.1X Authentication method
EAP-MD5
Range YES/NO
802.1X Authentication System Flags Flag name Description
Default Disabled
Ethernet Monitoring
White List Access
Disabling 802.1X Authentication
To enable, disable, view or modify the White List
Enabling, Disabling and Modifying the White List
Workstation / Device
Iii Click Yes to apply the modified White List
IP Address Modes
System Flag
Disabled
Alternative Network Address Types Anat
Bfcp Over UDP AS-SIP Content
Enabling AS-SIP Content
Internet Control Message Protocol Icmp
System Flag Enableacceptingicmpredirect
System Flag Enablesendingicmpdestinationunreachable
Modifying the flag values
Password Encryption
Upgrade / Downgrade Guidelines
Polycom
SIP UDP
Non-hashed Passwords
Media Encryption and Authentication
Self-signed Certificate Creation Field Value
Privacy Protocols Flag Settings
Negotiation Protocol Authentication Tag Length
Range 80, 32
NGH Flag Value
Collaboration Server Hardware Monitoring
Viewing the Status of the Hardware Components
To access Hardware Monitor
HW Monitor Pane Status Columns Field Description
Diagnostics , or Empty
Viewing the Properties of Hardware Components
HW Monitor Pane Toolbar
Critical
Properties
To view the MCU Properties
Hardware Properties dialog box has the following structure
General information is displayed
MCU 1800 Properties General Info
MCU Properties Event Log Column Description
To view a card properties
Card Properties General Info Field Description
Mezzanine
To view the supporting hardware components properties
View Backplane Properties
View FAN Properties
Click Close to return to the Hardware Monitor pane
Fans
View LAN Properties
Temperature Thresholds
To view a LAN connector properties
Diagnostic Mode
To run Diagnostics on a card
Polycom, Inc 889
To exit the Diagnostics Mode
Call Disconnection Causes Description
Appendix a Disconnection Causes
IP Disconnection Causes
ARQ
Call Disconnection Causes Description
Is longer than the server is willing to interpret
Request
Isdn Disconnection Causes
Isdn Disconnection Causes Number Summary Description
Enquiry
CUG
Isdn Disconnection Causes Number Summary Description
Mandatory information elements containing invalid content
ULTRASECUREMODE=YES
Appendix B Active Alarms
Active Alarms Alarm Code Alarm Description
Appendix B Active Alarms
Active Alarms Alarm Code Alarm Description
Active Alarms Alarm Code Alarm Description
Active Alarms Alarm Code Alarm Description
Active Alarms Alarm Code Alarm Description
Active Alarms Alarm Code Alarm Description
Install the appropriate media card
Active Alarms Alarm Code Alarm Description
Failure
Active Alarms Alarm Code Alarm Description
Active Alarms Alarm Code Alarm Description
Conference Summary Record Fields Description
Appendix C CDR Fields, Unformatted File
Conference Summary Record
Conference Summary Record Fields
Event Types
Event Records
Standard Event Record Fields
Event Specific Fields
CDR Event Types Event Code Event Name Description
Update
Participant Connected Recording
Link SIP Private
Extensions Gatekeeper
User Update
User SET END
Time
Operator
Start
Event Fields for Event 1 Conference Start
Event Fields for Event 1 Conference Start Description
Event Fields for Event 2001 Conference Start Continue
Appendix C CDR Fields, Unformatted File
Event Fields for Event 5001 Conference Start Continue
Event Fields for Event 2 Conference END
Event Fields for Event 6001 Conference Start Continue
Event Fields for Event 11001 Conference Start Continue
Any other number Unknown
NTI TIE Trunk ATT Accunet
Event fields for Event 4 ISDN/PSTN Channel Disconnected
Event fields for Event 5 ISDN/PSTN Participant Connected
Appendix C CDR Fields, Unformatted File
Appendix C CDR Fields, Unformatted File
Appendix C CDR Fields, Unformatted File
Number of MCU Phone Numbers
Terminal
Event fields for Event 15 H323 Call Setup
SIP URI
Event fields for Event 15 H323 Call Setup
Changed
MCU
Terminal
Event Fields for Event 18 NEW Undefined Participant
Event Fields for Event 20 Billing Code
Event Fields for Event 22 Dtmf Code Failure
Event fields for Event 26 Recording Link
Event Fields for Event 28 SIP Private Extensions
Event Fields for Event 30 Gatekeeper Information
Event fields for Event 31 Participant Connection Rate
Event Fields for Event FieldDescription
Characters
Appendix C CDR Fields, Unformatted File
Event Fields for Event 106 User SET END Time
Is currently supported
Isdn
Polycom, Inc 946
Disconnection Cause Values
Event Fields for Events 2011, 2012,
Event Fields for Event 3010 Participant Information
VIP
Disconnection Cause Values Value Call Disconnection Cause
Disconnection Cause Values Value Call Disconnection Cause
Disconnection Cause Values Value Call Disconnection Cause
Ad Hoc Conferencing without Authentication
Conference is started using one of the following method
Ad Hoc Conferencing with Authentication
Ad Hoc Conference Initiation without Authentication
Polycom, Inc 953
Conference Access with External Database Authentication
Conference Access Validation All Participants Always
Conference Access Validation Chairperson Only Upon Request
Ad Hoc Settings
Authentication Settings
To set the System Configuration flags
Click OK Reset the MCU for flag changes to take effect
Enableexternaldbaccess
Modify the values of the following flags
» Set the External Server Authentication field to Numeric ID
Set the External Server Authentication field to
Page
RTP Statistics
Endpoint
Details
Following details are displayed
Processing, but is not considered a fault
Number of packets arriving out of order.
Certificate Template Requirements
Appendix F- Secure Communication Mode
Certificate Configuration and Management
Switching to Secure Mode
Configure Certificate Management
Purchasing and Installing a Certificate
Certificate Requirements
Enabling Secure Communication Mode
To enable secure communications mode
Default for U.S. Federal licenses TLSV1
Creating/Modifying System Flags
Polycom, Inc 967
Restoring Defaults
Alternate Management Network
Alternate Management Network 1500/2000/4000
Configure the Workstation
Management Network Primary
To modify the workstation’s IP addresses
Polycom, Inc 971
Page
Collaboration Server RMX
Connect to the Management Network
To connect directly to the Collaboration Server
Polycom, Inc 974
Connect to the Alternate Management Network 1500/2000/4000
Collaboration Server RMX
To connect to the Alternate Management Network
Procedure 1 Install the RMX Manager
Procedure 2 Configure the Modem
Procedure 3 Create a Dial-up Connection
Configure the modem with the following settings
When the New Connection Wizard is displayed, click Next
Polycom, Inc 979
Polycom, Inc 980
Connection Wizard
Click All Programs
Procedure 4 Connect to the Collaboration Server
To Connect using the RMX Manager To use the browser
Appendix H Deployment Into Microsoft Environments
Overview
Deployment Architecture 2 RealConnect Cascaded Conferences
Backward Compatibility to Lync
Support for HD1080p Resolution
Video Resource Requirements and Implications
FEC Forward Error Correction
Limit Maximum Resolution for MS SVC Using a System flag
Default Auto
IPv6 Support
Range Default
System Flags for Cropping Control
Sharing Content During a Conference
RealPresence CSS Gateway
RealPresence CSS Plug
CSS Gateway Usage Guidelines
Lync
CSS Behavior by Lync Content Type CSS Plug CSS Gateway
MLA Mode Collaboration Server Side Lync 2013 Avmcu Side
Cisco TIP Support
Lync 2013 Participant Monitoring
Mainandinslave
Monitoring Participant Properties Channel Status Tab
Polycom, Inc 994
Deployment Architecture 1 RealPresence Hosted Conferences
Look and Feel
Deployment Architecture 2 RealConnect Cascaded Conferences
Look and Feel for Lync Clients and Group Series Endpoints
Look and Feel for Legacy Endpoints
Video Optimized
Handle Low Bit Rate Calls From the Avmcu
Remove Empty Cells From the Video Layout
Case
Range
Polycom, Inc 1000
Initiate and Connect to a Conference
Meet Now Lync Conference
RealConnect for Lync
To connect to an Avmcu conference
Video Switching Conferences
Call Admission Control
Conferencing Behavior
Continuous Presence Conferences
Monitoring Participant Connections
Active Alarms and Troubleshooting
Active Alarms
ICE Active Alarms
URI
Troubleshooting
Known Issues
Polycom, Inc 1007
Appendix I Polycom Open Collaboration Network Pocn
Deployment Architectures
Single Company Model Polycom and Cisco Infrastructure
IOS
Solution Architecture Components Version Description
Ctms
VCS
Polycom Equipment
MLA
Call Flows
Multipoint call with DMA
Multipoint call without DMA
Company to Company Models Using a Service Provider
Model
Model
Collaboration Server
Company to Company via Service Provider Model
Cisco telephony and desktop endpoints
Multipoint call via Service Provider Model
Call Flow
Polycom, Inc 1018
Company B Solution Architecture Components Cisco Equipment
Company a
Company B
Deployment architecture includes
Polycom, Inc 1020
Gatekeepers
Administration
Configuring the Cisco and Polycom Equipment
Cisco Equipment
Polycom Equipment
Supported Polycom products Polycom TIP and SIP Versions
SIP only no TIP support Versions
Configuring the Collaboration Server
Configuring DMA
Configuring Endpoints
Set the Mintipcompatibilitylinerate System Flag
Configuring the Conference and Entry Queue IVR Services
Configuring Entry Queues and IVR Services
Entry Queue and Virtual Entry Queue Access
Procedure 1 Set the Mintipcompatibilitylinerate System Flag
Endpoints Registered to Cucm
Outbound Proxy Servers table
TIP HD Video Resolution by Line Rate
SIP Server field, select Specify
Polycom, Inc 1027
Polycom, Inc 1028
Polycom, Inc 1029
Polycom, Inc 1030
Polycom, Inc 1031
Polycom, Inc 1032
Content Sharing Behavior
Polycom Immersive Telepresence Systems ITP Version
Polycom video conferencing endpoints HDX Version
Cisco TelePresence System CTS Versions 1.7
Polycom, Inc 1034
Collaboration with Microsoft and Cisco
RTV 720p Cisco TelePresence System CTS Versions CTS
Cucm
RealPresence Capture Server
HDX RSS
DMA Cmad ITP OTX, RPX, ATX, TPX
Microsoft
Cisco
Multipoint Calls using DMA
Solution Interoperability Table
Microsoft Lync Server
CU4
SP2
Supported TIP Resolutions and Resource Allocation
Supported Resolutions
TIP Layout Support & Resource Usage
Resource Allocation
Configuring the Microsoft, Cisco and Polycom Components
To configure the Microsoft, Cisco and Polycom components
Appendix H Integration Into Microsoft Environments
Register the ITP endpoints to the Lync server
Polycom, Inc 1046
Polycom, Inc 1047
Flow Control Via H.239
TIP Compatibility Prefer TIP Content Receiver
Encryption
To enable Dtls negotiation for content encryption
A new or existing Profile, click the Advanced tab
Polycom, Inc 1051
Resolution Configuration
Video and Content Endpoint Registration Lync
Content XGA,5fps No Content
Endpoints
HDX to Collaboration HD H.264 Video Server
Operations During Ongoing Conferences
Monitoring
CTS Participants
Participant Properties General dialog box opens
Polycom, Inc 1055
Lync Participants RTV
Known Limitations
Polycom, Inc 1058
Standard restore deletes the following files
Appendix J Restore Defaults
Perform a Standard Restore
To perform a Standard Restore using the RMX Web Client
Restore Factory Defaults dialog, select Standard Restore
Perform a Comprehensive Restore
To perform a comprehensive restore using the RMX Web Client
Optional. Back up the system configuration
To perform a comprehensive restore using the USB key
Select Open Folder to view files using Windows Explorer
Appendix K SIP RFC Support
MD5
Rsvp
Srtp
Appendix K SIP RFC Support
Appendix L Media Traffic Shaping
Traffic Shaping Guidelines
HD1080p Audio Only
System Flags
Capacity Reduction During Traffic Shaping
323 & SIP Flag Settings
Flag name Siptimerssetindex
Appendix M Homologation for Brazil
323 & SIP Protocol Flag Options
Flag name H323TIMERSSETINDEX
Flag name Disabledummyregistration